How to Port Your Sprite Kit Game from iOS to OS X
Learn how to port your Sprite Kit games from iOS to OS X! By Neil North.
Correcting Pre-loading Issues
This bug may not raise its head on all systems, but when it does it definitely points to a performance issue. “First-time-through” bugs like this usually stem from the initial load of resources into memory.
Texture atlases are the first resource type that springs to mind, but since this app doesn’t contain animations or large complex images, it’s safe to assume the problem is somewhere else.
The sound effects are the next most likely candidate as the sound files don’t get loaded until the user clicks on the screen.
To fix this, add the following instance variable to MyScene.m:
SKAction *_playPewPew;
Next, add the following line to initWithSize: inside the if statement:
_playPewPew = [SKAction playSoundFileNamed:@"pew-pew-lei.caf" waitForCompletion:NO];
This modifies your app to preload the sound file when the scene initializes.
Find the following line in screenInteractionEndedAtLocation::
[self runAction:[SKAction playSoundFileNamed:@"pew-pew-lei.caf" waitForCompletion:NO]];
…and replace it with the following:
[self runAction:_playPewPew];
Build and run your app; click the mouse and ensure that the delay has been eradicated.
If your system didn’t expose this bug, then at least the changes above will ensure that it won’t happen on someone else’s system.
Correcting SKS Issues

At the time of this writing the bug in the particle effect seems to be an issue with Xcode 5. You’ll override the file reference to the texture in your sks file.
Technically, there isn’t anything wrong with your sks file – and you won’t experience this issue on all systems – but you should fix it nonetheless.
Find the following line in projectile:dideCollideWithMonster: of MyScene.m:
SKEmitterNode *emitter = [NSKeyedUnarchiver unarchiveObjectWithFile:[[NSBundle mainBundle] pathForResource:@"SmallExplosion" ofType:@"sks"]];
Add the following code directly under the line you found above:
emitter.particleTexture = [SKTexture textureWithImageNamed:@"spark"];
All you have done above is to tell Xcode where to find the particular texture.
Build and run your app; now you can admire your epic glitch-free particle effect.
Correcting Image Resizing Issues
Navigate to your SpriteKitSimpleGameMac group and then to AppDelegate.m. Take a look at the screen size set in applicationDidFinishLaunching:.
It’s set to 1024 x 768 — this is the resolution of the non-Retina iPad.
Now take a look at the contents of sprites.atlas. As expected, all iPad versions of images are suffixed with ~ipad so that your app knows to use these images when it runs on an iPad.
Unfortunately, there is no ~mac suffix you can use here; instead, you’ll need to create a separate texture atlas for the Mac version of your app.
In order to keep your build as small as possible, you should use a texture atlas with only the resolutions your app will actually use.
Right-click on sprites.atlas and select Show in Finder to take you to the images folder.
Create a copy of sprites.atlas and delete all images from the copied folder that don’t have ~ipad in their name.

Next, remove the ~ipad designator from the file names but leave the @2x designator intact.
Note: The @2x files have been left in the project to support the Retina screens on the Macbook Pro.
Rename the folder to spritesMac.atlas and drag the renamed folder into your project.
In the Choose options for adding these files dialog, make sure only the SpriteKitSimpleGameMac target is ticked in the Add to targets section as shown below:
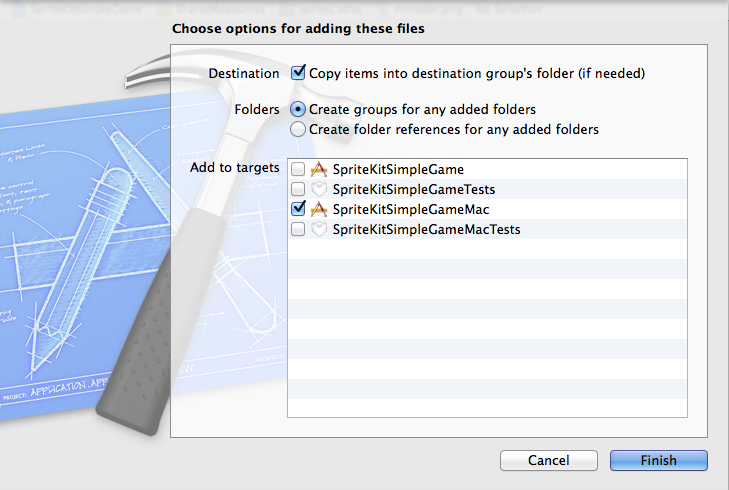
Click Finish. Now that the folder has been imported, select sprites.atlas and turn off target membership for Macs. This ensures that each texture atlas works separately of the other.
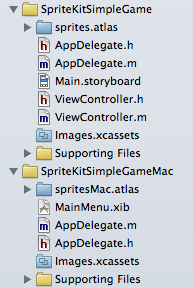
Keeping with the spirit of staying organized, move the iOS texture atlas into the iOS group and the Mac texture atlas into the Mac group, as shown below:
Next, go to Project\Clean. This will remove any old files from your build directory (if you forget to do this it might not work, as sprites.atlas may still exist).
Build and run your app; you should see that everything loads at the proper size, as shown below:

At this point your app supports iPhone, iPad and Mac OS X resolutions — and Retina-compatible to boot.
Correcting Soundtrack Issues
Finally, you’ll need to deal with the missing soundtrack to your game.
Look at ViewController.m in the SpriteKitSimpleGame group. viewWillLayoutSubviews has a small section of code which instantiates AVAudioPlayer and sets it to repeat forever.
NSError *error;
NSURL *backgroundMusicURL = [[NSBundle mainBundle] URLForResource:@"background-music-aac" withExtension:@"caf"];
self.backgroundMusicPlayer = [[AVAudioPlayer alloc] initWithContentsOfURL:backgroundMusicURL error:&error];
self.backgroundMusicPlayer.numberOfLoops = -1;
[self.backgroundMusicPlayer prepareToPlay];
[self.backgroundMusicPlayer play];
Aha — you don’t have a ViewController in Mac OS X. Therefore, you’ll need to call this code from AppDelegate instead.
Find the following line in AppDelegate.m of the SpriteKitSimpleGameMac group:
@implementation AppDelegate
..and replace it with the following:
@import AVFoundation;

@implementation AppDelegate {
    AVAudioPlayer *backgroundMusicPlayer;
}
Next, add the following code to the top of applicationDidFinishLaunching::
NSError *error;
NSURL * backgroundMusicURL = [[NSBundle mainBundle] URLForResource:@"background-music-aac" withExtension:@"caf"];
backgroundMusicPlayer = [[AVAudioPlayer alloc] initWithContentsOfURL:backgroundMusicURL error:&error];
backgroundMusicPlayer.numberOfLoops = -1;
[backgroundMusicPlayer prepareToPlay];
[backgroundMusicPlayer play];
Build and run your app; the music plays on!
You’ve resolved all of the bugs from the Mac conversion, but you still haven’t solved the issue of game controls in the Mac version of the game.
Using the Keyboard
The ninja’s movements in the iOS version of the app are controlled by tilting the device. These movements are processed by CoreMotion, and the game loop calls updatePlayerWithTimeSinceLastUpdate: to calculate the new player location for the current frame.
Responding to key presses requires a slightly different approach using the available methods to listen for keypress events.
Add the following code to updatePlayerWithTimeSinceLastUpdate: in MyScene.m just before the #endif statement:
#else
-(void)keyDown:(NSEvent *)theEvent {


}
This updates to the method to respond to a keypress as well. Note that there’s a corresponding keyUp to handle the release of the key to handle events that only last for the duration of the keypress.
You don’t want to respond to just any keypress; you can find out which key was pressed using the passed-in NSEvent.
Add the following code between the curly braces of the keyDown: method you just added:
-(void)keyDown:(NSEvent *)theEvent {
  NSString *keyPressed = [theEvent charactersIgnoringModifiers];
  if ([keyPressed length] == 1) {
      NSLog(@"Key: %c",[keyPressed characterAtIndex:0]);
  }
}
Here you extract the pressed characters from the event without any modifier keys. This means key combinations like Command + S will be ignored. As well, you check that the keypress is only one character in length to filter out any other unwanted events. You’ll dump the key pressed out to the console.
Build and run your project; press a few keys while the game is running and you’ll see the keys pressed show up in the debug area, similar to the following example:

Since you’ll use the up and down arrow keys to move your player sprite, press those keys and see what you get in the console:

Hmm, that looks a little odd. The arrow keys are part of the group known as function keys, so they don’t have a proper character representation. But don’t fret: there’s an easy way to detect when function keys are pressed.
NSEvent is your best friend when it comes to managing keyboard and mouse inputs on the Mac. This tutorial merely introduces NSEvent; it’s highly recommended that you check out the full NSEvent class reference.
For now, take a quick look at the section of NSEvent documentation that deals with the function keys enum. The keys you’re concerned with are NSUpArrowFunctionKey and NSDownArrowFunctionKey.
Go back to MyScene.m and find the keyDown: method you just added.
Comment out the NSLog statement and paste the following code immediately below that:
unichar charPressed = [keyPressed characterAtIndex:0];
switch (charPressed) {
    case NSUpArrowFunctionKey:
        [_player runAction:[SKAction moveByX:0.0f y:50.0f duration:0.3]];
        break;
    case NSDownArrowFunctionKey:
        [_player runAction:[SKAction moveByX:0.0f y:-50.0f duration:0.3]];
        break;
    default:
        break;
}
Here you store the pressed character as Unicode character and compare it to the up and down function keys. You then use an SKAction to move the character up and down accordingly.
Build and run your project; press the up and down arrow keys and you should see your character moving up and down the screen like so:

You’ve spent all this time modifying the game to be played on a Mac, but you still need to check that you haven’t affected any portion of the iOS version of the game!
Build and run your project using the iOS target and play around with it a bit to make sure none of the game functions have been affected by your changes.