How to Port Your Sprite Kit Game from iOS to OS X
Learn how to port your Sprite Kit games from iOS to OS X! By Neil North.
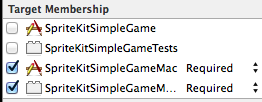
Adding Target Membership
Expand the Frameworks group and select UIKit.framework, like so:

Expand the right Utilities Panel select File Inspector, like so:

About halfway down the File Inspector you’ll see the Target Membership section. This is where you select the targets that will use this file.
UIKit is only available on the iOS platform, so leave it unchecked on your Mac OS X targets, as shown below:

The Cocoa Framework is only available on Mac OS X so ensure it’s checked for your Mac targets and unchecked for your iOS targets like so:
The Sprite Kit Framework is available to iOS and Mac OS X so set the target membership as below:

Each individual file in your project has its own target membership with the exception of texture atlases. The atlas itself is the only place you need to set a target membership and all contained textures will be automatically included.
However, classes work a little differently. You can’t set a target membership on a .h file — instead, you must set the target membership on the .m file.
Armed with your new-found understanding of target membership, work through each file in your SharedResources group and make sure both SpriteKitSimpleGame and SpriteKitSimpleGameMac are ticked on each file. In total, you should need eight ticks to get the job done.
Next, work through each file in your SpriteKitSimpleGame group and make sure that only SpriteKitSimpleGame is ticked for each — they should all be set correctly at this point, but it’s good to check.
Finally, work through each file in SpriteKitSimpleGameMac group and make sure that only SpriteKitSimpleGameMac files are ticked. Again, you shouldn’t have to change any but it never hurts to check.
Now that your project is properly set up for your iOS and Mac targets, you can get down to what you’re good at — writing code!
Getting the Game to Build and Run
As it stands right now, your project will still build and run without issue for iOS. The changes you just made have no real effect on the existing game. However, if you build and run the Mac target, you’ll see a bunch of errors. That’s because you haven’t yet accounted for the differences between iOS and OS X.
Build and run your project using the SpriteKitSimpleGameMac target; what do you see?
You’ll receive the error Module ‘CoreMotion’ not found. Mac OS X doesn’t have a CoreMotion class or its equivalent; you’ll have to work around this issue and use the keyboard to control player movement. However, your primary goal is to get the project to a buildable state before you worry about implementation details like that.
But how will you fix this? You can’t just remove the line of code referring to CoreMotion, otherwise the iOS version will break. You can’t work around this by using an if statment, since the compiler will still check each line of the code and throw an error if it doesn’t recognize something.
Open MyScene.m and replace:
@import CoreMotion;
with the following code:
#if TARGET_OS_IPHONE
@import CoreMotion;
#endif
Unlike a regular if statement, an #if is performed by the preprocessor. TARGET_OS_IPHONE returns TRUE if the current target is iOS.
Note: If you are plan to use an #if statement to check if the target OS is Mac OS X then the preferred method to check this is !TARGET_OS_IPHONE.
TARGET_OS_MAC seems to work — but the problem is that it also returns TRUE for iOS.
This might seem odd, but Apple uses !TARGET_OS_IPHONE in their example projects that contain multiple targets, so if it is a glitch, it’s most likely one they don’t plan to fix.
Now you will need to find the remaining code related to CoreMotion and surround it with #if statements.
Find the following code in the instance variables for MyScene.m:
CMMotionManager *_motionManager;
…and replace it with:
#if TARGET_OS_IPHONE
  CMMotionManager *_motionManager;
#endif
Scroll down to the init method and find the following code:
_motionManager = [[CMMotionManager alloc] init];
_motionManager.accelerometerUpdateInterval = 0.05;
[_motionManager startAccelerometerUpdates];
Replace the above code with the following:
#if TARGET_OS_IPHONE
_motionManager = [[CMMotionManager alloc] init];
_motionManager.accelerometerUpdateInterval = 0.05;
[_motionManager startAccelerometerUpdates];
#endif
Now, find the following code [TODO: FPE: Again, are we in the same file?]:
[self updatePlayerWithTimeSinceLastUpdate:timeSinceLast];
…and replace it with the following:
#if TARGET_OS_IPHONE
[self updatePlayerWithTimeSinceLastUpdate:timeSinceLast];
#endif
Last but not least, locate the method named updatePlayerWithTimeSinceLastUpdate: and wrap the entire method with the following code:
#if TARGET_OS_IPHONE
- (void)updatePlayerWithTimeSinceLastUpdate:(CFTimeInterval)timeSinceLast
.
.
.
}
#endif
If you build this against an iOS target, all of the above #if statements will return TRUE, so the app compiles just as it did before. In contrast, if you build this against a Mac OS X target all of the above #if statements will return FALSE and none of the above blocks will be compiled.
Take a look at the touchesEnded:withEvents: method in MyScene.m. Since the current version of Mac OS X doesn’t support touch screens, this method is meaningless. The Mac OS X version of this game will use mouse clicks instead as a perfectly adequate substitute for screen touches.
To avoid adding a bunch of boilerplate code, you’ll now create a class that inherits from SKScene to help you handle both screen touches and mouse clicks!
Adding Event Handlers
Select your SharedResources group.
On the menu bar select File \ New \ File… as shown below:

Select Objective-C Class from either the iOS or OS X category and click Next.

Name the file SKMScene and make it a subclass of SKScene.

Place the file directly under your project folder, make sure both iOS and Mac targets are ticked in the target area and click Create.

Open SKMScene.h and replace its contents with the following code:
@import SpriteKit;

@interface SKMScene : SKScene

//Screen Interactions
-(void)screenInteractionStartedAtLocation:(CGPoint)location;
-(void)screenInteractionEndedAtLocation:(CGPoint)location;

@end
You’ll override the above two screen interaction methods using subclasses of SKMScene.
Add the following code to SKMScene.m directly under the line @implementation SKMScene:
#if TARGET_OS_IPHONE
-(void)touchesBegan:(NSSet *)touches withEvent:(UIEvent *)event {
  UITouch *touch = [touches anyObject];
  CGPoint positionInScene = [touch locationInNode:self];
  [self screenInteractionStartedAtLocation:positionInScene];
}

- (void)touchesEnded:(NSSet *)touches withEvent:(UIEvent *)event
{
  UITouch *touch = [touches anyObject];
  CGPoint positionInScene = [touch locationInNode:self];
  [self screenInteractionEndedAtLocation:positionInScene];
}

- (void)touchesCancelled:(NSSet *)touches
               withEvent:(UIEvent *)event
{
  UITouch *touch = [touches anyObject];
  CGPoint positionInScene = [touch locationInNode:self];
  [self screenInteractionEndedAtLocation:positionInScene];
}
#else
-(void)mouseDown:(NSEvent *)theEvent {
  CGPoint positionInScene = [theEvent locationInNode:self];
  [self screenInteractionStartedAtLocation:positionInScene];
}

- (void)mouseUp:(NSEvent *)theEvent
{
  CGPoint positionInScene = [theEvent locationInNode:self];
  [self screenInteractionEndedAtLocation:positionInScene];
}

- (void)mouseExited:(NSEvent *)theEvent
{
  CGPoint positionInScene = [theEvent locationInNode:self];
  [self screenInteractionEndedAtLocation:positionInScene];
}
#endif

-(void)screenInteractionStartedAtLocation:(CGPoint)location {
  /* Overridden by Subclass */
}

-(void)screenInteractionEndedAtLocation:(CGPoint)location {
  /* Overridden by Subclass */
}
That’s a fair bit of code, but if you read through from the top, it makes a lot of sense. Touching the screen or the end of a touch event calls the methods in the #if TARGET_OS_IPHONE block. You then create a CGPoint containing the pixel location of the touch and calla the relevant screenInteraction method.
Pressing a mouse button or releasing the mouse button calls the methods in the #else section. Similar to above, you create a CGPoint containing the pixel location of the touch and call the relevant screenInteraction method.
The advantage of using this subclass is that both touch and click events call a screenInteraction method. The screenInteraction methods have no code as you’ll override these in your subclass.
Open MyScene.h and add the following class declaration just under #import :
#import "SKMScene.h"
Next, update the superclass in the @interface line to SKMScene as shown below:
@interface MyScene : SKMScene
This ensures your game scene inherits from your SKMScene subclass. You can now substitute your subclasses for the touch events.
In MyScene.m find the following line:
-(void)touchesEnded:(NSSet *)touches withEvent:(UIEvent *)event {
…and replace it with the following:
-(void)screenInteractionEndedAtLocation:(CGPoint)location {
Next, delete the following lines from the method as you won’t need them any longer:
UITouch *touch = [touches anyObject];
CGPoint location = [touch locationInNode:self];
Build and run your project using the Mac OS X target; it should compile and run without too many issues:

Congratulations — you’re now running your Sprite Kit game on your Mac! You’ll notice that it has a few bugs:
- Some Macs have a noticeable pause the first time you click on the screen.
- The particle effect appears to be a little broken on some Macs.
- Not everything is sized correctly on the screen.
- The background music has gone noticeably silent.
You’ll tackle each of these bugs in turn — and you’ll learn about a few of the common bugs you’ll encounter when you convert apps between platforms.