Drag and Drop Tutorial for SwiftUI
Learn how to use the drag and drop API in SwiftUI by building your own simple iPadOS and iOS bug reporting app. By Warren Burton.
Dragging Within the App
In this section, you’ll add an icon to EditorView that you can drag onto the image to mark points of interest. First, open EditorView.swift, then add this view to ZStack after the onDrop(of:delegate:) modifier you just added:
VStack {
  Spacer()
  ToolView()
    .padding()
}
Here, you place ToolView over the top of the image. The Spacer pushes ToolView to the bottom of VStack. ToolView is an arrow image with rounded rectangle borders. It’s a simple, pre-baked view to keep you moving in the tutorial.
Build and run. Select a bug with an image, and now you have an arrow icon at the bottom edge of the image in the detail view:
![]()
You’re going to be able to drag that icon onto the image soon. But first, you need to do some prep work.
Creating Your Own UTType
Drop actions need UTType specifications to work and so do drag actions. To support a custom drop action, you’ll need a custom UTType.
Start by creating a new Swift file called Tool.swift inside the Model group. Add this code to the file:
import UniformTypeIdentifiers

protocol Tool {
  static var uti: UTType { get }
  static var name: String { get }
  static var itemProvider: NSItemProvider { get }
}
You’ve described a general tool protocol to allow a Tool to provide three types useful for drags. To drag something, it needs a Universal Type Identifier, a unique name as well as an item provider which will be used to handle the drop.
Next, add this code to the file:
enum ArrowTool: Tool {
  static var name: String = "arrow"
  static var uti = UTType("com.raywenderlich.pointybug.tool.arrow") ?? .data
  static var itemProvider = NSItemProvider(
    item: ArrowTool.name as NSString,
    typeIdentifier: ArrowTool.uti.identifier)
}
ArrowTool adopts Tool. The type identifier of com.raywenderlich.pointybug.tool.arrow is a reverse-coded name unique to the app. You want to be sure no one else uses that identifier.
Exporting Your Own UTType
You need to tell the other apps about this UTI type. Select the PointyBug project in the Project navigator to open the project settings and then select the PointyBug target. In the Info tab, expand Exported Type Identifiers and click + to add a new UTI.
Enter Toolbox item arrow for the description, and com.raywenderlich.pointybug.tool.arrow for the Identifier — the same value you used in your code. Under Conforms To enter public.data. Similarly to Swift protocols, UTIs can conform to other UTIs. Once you’re done, your new UTI should look like the following image:
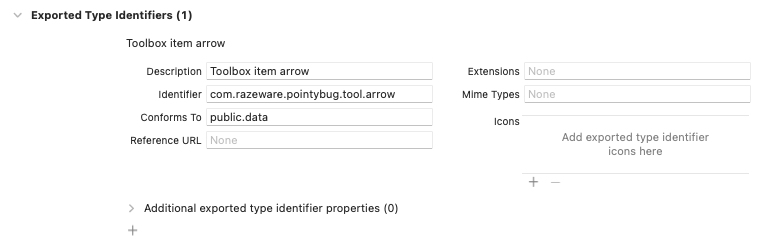
You’ve added an Exported UTI to your application’s Info.plist file and told iOS the UTI exists. Without this declaration, you can’t instantiate the UTType.
You’re now ready to set up a drag operation. In the Project navigator in the folder Views, open ArrowToolView.swift.
Add this modifier to the ZStack in the body of ArrowToolView:
.onDrag { ArrowTool.itemProvider }
Like onDrop(of:delegate:), you can call onDrag(_:) on any View. You return the NSItemProvider for the ArrowTool that you created before.
Build and run. Select any bug with an image, then hold and drag the arrow icon.

The icon will lift and gain a plus symbol. Nothing happens when you drop the arrow. The drop part is what you’ll do next.
Receiving a Custom UTType
When you drag the arrow, you place information on the dragging pasteboard. You need to register for that type of information and ask to receive it. The first thing to do is create another controller to perform all the decoding logic and update the model with that information.
Create a new Swift file called ToolDropController.swift in the Controller group. Add this class declaration to the top of the file:
import SwiftUI

class ToolDropController {
  var bugController: BugController
  var bugID: BugID
  var geometry: GeometryProxy
  var imageSize: CGSize

  init(
    bugID: BugID,
    bugController: BugController,
    geometry: GeometryProxy,
    imageSize: CGSize
  ) {
    self.bugID = bugID
    self.bugController = bugController
    self.geometry = geometry
    self.imageSize = imageSize
  }
}
In this declaration, you create ToolDropController with everything it needs to know to update the model. Next, add this extension to ToolDropController.swift:
extension ToolDropController {
  static func adjustedImageRect(
    geometry: GeometryProxy,
    imageSize: CGSize
  ) -> CGRect {
    let frame = geometry.frame(in: .global)
    let xScale = frame.width / imageSize.width
    let yScale = frame.height / imageSize.height
    let minScale = min(xScale, yScale)
    let finalImageSize = imageSize
      .applying(CGAffineTransform(scaleX: minScale, y: minScale))
    let xOrigin = (frame.width - finalImageSize.width) / 2.0
    let yOrigin = (frame.height - finalImageSize.height) / 2.0
    let origin = CGPoint(x: xOrigin, y: yOrigin)
    let imageRect = CGRect(origin: origin, size: finalImageSize)
    return imageRect
  }
}
This utility method takes two pieces of information: the size of the image and the size of the rectangle it’s placed inside. Next, you figure out how the image will fit in the box by using the least scale value for either axis. Finally, you use that information to return the rectangle that displays the image in its container:

Adding Display Element to Image
Finally, add this extension to the end of ToolDropController.swift:
extension ToolDropController: DropDelegate {
  func performDrop(info: DropInfo) -> Bool {
    // 1
    guard
      let selected = bugController.bug(withID: bugID),
      info.hasItemsConforming(to: [ArrowTool.uti])
    else {
      return false
    }

    // 2
    let location = info.location
    let frame = geometry.frame(in: .global)
    let frameAdjustedOrigin = CGPoint(
      x: location.x,
      y: location.y + frame.minY / 2 - 20)

    // 3
    let imageRect = ToolDropController
      .adjustedImageRect(geometry: geometry, imageSize: imageSize)
    let normalizedX = ((frameAdjustedOrigin.x - imageRect.minX)
      - imageRect.width / 2.0) / imageRect.width
    let normalizedY = ((frameAdjustedOrigin.y - imageRect.minY)
      - imageRect.height / 2.0) / imageRect.height

    // 4
    let element = DisplayElement(
      parentID: bugID,
      elementID: selected.nextElementID(),
      originx: normalizedX,
      originy: normalizedY,
      elementType: .arrow)
    bugController.add(element, to: selected)
    return true
  }
}
In this code, you conform ToolDropController to SwiftUI’s DropDelegate:

- First, you work out if the drop is describing
ArrowTool. - Then, you calculate where the drop happens relative to the container of the image.
- Finally, you calculate where the drop happens relative to the image itself. You then normalize that coordinate to between -0.5 and +0.5.
- Once you have all that info, you can create a
DisplayElementand add that element to the selected bug.
Now that you have your control logic constructed, you can use it in your view.