Creating and Publishing a Flutter Package
In this tutorial, you’ll learn how to create and publish your own Dart packages to be used in Flutter apps. By Edson Bueno.
Understanding the library Keyword
Returning to your focus_detector project, open lib/focus_detector.dart that Android Studio generated for you. Look at the first line:
library focus_detector;
This sets the name of the file’s library to focus_detector. The default library name is the filename, making this line unnecessary. So why have a library keyword? There are two cases in which you might want to specify a library name:
- Adding library-level documentation to your package. The dartdoc tool requires a
librarydirective to generate library-level documentation. For example: - Giving the library a different name.
/// Contains utility functions for displaying dialogs and snackbars.
library alert_utils;
/// Contains utility functions for displaying dialogs and snackbars.
library alert_utils;
When you import a library, you give the uniform resource identifier (URI) to the import directive, not the library name. So the only place you can actually see the name is in the documentation page. As you see, there’s little point in changing the name.
That said, the Dart documentation recommends you omit the library directive from your code unless you plan to generate library-level documentation.
Enough with the talk! You’re now ready for some action.
Adjusting the Pubspec
Open your new project’s pubspec.yaml file. Notice that the content of the file is grouped into five sections: metadata, environment, dependencies, dev_dependencies, and flutter. For this tutorial, you’ll need only the first three:
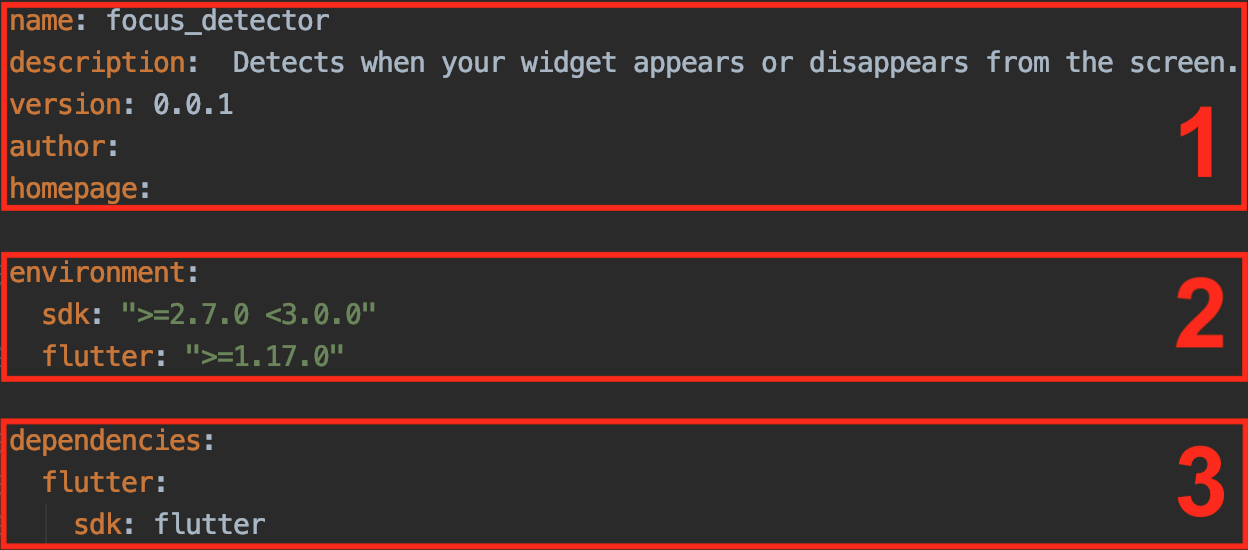
Everything users need to find your package comes out of here.
You already provided parts of this information when creating the project. Now you need only a few adjustments:
This should be your result:
Use this section to restrict the Dart or Flutter SDK versions of your users. This is useful if, for example, your package relies on a feature introduced in an earlier Flutter release or you still haven’t complied with a breaking change in the API.
For this tutorial, the defaults are great.
Packages can also depend on other packages. This section is no different than the one you find in your apps. FocusDetector uses the 0.1.5 version of a package published by google.dev called VisibilityDetector. Specify the dependency, then make sure your section looks like this:
-
version: Replace
0.0.1with1.0.0. Unless you’re publishing unfinished or experimental code, avoid 0.*.* version numbers. It might scare off some users. - author: This property is no longer used, so delete it.
- homepage: Put https://github.com/EdsonBueno/focus_detector. The URL doesn’t have to be from a git repository, but that’s the most common usage.
-
The Metadata
Note: Remember: The focus_detector package is already published on pub.dev. The homepage field here is being set to the existing code repository.
name: focus_detector
description: Detects when your widget appears or disappears from the screen.
version: 1.0.0
homepage: https://github.com/EdsonBueno/focus_detector
- The Environment
- The Dependencies
dependencies:
  flutter:
    sdk: flutter
  visibility_detector: ^0.1.5
name: focus_detector
description: Detects when your widget appears or disappears from the screen.
version: 1.0.0
homepage: https://github.com/EdsonBueno/focus_detector
dependencies:
  flutter:
    sdk: flutter
  visibility_detector: ^0.1.5
Last, click Pub get at the top of your screen to download your new dependency.
Now that FocusDetector has a new place to call home, it’s finally time to bring it in.
Bringing the Code
Go back to the yes_we_scan project on Android Studio. Copy lib/utils/focus_detector.dart and paste it under the lib folder of the focus_detector project. When presented with the Copy dialog, click Refactor. Then, on the next dialog, click Overwrite.
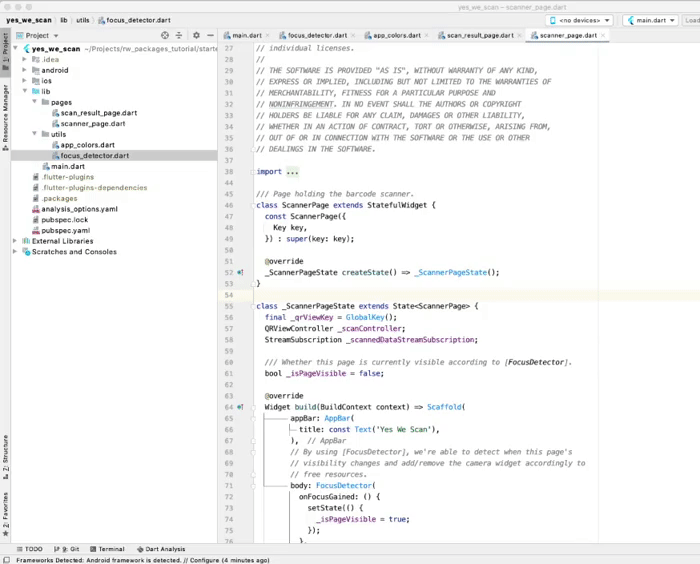
By replacing the old lib/focus_detector.dart Android Studio had created for you, you broke the tests. Because testing is outside the scope of this article, delete the test directory as a quick fix.
Analyzing the Code
You can’t build and run a package. What you can do is run the flutter analyze command on your terminal to analyze your code for issues.
Open Android Studio’s shell by clicking Terminal at the bottom of your screen. Then, type in flutter analyze and press Enter, as shown below.

The command should give you a No issues found! message. If that’s the case, you’re good to go.
Structuring Packages
Focus Detector is a single-class package, so there isn’t much thinking to do about how to organize it. But what if your next package contains many files? Some of them you might want exposed to your users, while others you might prefer to keep private. When that is the case, the convention tells you to follow these simple rules:
- Keep your implementation files under the lib/src directory. All code inside this folder is private and should never be directly imported by your users.
- To make these implementation files public, use the
exportkeyword from a file that is directly under lib, like in the previous alert_utils example above.
The main benefit of this approach is being able to change your internal structure later without affecting end users.
An extension of the second rule is that there should be a library file directly under lib with the same name as your project that exports all your public implementation files. Think of it as your “main” library file. The advantage is that users can explore all your functionalities by importing a single file.
It isn’t an anatomy class if it doesn’t have a dissected body. :] So take a look at the internal structure of a more complex package, the Infinite Scroll Pagination:

If you want to know more about the Infinite Scroll Pagination package, check out Infinite Scrolling Pagination in Flutter.
Creating an Example Project
Every good package has an example app. The example app is the first thing your users will turn to if they can’t make your package work right off the bat. It should be as concise as possible while still showcasing every feature.
Create your example project by again clicking File ▸ New ▸ New Flutter Project. This time, select Flutter Application and click Next.
Like you did before, follow the instructions to fill in the fields:
- Project name: Type in example. Don’t change this name, or your example project won’t follow the convention of being in the example folder.
- Flutter SDK path: Make sure the default value is the right path to your Flutter SDK.
- Project location: Choose the root folder of your package’s project.
- Description: Here, you can type anything you want or go with Example app of the Focus Detector package..
Click Next and, in the following window, type com.focusdetector.example in the Package name field. Finally, click Finish and wait until Android Studio opens your example project in a new window.