Using Safe Args With the Android Navigation Component
In this Safe Args tutorial, you’ll learn how to safely pass data between different destinations while using the Android Navigation Component. By Husayn Hakeem.
Retrieving Arguments in a Destination
Since you’ve defined arguments for the ConfirmationFragment destination, Safe Args will generate a class named ConfirmationFragmentArgs, whose name is the destination ConfirmationFragment and the suffix Args. This class has a static method fromBundle(Bundle). You’ll use it to retrieve the arguments ConfirmationFragment needs.
To do this, open ConfirmationFragment.kt and replace the TODO on line 64 with the following:
// 1
val bundle = arguments
if (bundle == null) {
  Log.e("Confirmation", "ConfirmationFragment did not receive traveler information")
  return
}

// 2
val args = ConfirmationFragmentArgs.fromBundle(bundle)
showTravelerInformation(args.travelerInformation)
showTravelAddOns(args.travelAddOns)
showPromoCode(args.promoCode)
In the code above, you’re:
- Getting the fragment’s arguments, assigning them to the variable
bundleand making sure it isn’t null. If it is, the program logs the error and returns from the method. - Using
ConfirmationFragmentArgs.fromBundle(), which Safe Args generated. You pass it the non-null arguments this Fragment received, then retrieve each piece of information it expects: the traveler’s information, the travel add-ons and the promo code.
Build and run the app. You’ll notice that the app crashed on clicking Next. This is because the confirmation screen expects data you haven’t sent yet. You’ll wire both screens in the next steps!

Defining an Argument in an Action
Just as the confirmation screen specifies the arguments it expects to receive, the action that navigates from the information screen to the confirmation screen has to define those same arguments. This ensures the sender — the travel information screen — is sending the correct information.
In the previous step, you added arguments using the editor. In this step, you’ll add them using XML, which is just as easy!
You’ll again need to define the three pieces of information to send: the traveler’s information, the travel add-ons and the promo code. Open navigation_graph.xml, select the Code window from the top-right corner and scroll down to the action block.
Start by defining the promo code argument using the code below:
<action ...>
  <argument
    android:name="promoCode"
    android:defaultValue="@null"
    app:argType="string"
    app:nullable="true" />
</action>
The argument definition above specifies:
- The argument’s name.
- The argument’s default value. Since the promo code is optional, you set it to null in case the user doesn’t enter one.
- The argument’s type.
- The argument’s nullability. If the traveler doesn’t have a promo code, it appears as null.
This is the exact definition of the promo code argument inside ConfirmationFragment.
As an exercise, add the remaining two arguments: the traveler’s information and the add-ons. If you get stuck, check how they’re defined inside ConfirmationFragment.
Need help? Just open the spoiler below to find out how.
[spoiler title=”Solution”]
Here are the arguments to add below the previous one:
<argument
  android:name="travelAddOns"
  app:argType="integer[]" />

<argument
  android:name="travelerInformation"
app:argType="com.raywenderlich.android.safeargs.TravelerInformation" />
[/spoiler]
Once you’re done, build and run to let Safe Args do its magic yet again.

Sending Arguments From a Destination
This time, Safe Args will generate the class TravelInformationFragmentDirections, whose name is the initial destination TravelInformationFragment with the suffix Directions. Inside this class is actionTravelInformationFragmentToConfirmationFragment, which is the name of the navigation action defined in navigation_graph.xml. This method takes all the mandatory data it will pass to the confirmation screen. Note that mandatory arguments are those that don’t have a default value.
Open TravelInformationFragment.kt and replace the TODO on line 71 with the following:
// 1
val travelerInformation = getTravelerInformation()
val addOns = getAddOns(clickListener)
val promoCode = getPromoCode()

// 2
val directions = TravelInformationFragmentDirections.actionTravelInformationFragmentToConfirmationFragment(promoCode, addOns, travelerInformation)
Here’s what’s happening in the code above:
- You read the information the user entered on the screen, which you must pass to the next screen. This includes their traveler information, the travel add-ons they selected and their promo code.
- You build a
NavDirectionsinstance that wraps the arguments passed during navigation. Note that the order of arguments has to match the order in navigation_graph.xml.
Now, change the argument of findNavController().navigate() from R.id.action_travelInformationFragment_to_confirmationFragment to directions. The method invocation should now appear as follows:
findNavController().navigate(directions)
In the code above, you use NavDirections, which you created earlier, to specify the destination and the arguments to pass.
Build and run. Enter data on the first screen, select a couple of add-ons, optionally input a promo code and navigate to the following screen. You’ll see the information you’ve entered display correctly. The app’s finally functional!

Safe Args and Proguard
When using Parcelable, Seriazable and Enum types with Safe Args, you specify the type’s name in the navigation graph as you define the argument. The mapping between these types and their corresponding classes in your project won’t persist if your project uses obfuscation. Therefore, you must prevent the minification process at build time from obfuscating these classes.
SafeFly uses obfuscation and code shrinking, as you may have noticed in build.gradle.
buildTypes {
  release {
    minifyEnabled true // Enables code shrinking and obfuscation
    ...
  }
}
It passes a TravelerInformation instance when navigating between screens in the app. There are two approaches you can use to prevent obfuscation from occurring. The first is annotating the class with @androidx.annotation.Keep in TravelerInformation.kt:
@Keep
class TravelerInformation(...): Parcelable
The second is adding keepnames rules to proguard-rules.pro:
-keepnames class com.raywenderlich.android.safeargs.TravelerInformation
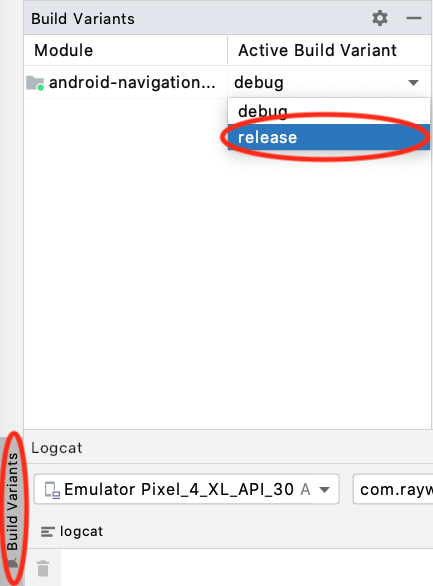
Implement either of these options, go to the bottom-left corner of Android Studio, click Build Variants and select release from Active Build Variant.
Build and run. This runs a release build with code that was shrunk and obfuscated. Make sure you can still enter information on the first screen and see it displayed on the confirmation screen.
Where to Go From Here?
Download the final project using the Download Materials button at the top or bottom of the tutorial.
Congratulations! You learned why you should use Safe Args with Android’s Navigation Component. You also saw how to create arguments and pass data between destinations. Additionally, you learned how to properly handle using Safe Args and obfuscation in your app.
If you need to brush up on Android’s ‘Navigation Component or want to learn about advanced topics such as deep links and transitions, check out The Navigation Architecture Component Tutorial series of articles.
I hope you enjoyed this tutorial! If you have any questions or comments, please join the forum discussion below.