UICollectionView Tutorial: Getting Started
Get hands-on experience with UICollectionView by creating your own grid-based photo browsing app using the Flickr API. By Owen L Brown.
UICollectionViewDataSource
Open FlickrPhotosViewController.swift. Add the following extension to the file for UICollectionViewDataSource:
// MARK: - UICollectionViewDataSource
extension FlickrPhotosViewController {
  // 1
  override func numberOfSections(in collectionView: UICollectionView) -> Int {
    return searches.count
  }

  // 2
  override func collectionView(
    _ collectionView: UICollectionView,
    numberOfItemsInSection section: Int
  ) -> Int {
    return searches[section].searchResults.count
  }

  // 3
  override func collectionView(
    _ collectionView: UICollectionView,
    cellForItemAt indexPath: IndexPath
  ) -> UICollectionViewCell {
    let cell = collectionView.dequeueReusableCell(
      withReuseIdentifier: reuseIdentifier,
      for: indexPath)
    cell.backgroundColor = .black
    // Configure the cell
    return cell
  }
}
These methods are pretty straightforward:
- There’s one search per section, so the number of sections is the count of
searches. - The number of items in a section is the count of
searchResultsfrom the relevantFlickrSearch. - This is a placeholder method to return a blank cell. You’ll populate it later. Note that collection views require you to register a cell with a reuse identifier. A runtime error will occur if you don’t.
Build and run again. Perform a search. You’ll see 20 new, albeit dull-looking, cells:

Next, you will improve the layout of the cells.
UICollectionViewFlowLayoutDelegate
As mentioned earlier, every collection view has an associated layout. You’ll use the pre-made flow layout for this project since it’s easy to use and gives you the grid-view style you need.
Still in FlickrPhotosViewController.swift, add the following constant below flickr:
private let itemsPerRow: CGFloat = 3
Next, add UICollectionViewDelegateFlowLayout to let the view controller conform to the flow layout delegate protocol. Add this extension at the bottom of the file:
// MARK: - Collection View Flow Layout Delegate
extension FlickrPhotosViewController: UICollectionViewDelegateFlowLayout {
  // 1
  func collectionView(
    _ collectionView: UICollectionView,
    layout collectionViewLayout: UICollectionViewLayout,
    sizeForItemAt indexPath: IndexPath
  ) -> CGSize {
    // 2
    let paddingSpace = sectionInsets.left * (itemsPerRow + 1)
    let availableWidth = view.frame.width - paddingSpace
    let widthPerItem = availableWidth / itemsPerRow

    return CGSize(width: widthPerItem, height: widthPerItem)
  }

  // 3
  func collectionView(
    _ collectionView: UICollectionView,
    layout collectionViewLayout: UICollectionViewLayout,
    insetForSectionAt section: Int
  ) -> UIEdgeInsets {
    return sectionInsets
  }

  // 4
  func collectionView(
    _ collectionView: UICollectionView,
    layout collectionViewLayout: UICollectionViewLayout,
    minimumLineSpacingForSectionAt section: Int
  ) -> CGFloat {
    return sectionInsets.left
  }
}
Here’s a breakdown:
Subtracting that from the view’s width and dividing by the number of items in a row gives you the width for each item. You then return the size as a square.
-
collectionView(_:layout:sizeForItemAt:)tells the layout the size of a given cell. - Here, you work out the total amount of space taken up by padding. You’ll have
n + 1evenly sized spaces, wherenis the number of items in the row. You can take the space size from the left section inset. -
collectionView(_:layout:insetForSectionAt:)returns the spacing between the cells, headers and footers. A constant stores the value. - This method controls the spacing between each line in the layout. You want this spacing to match the padding at the left and right.
Build and run again. Perform a search.
Behold! The black squares are bigger than before!

With this infrastructure in place, you’re now ready to display some photos on screen!
Creating Custom UICollectionViewCells
One of the best things about UICollectionView is, like table views, it’s easy to set up collection views in the Storyboard editor visually. You can drag and drop collection views into your view controller and design your cell’s layout from within the Storyboard editor. Time to see how it works.
Open Main.storyboard and select the collection view. Give yourself room to work by setting the cell size to 200×200 in the Size inspector:
![]()
Drag an image view onto the cell and stretch it so it takes up the entire cell. With the image view still selected, open the pin menu. Uncheck Constrain to margins and add constraints of 0 points all the way around:
![]()
With the image view still selected, change its Mode to Aspect Fit in the Attributes inspector, so the images aren’t cropped or stretched in any way:
![]()
Now it’s time to subclass UICollectionViewCell.
Subclassing UICollectionViewCell
UICollectionViewCell doesn’t allow for much customization beyond changing the background color. You’ll almost always want to create a subclass to easily access any content subviews you add.
Choose File ▸ New ▸ File. Then choose iOS ▸ Source ▸ Cocoa Touch Class. Click Next.
Name the new class FlickrPhotoCell, making it a subclass of UICollectionViewCell.
Open Main.storyboard and select the cell. In the Identity inspector, set the cell’s class to FlickrPhotoCell:
![]()
Open the Assistant editor, making sure it displays FlickrPhotoCell.swift. Then, Control-drag from the image view to the class to add a new outlet. Name it imageView:

Now you have a custom cell class with an image view. It’s time to put a photo on it!
Open FlickrPhotosViewController.swift. Replace collectionView(_:cellForItemAt:) with:
override func collectionView(
  _ collectionView: UICollectionView,
  cellForItemAt indexPath: IndexPath
) -> UICollectionViewCell {
  // 1
  let cell = collectionView.dequeueReusableCell(
    withReuseIdentifier: reuseIdentifier,
    for: indexPath
  ) as! FlickrPhotoCell
  // 2
  let flickrPhoto = photo(for: indexPath)
  cell.backgroundColor = .white
  // 3
  cell.imageView.image = flickrPhoto.thumbnail

  return cell
}
This is a little different from the placeholder method you defined earlier:
- The cell coming back is now a
FlickrPhotoCell. - You need to get the
FlickrPhotorepresenting the photo to display by using the convenience method from earlier. - You populate the image view with the thumbnail.
Build and run. Perform a search, and you’ll finally see the pictures you’ve been searching for!
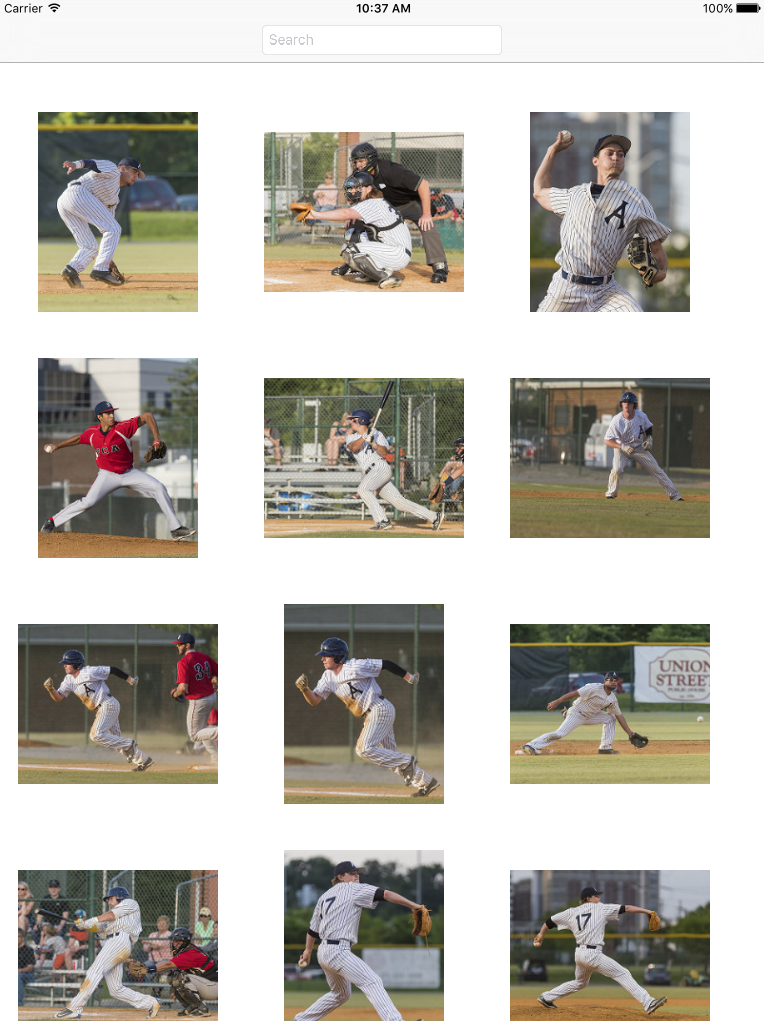
Yes! Success!
At this point, you have a cool working example of UICollectionView. Pat yourself on the back!
Where to Go From Here?
You can download the final project using the Download Materials button at the top or bottom of this tutorial.
In this tutorial you learned how to create a brand new UICollectionView, specify a layout, connect its data source to a remote API, and even create a custom UICollectionViewCell that shows an image.
You only scratched the surface of what’s possible with UICollectionView, but there’s more! Check out UICollectionView: Reusable Views Selection Reordering . It enhances the app you built by teaching you how to:
- Add custom headers to collection views.
- Easily move cells by dragging them.
- Implement single cell selection to bring up a detail view.
- Implement multi-cell selection.
If you’re interested in other cool ways to handle UICollectionView‘s data source and cells, check out:
- UICollectionViewDiffableDataSource
- CellRegistration from WWDC 2020
In the meantime, if you have any questions or comments, please join the forum discussion below!