Google Glass App Tutorial
In this Google Glass app tutorial, you will learn how to make your first Google Glass app – a simple shopping list app! By Evan Dekhayser.
Basic Project Settings
Now take Glass off and get back to work. :]
The template project is not ready for real-time. You didn’t think we’d let you off that easily in this tutorial, did you? It’s missing some pretty important pieces of code.
Open AndroidManifest.xml, which you’ll find in the manifests directory. Under the <manifest> tag and above the <application> tag, add this line of code:
<uses-permission android:name="com.google.android.glass.permission.DEVELOPMENT" />
That code requests permission to test new, unlisted voice commands in your app.
Note: This line of code is for development purposes only. To launch Glassware with unique commands, you’ll need to submit a new voice command for approval before you release the app.
Open voice_triggers.xml (in the res/xml folder). This file declares the voice command that launches your Glassware.
When you first run the app, you needed to say, “OK Glass, show me a demo.” That command is currently declared in this file.
I’m going out on a limb here and guessing that you don’t want the user to launch your app by saying, “Show me a demo.”
For a more contextual trigger, simply change this line to the following:
<trigger keyword="@string/app_name" />
This changes the starting voice trigger to be the same as your app’s name. So in this case, the trigger is “Shopping List.” Note that command is replaced by keyword.
Another thing that sticks out is the strange appearance of the app. Google Glass apps are generally white text on a black background. However, if you look at the app you have, it’s just the opposite.
In order for the app to look normal, you’ll need to specify what theme to use. Open res/values/styles.xml and look for this line:
<style name="AppTheme" parent="android:Theme.Holo.Light"></style>
Currently, the app uses the Holo.Light theme, which is more appropriate for the screen of an Android phone or tablet than it is for Glass.
Light backgrounds tend to make it more difficult to see the content because the screen is semi-transparent, so the text can get lost in background. Besides, your app will look like a bit of an oddball when compared to other apps.
Replace the above line with the following to implement the default theme.
<style name="AppTheme" parent="android:Theme.DeviceDefault"></style>
Now, run the app again on your Google Glass. Notice how the launch command is no longer Show me a demo, but Open Shopping List instead. Also, when you open the app, it should now be a little easier on the eyes.
Looking spiffy!

Foundation of Voice Commands
Although you just told Android that your app will test your custom voice commands, each individual activity that uses them must explicitly request permission to use them.
In MainActivity.java, find onCreate(Bundle bundle). Right below the call to super.onCreate(bundle);, add the following line:
getWindow().requestFeature(WindowUtils.FEATURE_VOICE_COMMANDS);
You need to import WindowUtils, so add this line of code at the top of the file:
import com.google.android.glass.view.WindowUtils;
Alternatively, you can press Option-Enter and Android Studio will automatically add the import.
Next, you need to declare which voice commands your app must listen to. Glass apps practice selective hearing unless you force their hands, very much like teenagers. :]
Open strings.xml inside res/values. It should predefine the following values:
<string name="app_name">Shopping List</string>
<string name="title_activity_main">Shopping List</string>
<string name="hello_world">Hello world!</string>
For your shopping list, you’ll need two basic functions: the ability to add and remove an item from the list.
Add the following lines under the "hello_world" declaration:
<string name="add_item">Add item</string>
<string name="remove_item">Remove item</string>
On its own, these declarations don’t mean a thing. They only give you a constant string that can be referenced anywhere in the project so you don’t accidentally type in the wrong value.
When using Google Glass, one phrase that you use frequently is “OK Glass.” This is the command that tells your device to listen up. The commands that are available afterwards depend on how the app was designed or context.
Menus are created using XML. (I promise this is the last XML you’ll have to look at!) In the Project Navigator, select res. Press ⌘N (or File\New) and select Directory. When prompted for the name of the directory, enter menu.
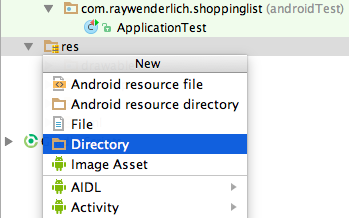
Again, select this new directory and press ⌘N. This time, select Menu resource file. Name the file activity_menu.
Replace everything beneath the XML version header line with the following:
<menu xmlns:android="http://schemas.android.com/apk/res/android">
    <item
        android:id="@+id/add_menu_item"
        android:title="@string/add_item">
    </item>
    <item
        android:id="@+id/remove_menu_item"
        android:title="@string/remove_item">
    </item>
</menu>
Not only will this file let you create a menu with these two voice commands, it also generates a unique identifier for each one to help you figure out which command was used. This way, you know whether the user wanted to add or remove an item from the list.
For the app to know that you want these options in the “OK Glass” menu, you need to inflate the menu in two designated methods.
To inflate a menu means that you convert an XML file into a Menu object.
In MainActivity.java, add the following method after onCreate():
@Override
public boolean onCreatePanelMenu(int featureId, Menu menu) {
    if (featureId == WindowUtils.FEATURE_VOICE_COMMANDS){
        getMenuInflater().inflate(R.menu.activity_menu, menu);
        return true;
    }
    return super.onCreatePanelMenu(featureId, menu);
}
At the top of the file, import the following file, or use Option-Enter to automatically import:
import android.view.Menu;
These methods inflate your menu options into the menu parameter, so that it knows what voice commands are available.
Run the app on your Google Glass. When you get into the app, say, “OK Glass.” A menu with the options Add Item and Remove Item will appear.

Try to use the Add Item command. Glass will recognize the voice command, but nothing will happen. Why is that?
You’ve not yet told the app what to do when it hears the voice command.
Asking User for an Item
After the user triggers a voice command, onMenuItemSelected is called. Add the following code under onCreatePanelMenu:
@Override
public boolean onMenuItemSelected(int featureId, MenuItem item) {
    // 1
    if (featureId == WindowUtils.FEATURE_VOICE_COMMANDS) {
        // 2
        Intent intent = new Intent(RecognizerIntent.ACTION_RECOGNIZE_SPEECH);
        // 3
        startActivityForResult(intent, item.getItemId());
        return true;
    }
    return super.onMenuItemSelected(featureId, item);
}
At the top of the file, import these classes (or do three Option-Enters):
import android.content.Intent;
import android.view.MenuItem;
import android.speech.RecognizerIntent;
It’s short and sweet, but there’s quite a bit of action in those three lines:
- First, you check to make sure that the feature ID is for voice commands – this means the menu item was selected from the “OK Glass” menu.
- When the voice commands are called, this finds out what you want the app to do. If the user wants to add an item, you need to find out what that item is! In order to do this, you create an Intent.
- This Intent, when started, shows the “Speak your message” screen with the microphone on the right side, a screen most Glass users know well. After the user dictates the item they want to add (or remove), you’re able to use the transcribed text in your app.
Depending on the action you need to call when the intent is completed, you need to pass a different constant.
When the intent completes, it gives you back the constant you pass in; from there, you can act according to which action you originally intended.
But you’ve already thought of this! The way you set up activity_menu.xml has already defined a unique constant for each action. This item ID is attached to the MenuItem parameter in the method. You launch the intent using startActivityForResult, and pass the MenuItem’s ID as the second parameter.
If the feature isn’t for voice commands, then it is best practice to pass on the method call to the superclass.
Run and launch the app and say “OK Glass,” followed by “Add Item.” A new screen will appear that lets you say the item you want to add.

You know you’re craving a sugar rush right about now, so why not tell Glass to add a 3 Musketeers or your favorite candy bar to the list?
Note: Glass needs a working network connection to understand voice commands.
But when you try to add an item nothing in the app changes. This makes sense because you haven’t set anything to use the dictated text. Seems that you won’t be getting your sugar fix until you work through this tutorial.
Even though it’s empty, your shopping list is almost done! All that you have left to do is save and load some items in the list.