Integrating Parse and React Native for iOS
Learn how to combine the power of a Parse backend and the flexibility of a React Native frontend in your iOS apps! By Christine Abernathy.
Adding Some Sample Data
You’re almost ready to touch some actual code — oh the anticipation! :] But you’ll need to add some data to work with first.
You can download some sample property photos in this zip file. Download and unzip the file; the photos are contained in the Media directory.
Still within the Data Browser on the Parse site, click + Row or + Add a row. Double-click inside the new row’s img_url column to upload a photo. The label should change from undefined to Upload File as shown below:

Click Upload File, browse to house1.jpeg, then click Open. The Data Browser should now show a new row with img_url set:
![]()
You should also see the objectId, createdAt, updatedAt and ACL columns set appropriately. By default, the ACL permission is set to public read and write.
Click Security and change the Listing class permission to public read only:
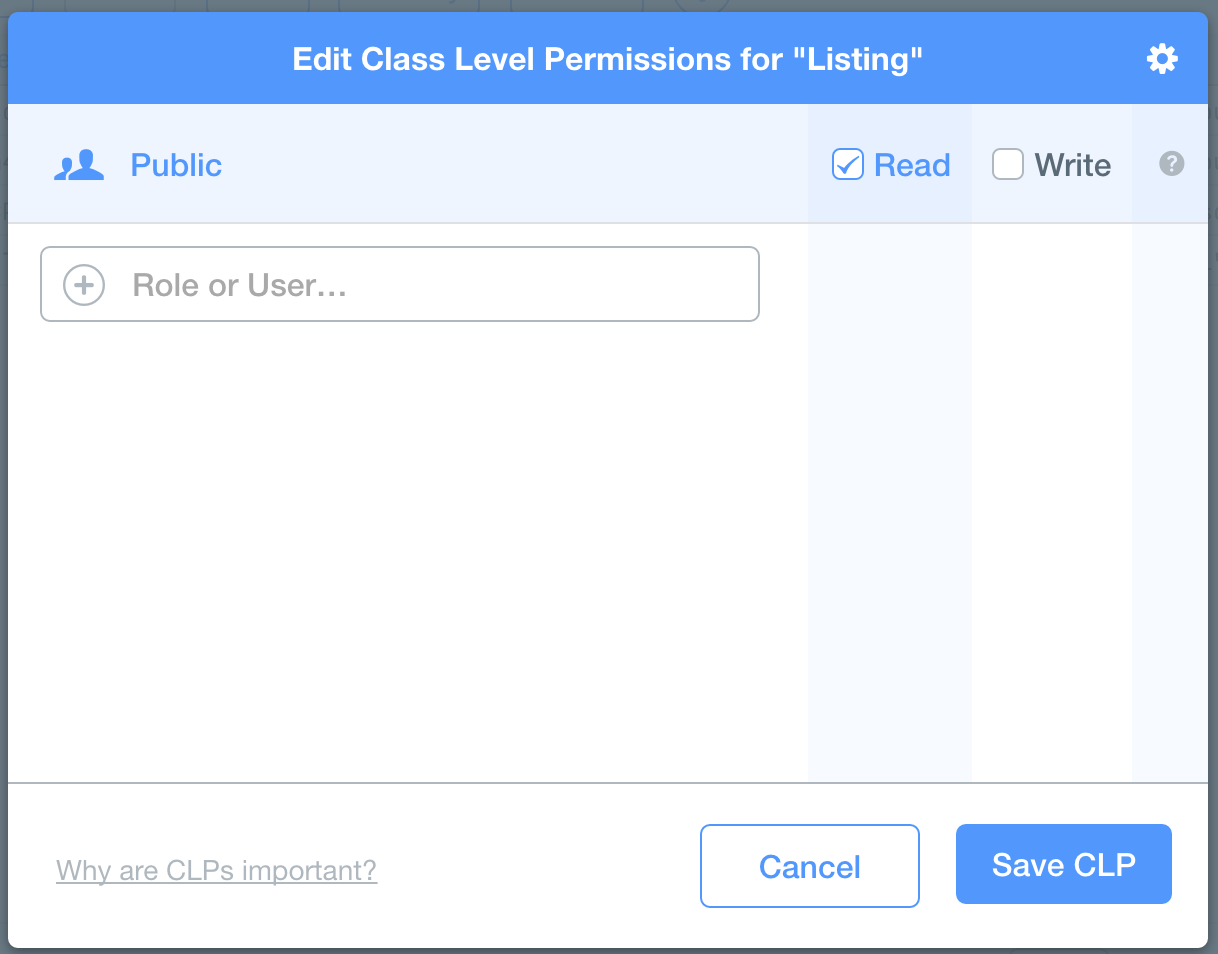
Click Save CLP. Note that the class level permission will supercede an individual row’s permission setting.
Note: There are many options you can use to secure your data. You can learn more from this series of blog posts from Parse.
Continue filling in data for this new row as follows:
-
price: 390000 -
title: Grand mansion -
property_type: house -
bedroom_number: 5 -
bathroom_number: 4 -
summary: Luxurious home with lots of acreage.
Armed with this pricely listing, you’re ready to modify your app and test your Parse setup.
Swapping in Parse Calls
It’s finally time to get your hands on the code! You’ll start by retrieving all listings on Parse, without any filtering to begin.
Modifying the Query Logic
Open package.json and add the following two new dependencies:
{
  "name": "PropertyFinder",
  "version": "0.0.1",
  "private": true,
  "scripts": {
    "start": "node_modules/react-native/packager/packager.sh"
  },
  "dependencies": {
    "react-native": "^0.8.0",
    "parse": "^1.5.0",
    "parse-react": "^0.4.2"
  }
}
Don’t forget to add a comma (,) to the end of the react-native dependency. With this change, you’ve added Parse and Parse+React to your list of dependencies.
Use Terminal to navigate to your project’s main directory and execute the following command:
npm install
This should pull in the dependencies you just added. You should some output similar to the following:
parse-react@0.4.2 node_modules/parse-react

parse@1.5.0 node_modules/parse
└── xmlhttprequest@1.7.0
Next, you’ll initialize Parse and add your credentials to the app.
Open index.ios.js and add the following line beneath the other require statements, but before the destructuring assignment of AppRegistry and StyleSheet:
var Parse = require('parse').Parse;
This loads the Parse module and assigns it to Parse.
Add the following code after the destructuring assignment:
Parse.initialize(
  'YOUR_PARSE_APPLICATION_ID',
  'YOUR_PARSE_JAVASCRIPT_KEY'
);
Replace YOUR_PARSE_APPLICATION_ID with your Parse application ID and YOUR_PARSE_JAVASCRIPT_KEY with your Parse JavaScript key. You did write down your Parse application ID and JavaScript key, didn’t you? :] If not, you can always go to the Parse Dashboard and look at the Settings page for your app to find them again.
Open SearchPage.js to make your query logic changes. Add the following code near the top of the file, beneath the React require statement:
var Parse = require('parse').Parse;
var ParseReact = require('parse-react');
This loads the Parse and Parse+React modules and assigns them to Parse and ParseReact respectively.
Next, update the SearchPage declaration to add the Parse+React mixin to the component, just above getInitialState:
var SearchPage = React.createClass({
  mixins: [ParseReact.Mixin],
A React mixin is a way to share functionality across disparate components. It’s especially useful when you want to hook into a component’s lifecycle. For example, a mixin could define a componentDidMount method. If a component adds this mixin, React will call the mixin’s componentDidMount hook as well as the component’s componentDidMount method.
ParseReact.Mixin adds lifecycle hooks into a component when it’s mounted or it’s about to update. The mixin looks for an observe method where the Parse queries of interest are defined.
Add the following method to your component after the getInitialState definition:
observe: function(props, state) {
  var listingQuery = (new Parse.Query('Listing')).ascending('price');
  return state.isLoading ?  { listings: listingQuery } : null;
},
This sets up a Parse.Query for Listing data and adds a query filter to sort the results by least expensive first. This query executes whenever isLoading is true — which is the case whenever you initiate a search.
The results from Parse.Query will be attached to this.data.listings based on the key — listings — that’s paired with the listingQuery query.
Modify _executeQuery as shown below to only set the loading flag for now, rather than perform the call to the server:
_executeQuery: function() {
  this.setState({ isLoading: true });
},
Next, modify onSearchPressed to call _executeQuery:
onSearchPressed: function() {
  this._executeQuery();
},
Right now you’re not using the search term and loading all records instead; you’ll add this later on in the tutorial.
In a similar fashion, modify onLocationPressed to call _executeQuery as follows:
onLocationPressed: function() {
  navigator.geolocation.getCurrentPosition(
    location => {
      this._executeQuery();
    },
    error => {
      this.setState({
        message: 'There was a problem with obtaining your locaton: ' + error
      });
  });
},
Again, you’re calling `_executeQuery()` without using the location information just yet.
To clean up after yourself, delete _handleResponse and urlForQueryAndPage since you have no more need for these response handlers. Ahh, deleting code is so satisfying, isn’t it? :]
This is a good point to test your fetching logic. ParseReact.Mixin forces a re-rendering of your component whenever the results return.
Add the following statement to render just after the point where you set up the spinner:
console.log(this.data.listings);
This logs the listing data each time you render the component — including after you run the query.
Close the React Native packager window if it’s running so you can start afresh.
Open PropertyFinder.xcodeproj and build and run; the simulator will start and display the same UI you know and love from the original app:

Tap Go and check the Xcode console. You should see some output like this:
2015-06-05 10:14:27.028 [info][tid:com.facebook.React.JavaScript] []
2015-06-05 10:14:27.589 [info][tid:com.facebook.React.JavaScript] [{"id":{"className":"Listing","objectId":"vbHwqDH6n5"},"className":"Listing","objectId":"vbHwqDH6n5",
"createdAt":"2015-06-05T16:23:14.252Z","updatedAt":"2015-06-05T16:24:39.842Z","bathroom_number":4,"bedroom_number":5,
"img_url":{"_name":"tfss-30d28f46-1335-45d7-8d72-e02684c17d25-house1.jpeg",
"_url":"http://files.parsetfss.com/ec34afd8-2b15-4aea-a904-c96e05b4c83a/tfss-30d28f46-1335-45d7-8d72-e02684c17d25-house1.jpeg"},
"price":390000,"property_type":"house","summary":"Luxurious home with lots of acreage.","title":"Grand mansion"}]
The listing data is empty initially, but once you fetch the data it contains the single listing retrieved from Parse. You may also have noticed that the spinner remains once you’ve gotten the search results. This is because you haven’t done anything to properly handle the results. You’ll take care of this later on, but first you’ll take a brief detour into some UI modifications to use Parse data.