Android Fragments Tutorial: An Introduction with Kotlin
In this Android Fragments with Kotlin tutorial you will learn the fundamental concepts of fragments while creating an app that displays dogs breeds. By Aaqib Hussain.
A fragment is an Android component that holds part of the behavior and/or UI of an activity. As the name would suggest, fragments are not independent entities, but are tied to a single activity. In many ways, they have functionality similar to activities.
Imagine for a moment that you’re a super villain. You have a lot to do, so you might employ a few minions to run around and do your laundry and taxes in exchange for lodging and food. That’s kind of like the relationship between activities and fragments.
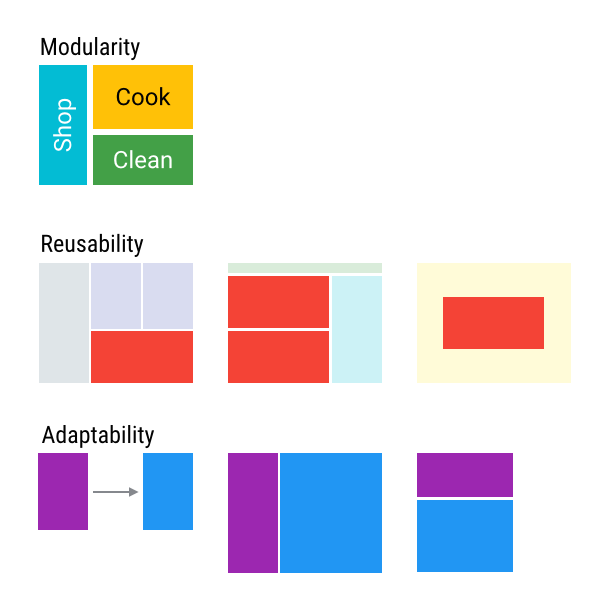
In the same way that you don’t actually need an army of little helpers to do your bidding, you don’t have to use fragments. However, if you use them well, they can provide:
- Modularity: Dividing complex activity code across fragments for better organization and maintenance.
- Reusability: Placing behavior or UI parts into fragments that multiple activities can share.
- Adaptability: Representing sections of a UI as different fragments and utilizing different layouts depending on screen orientation and size.
In this tutorial, you’ll build a mini-encyclopedia of dogs which displays a list of dog breeds arranged in a grid. When the user selects a breed, the app displays information about it. Through building this app you’ll learn how to:
- Create and add fragments to an activity.
- Let your fragments send information to an activity.
- Add and replace fragments by using transactions.
Note: This tutorial assumes you’re comfortable the basics of Android programming and understand what the activity lifecycle means. If you’re brand new to Android, you should work through both the Android Tutorial for Beginners and the Introduction to Activities first.
This tutorial utilizes an Android RecyclerView. If you’ve never used RecyclerView or need a refresher, you should also look at the Android RecyclerView Tutorial.
Time to get started!
Getting Started With Android Fragments
Use the Download Materials button at the top or bottom of this tutorial to download and extract the Starter Project.
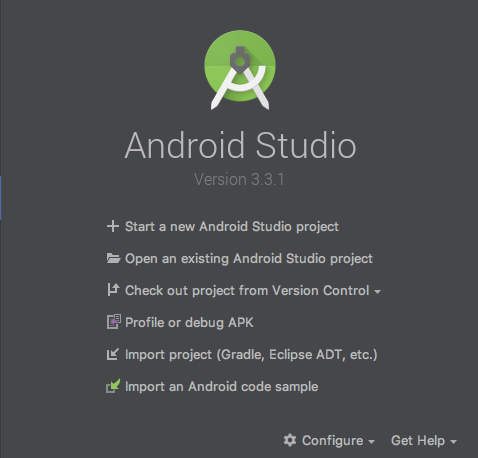
In the Welcome to Android Studio dialog, select Import project (Eclipse ADT, Gradle, etc.).
Check out the project El Dogo app. You’ll find some resource files: strings.xml, activity_main.xml, drawable and layout files. There are also some boilerplate layouts for your fragments, non-fragment code that you’ll need and a fragment class that you’ll use later to write your own.
The MainActivity will host all of your wee fragments and DogListFragment contains code to display a list of dog breeds content so that you can focus on fragments.
Build and run the project. You’ll see that it’s pretty quiet in there.
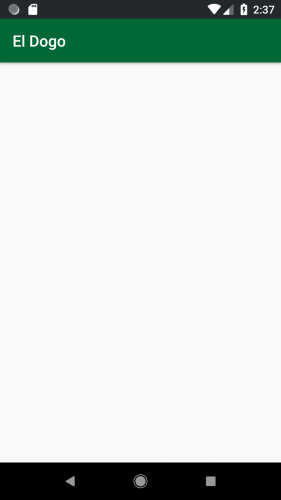
But don’t worry! You’ll fix that…soon!
Android Fragment Lifecycle
Like an activity, a fragment has a lifecycle with events that occur when the fragment’s status changes. For instance, an event happens when the fragment becomes visible and active, or when the fragment becomes unused and is removed. You can also add code and behaviors to callbacks for these events as you would for an activity.
Here’s a fragment lifecycle diagram from the official Android Developer documentation: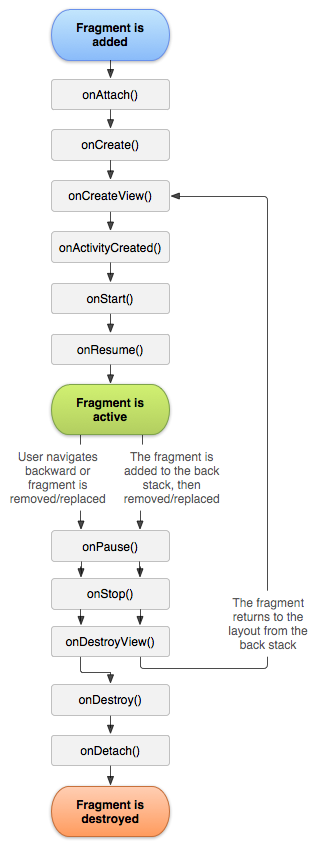

The following lifecycle events come into play when you add a fragment:
-
onAttach: The fragment attaches to its host activity. -
onCreate: A new fragment instance initializes, which always happens after it attaches to the host. Fragments are a bit like viruses. :] -
onCreateView: A fragment creates its portion of the view hierarchy, which is added to its activity’s view hierarchy. -
onActivityCreated: The fragment’s activity has finished its ownonCreateevent. -
onStart: The fragment is visible. A fragment starts only after its activity starts and often starts immediately after its activity does. -
onResume: The fragment is visible and interactable. A fragment resumes only after its activity resumes and often resumes immediately after the activity does.
But wait, the fragment isn’t done! These lifecycle events happen when you remove a fragment:
-
onPause: The fragment is no longer interactable. This occurs when either the fragment is about to be removed or replaced or when the fragment’s activity pauses. -
onStop: The fragment is no longer visible. This occurs either after the fragment is about to be removed or replaced or when the fragment’s activity stops. -
onDestroyView: The view and related resources created inonCreateVieware removed from the activity’s view hierarchy and destroyed. -
onDestroy: The fragment does its final clean up. -
onDetach: The fragment is detached from its activity.
As you can see, the fragment’s lifecycle intertwines with the activity’s lifecycle. But it has extra events that are particular to the fragment’s view hierarchy, state and attachment to its activity.
The V4 Support Library
In Android, when using fragments, there are two alternative fragment implementations you can use.
One type is the fragment that is provided by the platform version. A platform version corresponds to the version of Android that a user is running. For example, a device running Android 6.0, SDK Version 23, would be running platform version 23 of the library.
The second type is a support library fragment. When you include a support library, it is added to your project in the same manner as any third-party library.
Using the support library has two benefits when developing applications for multiple versions of Android.
First, it ensures that you have consistency in your code and functionality across different devices and platform versions. This means that bugs and fixes will be more consistent across different versions of Android using these libraries.
Second, when they add new features to the latest version of Android, the Android team will often back-port these features via the support library in order for developers to use on older versions of Android.
So, which library should you use?
Android has deprecated platform fragments in Android 9.0, SDK Version 28. So you should always go with the v4 support library when using fragments.
Creating a Fragment
Eventually, El Dogo will show a list of dogs breeds on launch and tapping on any of the items will display details about that particular breed. To start, you’ll work backwards and first create the detail page.
Open the starter project in Android Studio and find fragment_dog_details.xml under app ▸ src ▸ main ▸ res ▸ layout. This XML file lays out the dog detail display. It also displays one of the drawable resources and the associated String resources.

Locate the DogDetailsFragment.ky file in the project. This class will be responsible for displaying details for a selected breed.
In DogDetailsFragment.kt, the code now looks like this:
import android.os.Bundle
import android.support.v4.app.Fragment
import android.view.LayoutInflater
import android.view.View
import android.view.ViewGroup

//1
class DogDetailsFragment : Fragment() {

  //2
  companion object {

    fun newInstance(): DogDetailsFragment {
      return DogDetailsFragment()
    }
  }

  //3
  override fun onCreateView(inflater: LayoutInflater,
                            container: ViewGroup?,
                            savedInstanceState: Bundle?): View? {
    return inflater.inflate(R.layout.fragment_dog_details, container, false)
  }

}
This code:
- Declares
DogDetailsFragmentas a subclass ofFragment. Notice theimport android.support.v4.app.Fragment: This is from the v4 support library mentioned before. - Provides a method for creating new instances of the fragment, a factory method.
- Creates the view for the fragment.
Activities use setContentView() to specify the XML file that defines their layouts, but fragments create their view hierarchy in onCreateView(). Here you called LayoutInflater.inflate to create the hierarchy of DogDetailsFragment.
The third parameter of inflate specifies whether the inflated fragment should be added to the container. The container is the parent view that will hold the fragment’s view hierarchy. You should always set this to false when inflating a view for a fragment: The FragmentManager will take care of adding the fragment to the container.