Getting Started with MagicalRecord
Get started with MagicalRecord, an active record-style library to make your Core Data code cleaner and simpler! By Ed Sasena.
Cancel That Beer
Speaking of blank rows, what if the user starts to add a beer, but then decides not to? Restart the app if it is not already running.
- Tap the + button in the top right corner of the list view.
- Once the app transitions to the detail view, tap Cancel.
The app transitions back to the list view, but this time a blank beer has been added to the list. A disclosure indicator appears in the list with no beer name.
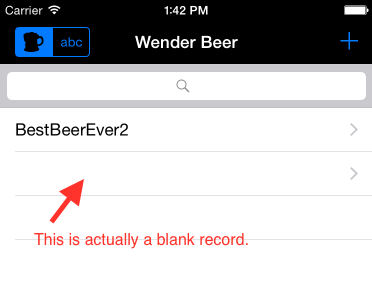
You’ll need MagicalRecord to come to the rescue to stop this blank record!
Open BeerDetailViewController.swift and find cancelAdd() – this is the method that gets called when you tap on the “Cancel” button. Add the following line to the beginning of the method:
currentBeer.deleteEntity()
When the detail view controller is loaded, viewDidLoad() creates a new Beer object if one isn’t being edited. If the user taps Cancel, then this object needs to be deleted from the data store. A call to MagicalRecord’s deleteEntity() will take care of the task.
- Highlight the method name.
- Right-click on the name.
- Select Jump to Definition.
For those who might be curious about finding a method’s origin:
Build and run. Repeat the steps to cancel adding a beer.
- Tap the + button in the top right corner of the list view.
- Once the app transitions to the detail view, tap Cancel.
This time no extra beer is added to the list. Great work – unless you were looking forward to extra beer. ;]
Delete a Beer
Time to clean up the bar area and delete the blank beer (or any beer) from the list. First, you’ll need to enable rows to be deleted from the table view.
Open BeerListViewController.swift and find tableView(_:commitEditingStyle:forRowAtIndexPath:). Add the following code inside the if statement:
//1
beers.removeAtIndex(indexPath.row).deleteEntity()
saveContext()

//2
let indexPaths = [indexPath]

//3
tableView.deleteRowsAtIndexPaths(indexPaths, withRowAnimation: .Automatic)

//4
tableView.reloadData()
Reviewing the code above:
- Remove the
Beerobject from thebeersarray and call MagicalRecord’sdeleteEntityto prepare to remove it from the data store. CallsaveContextto have MagicalRecord do the actual work of removing it from the data store. - Prepare to delete the corresponding row from the table view by making a temporary array,
indexPaths, with only one index-path object corresponding to the path pointing to the table view cell displaying the object to be deleted. - Tell the table view to remove the row(s) in the temporary array with an animation.
- Reload the table view to reflect the changes made by the deletion.
Notice the call to saveContext(). Code must be added to save changes to the data store. You’ve already done this once. Can you figure out how to make it work? Ready? Go!
[spoiler]
Have MagicalRecord save changes to the data store.
- In BeerListViewController.swift.
- Find
saveContext. - Add the following line to the method:
NSManagedObjectContext.defaultContext().saveToPersistentStoreAndWait()
NSManagedObjectContext.defaultContext().saveToPersistentStoreAndWait()
[/spoiler]
Build and run. Swipe left on the row with the empty beer and click Delete.

That gets rid of the empties. Try adding and deleting a few more – but not too many if you are driving.
Edit a Beer
Now that a beer can be added, cancelled, or deleted, try editing it. Click on the row in the table displaying the new beer name. What happens? The app transitions to an empty detail view. Did someone drink the beer? Actually, the list view needs to send the beer object to the detail view. Let’s fix that next.
Open BeerListViewController.swift and find prepareForSegue(_:sender:). This is the point where the list will transition by segue over to the detail view.
Add the following code right after if segue.identifier == "editBeer" {:
let indexPath = tableView.indexPathForSelectedRow()
let beerSelected = beers[indexPath!.row]
controller!.currentBeer = beerSelected
controller!.currentBeer.beerDetails = beerSelected.beerDetails
This code uses the indexPath for the row the user tapped as an index into the beers array to access the selected Beer object. The currentBeer property of the destination view controller (BeersDetailViewController) is set to the selected Beer object. beerDetails is set up as a child of currentBeer.
Build and run. Tap on the row in the table displaying the new beer name. There it is in the detail view. Excellent work!

Try editing the name and clicking Done. The app transitions to the list view and the new name is displayed. Perfect!
Finishing Touches
There are a few more things the app can do for users: perform searches and pre-populate a few beers so there’s some starter data.
Searching
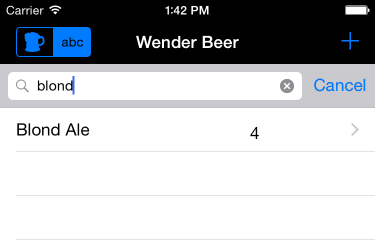
Now with multiple beers in the system, test the search capabilities. The starter app already included a Search Bar. Scroll to the top of the table to see it. Code needs to be added to search the list of beers.
Earlier, you used a MagicalRecord helper method to fetch and return all beers. Now, only those beers matching a specific search term are required.
For this, you’ll use an NSPredicate . Can you guess how to implement the search? The logic should live inside of performSearch() in BeerListViewController.swift.
[spoiler]
Add the following to performSearch before tableView.reloadData():
let searchText = searchBar.text
let filterCriteria = NSPredicate(format: "name contains[c] %@", searchText)

beers = Beer.findAllSortedBy(sortKeyName, ascending: true,
 withPredicate: filterCriteria,
 inContext: NSManagedObjectContext.defaultContext()) as? [Beer]
For other methods to fetch results, check the MagicalRecord header files.
[/spoiler]
Run the app again and drag the beer list down until the search bar is revealed. Search for one of the beers in the list, then search for one that isn’t in the list. Do you get the expected behavior?
Demo Data
It might be nice to give users some initial data to quickly demonstrate how to keep track of their favorite beers. In the final version of the project in AppDelegate.swift, there are two options for preloading beer data:
- To preload beer data only once, no matter how many times the app runs, uncomment
populateBeersunder OPTION 1. - To force preload of beer data, regardless if data has already been preloaded, uncomment
populateBeersunder OPTION 2. This might come in handy if one or more preloaded beers gets deleted and a fresh, full set is desired.
A Magical Debugger
When the app starts, MagicalRecord logged four things during the Core Data stack setup. It is showing the Core Data setup process happened and a defaultContext was created. This is the same defaultContext referenced in saveContext.
Also, when modifying or adding a new beer, after selecting Done, MagicalRecord performs a save and reports information to the log, such as:
- The defaultContext saved to the Main Thread.
- Any parents of the context will be saved, designated with flag 1.
- The save will be synchronous, designated with flag 1.
- Two objects (Beer and BeerDetails) were inserted into the context.
- The saved finished.
MagicalRecord will also log the fact that it is not saving a record due to no changes. Try this:
- Build and run the project.
- Make sure the console is visible. If not, click the square icon in the bottom right corner of the Xcode window.
- Select an existing beer from the list.
- Once in the detail view, go back to the list view by clicking Wender Beer.
The log output reports, “NO CHANGES IN ** BACKGROUND SAVING (ROOT) ** CONTEXT – NOT SAVING”.
Upon leaving the detail view, viewWillDisappear(_:) calls saveContext() which, in turn, saves the default context. Since no changes were made, MagicalRecord recognizes there is no need to perform a save operation and skips the process. There is no need to think about the need to save. Perform the save and let MagicalRecord figure it out.
Pay attention to the MagicalRecord log reports. They can provide very useful information.