Scene Kit Tutorial with Swift Part 2: Nodes
In this 5-part Scene Kit tutorial series, you’ll learn how to make your first 3D iOS game: a game like Fruit Ninja called Geometry Fighter! By Chris Language.
Adding ShapeTypes
Before you start adding geometric shapes to the scene, create a new Swift file to define a ShapeType enum for the various different shapes you’ll use in the game.
Right-click on the GeometryFighter group and select New File…. Select the iOS\Source\Swift File template and click Next:
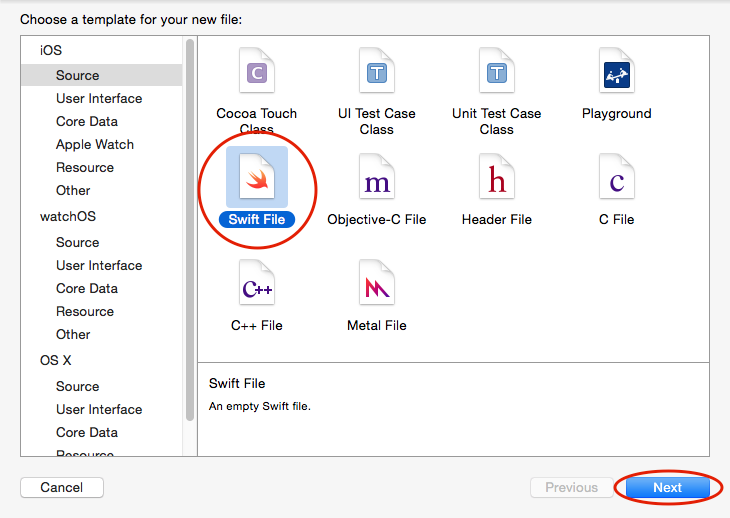
Name the file ShapeType.swift, make sure it’s included in your project, then click Create.
Once the file’s been created, open ShapeType.swift and replace its contents with the following:
import Foundation

// 1
public enum ShapeType:Int {

  case Box = 0
  case Sphere
  case Pyramid
  case Torus
  case Capsule
  case Cylinder
  case Cone
  case Tube

  // 2
  static func random() -> ShapeType {
    let maxValue = Tube.rawValue
    let rand = arc4random_uniform(UInt32(maxValue+1))
    return ShapeType(rawValue: Int(rand))!
  }
}
The code above is relatively straightforward:
-
You create a new public enum
ShapeTypethat enumerates the various shapes. -
You also define a static method
random()that generates a randomShapeType. This feature will come in handy later on in your game.
Adding a Geometry Node
Your next task is to create a method that spawns the various random shapes defined in the ShapeType enumerator.
Add the following method to GameViewController.swift, right below setupCamera():
func spawnShape() {
  // 1
  var geometry:SCNGeometry
  // 2
  switch ShapeType.random() {
  default:
    // 3
    geometry = SCNBox(width: 1.0, height: 1.0, length: 1.0, chamferRadius: 0.0)
  }
  // 4
  let geometryNode = SCNNode(geometry: geometry)
  // 5
  scnScene.rootNode.addChildNode(geometryNode)
}
Taking each numbered comment in turn;
-
First you create a placeholder
geometryvariable for use a bit later on. -
Next, you define a
switchstatement to handle the returned shape fromShapeType.random(). It’s incomplete at the moment and only creates a box shape; you’ll add more to it in the challenge at the end of this chapter. -
You then create an
SCNBoxobject and store it ingeometry. You specify the width, height, and length, along with the chamfer radius (which is a fancy way of saying rounded corners). -
This statement creates an instance of
SCNNodenamedgeometryNode. This time, you make use of theSCNNodeinitializer that takes ageometryparameter to create a node and automatically attach the supplied geometry. - Finally, you add the node as a child of the scene’s root node.
You now need to call this method from somewhere. Add the following line to viewDidLoad() below setupCamera():
spawnShape()
Build and run; you’ll see a white square displayed onscreen:

There’s a few things to observe here:
-
The box node is the default shape from
spawnShape(), and sits at(x:0, y:0, z:0)in the scene. -
You’re viewing the scene through your
cameraNode. Since the camera node lives at(x:0, y:0: z:10), the box is smack dab in the center of the camera’s viewable area.
Yes, it’s not very exciting (and hardly three-dimensional looking), but fear not – the next section will change all that.
Using Built-in View Features
SCNView comes with a few out-of-the-box features that help make your life easier.
Add the following lines to setupView() in GameViewController.swift, just below the current implementation:
// 1
scnView.showsStatistics = true
// 2
scnView.allowsCameraControl = true
// 3
scnView.autoenablesDefaultLighting = true
Here’s what’s going on in the code above:
-
showStatisticsenables a real-time statistics panel at the bottom of your scene. -
allowsCameraControllets you manually control the active camera through simple gestures. -
autoenablesDefaultLightingcreates a generic omnidirectional light in your scene so you don’t have to worry about adding your own light sources for the moment.
Build and run; things should look a little more exciting this time around!

You can use the following gestures to control the active camera in your scene:
- Single finger swipe: Rotates your active camera around the contents of the scene.
- Two finger swipe: Moves, or pans your camera left, right, up or down in the scene.
- Two finger pinch: Zooms the camera in and out of the scene.
- Double-tap: If you have more than one camera, this switches between the cameras in your scene. Of course since you have only one camera this won’t don that. However, it also has the effect of resetting the camera to its original position and settings.
Challenge
At this point, I’ll leave you off with a challenge to practice what you learned: to improve the switch statement inside spawnShape() to handle the remaining shapes in the enumerator.
Use Apple’s official Scene Kit documentation as a guide to the various geometric shapes. Also take a look at the ShapeType enum to see which shapes are left to create; their names should give you a good idea of where to start.
Don’t worry too much about the sizes to use; just try to make them about the same relative size as the box you made earlier.
If you get this working, congratulations, you are getting a firm grasp of some of the most fundamental concepts in Scene Kit! :]
Where To Go From Here?
Here is the example code from this Scene Kit tutorial with Swift (with the challenge completed).
At this point, you should keep reading to the third part of this tutorial series, where you’ll learn how to make the geometry move via Scene Kit physics.
If you’d like to learn more, you should check out our book 3D iOS Games by Tutorials. The book teaches you everything you need to know to make 3D iOS games, by making a series of mini-games like this one, including a games like Breakout, Marble Madness, and even Crossy Road.
In the meantime, if you have any questions or comments about this tutorial, please join the forum discussion below!