Swift Tutorial: Initialization In Depth, Part 1/2
Take your Swift skills to the next level by learning about how your instances are initialized in this in-depth two-part tutorial on initialization! By René Cacheaux.
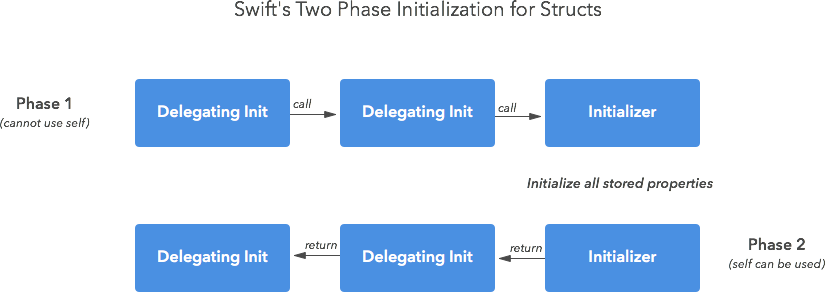
Introducing Two-Phase Initialization
So far, the code in your initializers have been setting up your properties and calling other initializers. That’s the first phase of initialization, but there are actually two phases to initializing a Swift type.
Phase 1 starts at the beginning of initialization and ends once all stored properties have been assigned a value. The remaining initialization execution is phase 2. You cannot use the instance you are initializing during phase 1, but you can use the instance during phase 2. If you have a chain of delegating initializers, phase 1 spans the call stack up to the non-delegating initializer. Phase 2 spans the return trip from the call stack.
Putting Two-Phase Initialization to Work
Now that you understand two-phase initialization, let’s apply it to our scenario. Each rocket engine has a combustion chamber where fuel is injected with oxidizer to create a controlled explosion that propels the rocket. Setting up these parameters is the phase 1 part to prepare for blastoff.
Implement the following CombustionChamberStatus struct to see Swift’s two-phase initialization in action. Make sure to show Xcode’s Debug area to see the output of the print statements.
struct CombustionChamberStatus {
  var temperatureKelvin: Double
  var pressureKiloPascals: Double

  init(temperatureKelvin: Double, pressureKiloPascals: Double) {
    print("Phase 1 init")
    self.temperatureKelvin = temperatureKelvin
    self.pressureKiloPascals = pressureKiloPascals
    print("CombustionChamberStatus fully initialized")
    print("Phase 2 init")
  }

  init(temperatureCelsius: Double, pressureAtmospheric: Double) {
    print("Phase 1 delegating init")
    let temperatureKelvin = temperatureCelsius + 273.15
    let pressureKiloPascals = pressureAtmospheric * 101.325
    self.init(temperatureKelvin: temperatureKelvin, pressureKiloPascals: pressureKiloPascals)
    print("Phase 2 delegating init")
  }
}

CombustionChamberStatus(temperatureCelsius: 32, pressureAtmospheric: 0.96)
You should see the following output in the Debug Area:
Phase 1 delegating init
Phase 1 init
CombustionChamberStatus fully initialized
Phase 2 init
Phase 2 delegating init
As you can see, phase 1 begins with the call to the delegating initializer init(temperatureCelsius:pressureAtmospheric:) during which self cannot be used. Phase 1 ends right after self.pressureKiloPascals gets assigned a value in the non-delegating initializer. Each initializer plays a role during each phase.
Isn’t the compiler super crazy smart? It knows how to enforce all these rules. At first, those rules might seem like nuisances, but remember that they provide a ton of safety.
What if Things Go Wrong?
You’ve been told the launch sequence will be fully autonomous, and that the sequence will perform a ton of tests to make sure all systems are good to go for launch. If an invalid value is passed into an initializer, the launch system should be able to know and react.
There are two ways to handle initialization failures in Swift: using failable initializers, and throwing from an initializer. Initialization can fail for many reasons, including invalid input, a missing system resource such as a file, and possible network failures.
Using Failable Initializers
There are two differences between normal initializers and failable initializers. One is that failable initializers return optional values, and the other is that failable initializers can return nil to express an initialization failure. This can be very useful — let’s apply it to the rocket’s tanks in our data model.
Each rocket stage carries two large tanks; one holds fuel, while the other holds oxidizer. To keep track of each tank, implement a new struct named TankStatus as follows:
struct TankStatus {
  var currentVolume: Double
  var currentLiquidType: String?

  init(currentVolume: Double, currentLiquidType: String?) {
    self.currentVolume = currentVolume
    self.currentLiquidType = currentLiquidType
  }
}

let tankStatus = TankStatus(currentVolume: 0.0, currentLiquidType: nil)
There’s nothing wrong with this code except that it doesn’t recognize failure. What happens if you pass in a negative volume? What if you pass in a positive volume value but no liquid type? These are all failure scenarios. How can you model these situatons using failable initializers?
Start by changing TankStatus‘s initializer to a failable initializer by appending a ? to init:
init?(currentVolume: Double, currentLiquidType: String?) {
Option-click on tankStatus and notice how the initializer now returns an optional TankStatus.
Update tankStatus‘s instantiation to match the following:
if let tankStatus = TankStatus(currentVolume: 0.0, currentLiquidType: nil) {
  print("Nice, tank status created.") // Printed!
} else {
  print("Oh no, an initialization failure occurred.")
}
The instantiation logic checks for failure by evaluating whether the returned optional contains a value or not.
Of course, there’s something missing: the initializer isn’t actually checking for invalid values yet. Update the failable initializer to the following:
init?(currentVolume: Double, currentLiquidType: String?) {
  if currentVolume < 0 {
    return nil
  }
  if currentVolume > 0 && currentLiquidType == nil {
    return nil
  }
  self.currentVolume = currentVolume
  self.currentLiquidType = currentLiquidType
}
As soon as an invalid input is detected, the failable initializer returns nil. You can return nil at any time within a structure’s failable initializer. This is not the case with a class’s failable initializer, as you’ll see in Part 2 of this tutorial.
To see instantiation failure, pass an invalid value into tankStatus‘s instantiation:
if let tankStatus = TankStatus(currentVolume: -10.0, currentLiquidType: nil) {
Notice how the playground prints, “Oh no, an initialization failure occurred.” Because initialization failed, the failable initializer returned a nil value and the if let statement executed the else clause.
Throwing From an Initializer
Failable initializers are great when returning nil is an option. For more serious errors, the other way to handle failure is throwing from an initializer.
You have one last structure to implement: one to represent each astronaut. Start by writing the following code:
struct Astronaut {
  let name: String
  let age: Int

  init(name: String, age: Int) {
    self.name = name
    self.age = age
  }
}
The manager tells you an astronaut should have a non-empty String for his or her name property and should have an age ranging from 18 to 70.
To represent possible errors, add the following error enumeration before the implementation of Astronaut:
enum InvalidAstronautDataError: Error {
  case EmptyName
  case InvalidAge
}
The enumeration cases here cover the possible problems you might run into when initializing a new Astronaut instance.
Next, replace the the Astronaut initializer with the following implementation:
init(name: String, age: Int) throws {
  if name.isEmpty {
    throw InvalidAstronautDataError.EmptyName
  }
  if age < 18 || age > 70 {
    throw InvalidAstronautDataError.InvalidAge
  }
  self.name = name
  self.age = age
}
Note that the initializer is now marked as throws to let callers know to expect errors.
If an invalid input value is detected — either an empty string for the name, or an age outside the acceptable range — the initializer will now throw the appropriate error.
Try this out by instantiating a new astronaut:
let johnny = try? Astronaut(name: "Johnny Cosmoseed", age: 42)
This is exactly how you handle any old throwing method or function. Throwing initializers behave just like throwing methods and functions. You can also propagate throwing initializer errors, and handle errors with a do–catch statement. Nothing new here.
To see the initializer throw an error, change johnny‘s age to 17:
let johnny = try? Astronaut(name: "Johnny Cosmoseed", age: 17) // nil
When you call a throwing initializer, you write the try keyword — or the try? or try! variations — to identify that it can throw an error. In this case, you use try? so the value returned in the error case is nil. Notice how the value of johnny is nil. Seventeen is too young for spaceflight, sadly. Better luck next year, Johnny!
