How to Submit An App to Apple: From No Account to App Store – Part 2
In the second half of this two-part series, you’ll learn how to publish an app to the Apple App Store including learning about Xcode’s Automatic Device Provisioning and actually uploading your app to the store. By Rony Rozen.
Submit An App With Xcode
Your application should now be tested and ready to roll. All you need to do is submit to Apple for approval. This is surprisingly easy considering what you’ve been through already. It’s a good idea to take a moment and make yourself familiar with Apple’s most common rejection reasons to know what needs extra attention and what to avoid.
Go to Xcode and choose Generic iOS Device in the scheme chooser:

Then choose Product\Archive:

If everything is okay with the build, Xcode will open the Organizer window with your app in the Archives tab. You don’t really need to click Validate… here because this will be done when you submit anyway, and Xcode should have already validated against most problems. So save yourself some time and click Upload to App Store….
You will then be prompted with App Store distribution options. All checkboxes should be selected by default. Leave them like this and click Next:

The next screen asks you to select your distribution certificate and provisioning profiles. Select the ones you created earlier in this tutorial, and click Next. Finally, once Xcode is done doing some of its magic, you’ll be presented with a summary page of the app you’re about to submit. Click Upload.
Your app will start uploading to iTunes Connect. Various messages will be displayed as code is compiled, verified and code-signed. When the upload finishes, you should see the following message:

Just smile and click Done :]
You’re almost done; only a couple of steps remain. Switch back to iTunes Connect, scroll down to the Build area you skipped earlier and click Select a build before you submit your app. If you don’t see that option, refresh the page. If you still don’t see it, check your email. There may have been a problem with the binary you submitted to Apple.
Select the build Xcode just uploaded and click Done.
Click Save at the top right.
Finally, click Submit for Review.
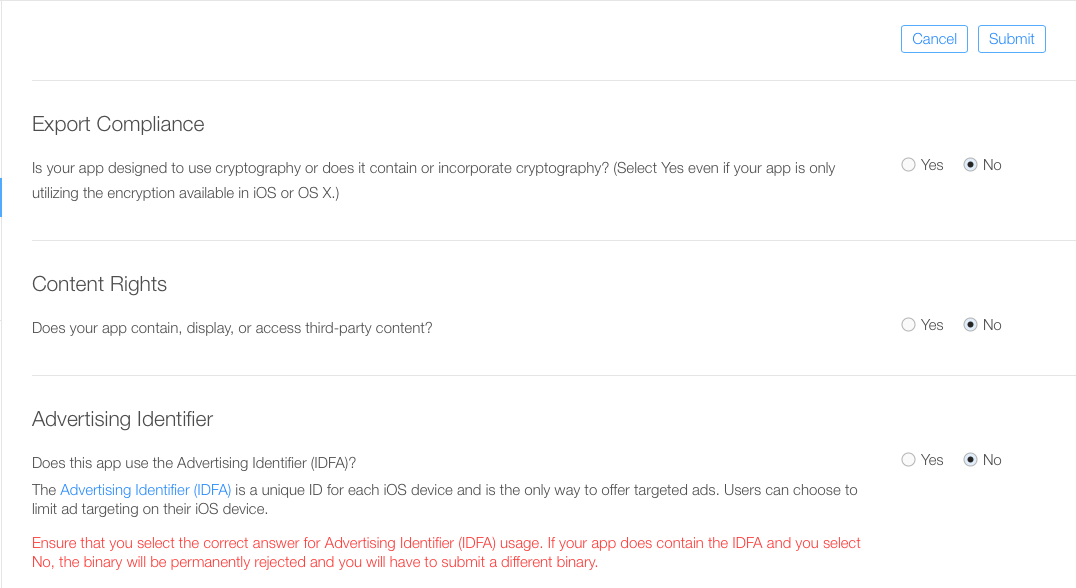
You’ll be asked several questions. Answer them honestly, then click Submit:
And you’re done! Can you believe it? You should receive a couple of emails from iTunes Connect telling you your app has been uploaded and is waiting for review. Your app’s status has also changed. It should now be Waiting For Review.
All you have to do now is wait for Apple to approve your app! You will receive emails about every change in your app’s status. Usually after a few days the status should change to “In Review,” then to “Approved.” Unless you chose a future release date, a few minutes after approval your app’s status will shift to “Processing For App Store,” then a few minutes later to “Ready For Sale.”
In iTunes Connect, you can click Activity on the top bar, followed by App Store Versions to see the status of your app throughout the process. The review time for your apps will vary based on traffic, but in general it takes around 5-10 days for most people.
If your app is not approved, Apple will email you with more information. They have become pretty good at specifying the exact problem and explaining how you can fix it. If this happens, just fix the problem and re-submit. If something is unclear, you can respond to their comments and your reviewer will usually reply in a timely manner.
Where To Go From Here?
If you’ve followed this tutorial on how to submit an app all the way, that was a long journey: from no account to an app on the App Store! You may not have an app ready to submit yet, but you should now feel confident about the submission and approval process once you do.
If you’ve submitted your first app while you were going through this tutorial, congratulations! Now go get ready for your next update or your next big app!
As mentioned earlier, there’s a whole lot more information available about the various aspects of iTunes Connect in the complete iTunes Connect Developer Guide.
For a more in-depth look at iOS App Distribution, including every step to publication and how to maintain the app once it’s on the store, read our book iOS App Distribution & Best Practices.
If you have any questions or comments about what you’ve done, please join in the forum discussion below!