Core Graphics on macOS Tutorial
Core Graphics is Apple’s 2D drawing engine for OS X. Discover how to build a great disc info app for OS X using Core Graphics to draw charts in this Core Graphics on OS X tutorial. By Ernesto García.
4.6 (5) · 1 Review
Drawing Strings
Drawing a string in a custom view is super easy. You just need to create a dictionary with the string attributes — for instance the font, size, color, alignment — calculate the rectangle where it will be drawn, and invoke String‘s method draw(in:withAttributes:).
Open GraphView.swift and add the following property to the class:
fileprivate var bytesFormatter = ByteCountFormatter()
This creates an ByteCountFormatter. It does all the heavy work of transforming bytes into a human-friendly string.
Now, add this inside drawBarGraphInContext(context:). Make sure you add it inside the for (index,fileType) in fileTypes.enumerated() loop:
// 1
let legendRectWidth = (barChartRect.size.width / CGFloat(fileTypes.count))
let legendOriginX = barChartRect.origin.x + floor(CGFloat(index) * legendRectWidth)
let legendOriginY = barChartRect.minY - 2 * Constants.marginSize
let legendSquareRect = CGRect(x: legendOriginX, y: legendOriginY,
                              width: Constants.barChartLegendSquareSize,
                              height: Constants.barChartLegendSquareSize)

let legendSquarePath = CGMutablePath()
legendSquarePath.addRect( legendSquareRect )
context?.addPath(legendSquarePath)
context?.setFillColor(fileTypeColors.fillColor.cgColor)
context?.setStrokeColor(fileTypeColors.strokeColor.cgColor)
context?.drawPath(using: .fillStroke)

// 2
let paragraphStyle = NSMutableParagraphStyle()
paragraphStyle.lineBreakMode = .byTruncatingTail
paragraphStyle.alignment = .left
let nameTextAttributes = [
  NSFontAttributeName: NSFont.barChartLegendNameFont,
  NSParagraphStyleAttributeName: paragraphStyle]

// 3
let nameTextSize = fileType.name.size(withAttributes: nameTextAttributes)
let legendTextOriginX = legendSquareRect.maxX + Constants.legendTextMargin
let legendTextOriginY = legendOriginY - 2 * Constants.pieChartBorderWidth
let legendNameRect = CGRect(x: legendTextOriginX, y: legendTextOriginY,
                            width: legendRectWidth - legendSquareRect.size.width - 2 *
                              Constants.legendTextMargin,
                            height: nameTextSize.height)

// 4
fileType.name.draw(in: legendNameRect, withAttributes: nameTextAttributes)

// 5
let bytesText = bytesFormatter.string(fromByteCount: fileTypeInfo.bytes)
let bytesTextAttributes = [
  NSFontAttributeName: NSFont.barChartLegendSizeTextFont,
  NSParagraphStyleAttributeName: paragraphStyle,
  NSForegroundColorAttributeName: NSColor.secondaryLabelColor]
let bytesTextSize = bytesText.size(withAttributes: bytesTextAttributes)
let bytesTextRect = legendNameRect.offsetBy(dx: 0.0, dy: -bytesTextSize.height)
bytesText.draw(in: bytesTextRect, withAttributes: bytesTextAttributes)
That was quite a bit of code, but it’s easy to follow:
- You’re already familiar with this code: calculate the position of the legend’s colored square, create a path for it and draw with the appropriate colors.
- Create a dictionary of attributes that includes the font and a paragraph style
NSMutableParagraphStyle. The paragraph defines how the string should be drawn inside the given rectangle. In this case, it’s left aligned with a truncated tail. - Calculate the position and size of the rectangle to draw the text in.
- Draw the text invoking
draw(in:withAttributes:). - Get the size string using the
bytesFormatterand create the attributes for the file size text. The main difference from the previous code is that this sets a different text color in the attributes dictionary viaNSFontAttributeName.
Build and run, or open Main.storyboard, to see the results).

The bar chart is complete! You can resize the window to see how it adapts to the new size. Watch how the text properly truncates when there isn’t enough space to draw it.
Looking great so far!
Cocoa Drawing
macOS apps come with the option to use AppKit framework to draw instead. It provides a higher level of abstraction. It uses classes instead of C functions and includes helper methods that make it easier to perform common tasks. The concepts are equivalent in both frameworks, and Cocoa Drawing is very easy to adopt if you’re familiar with Core Graphics.
As it goes in Core Graphics, you need to create and draw paths, using NSBezierPath, the equivalent of CGPathRef in Cocoa Drawing:
This is how the pie chart will look:

You’ll draw it in three steps:
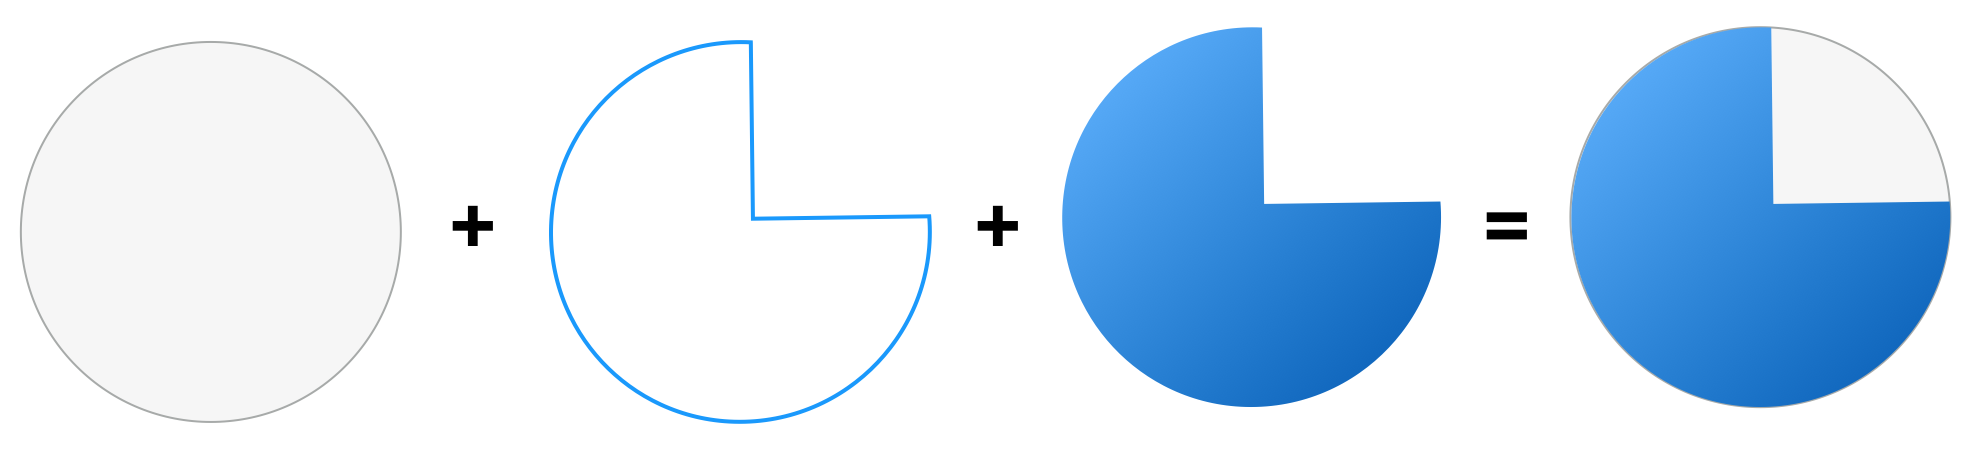
- First, you create a circle path for the available space circle, and then you fill and stroke it with the configured colors.
- Then you create a path for the used space circle segment and stroke it.
- Finally, you draw a gradient that only fills the used space path.
Open GraphView.swift and add this method into the drawing extension:
func drawPieChart() {
  guard let fileDistribution = fileDistribution else {
    return
  }

  // 1
  let rect = pieChartRectangle()
  let circle = NSBezierPath(ovalIn: rect)
  pieChartAvailableFillColor.setFill()
  pieChartAvailableLineColor.setStroke()
  circle.stroke()
  circle.fill()

  // 2
  let path = NSBezierPath()
  let center = CGPoint(x: rect.midX, y: rect.midY)
  let usedPercent = Double(fileDistribution.capacity - fileDistribution.available) /
    Double(fileDistribution.capacity)
  let endAngle = CGFloat(360 * usedPercent)
  let radius = rect.size.width / 2.0
  path.move(to: center)
  path.line(to: CGPoint(x: rect.maxX, y: center.y))
  path.appendArc(withCenter: center, radius: radius,
                                         startAngle: 0, endAngle: endAngle)
  path.close()

  // 3
  pieChartUsedLineColor.setStroke()
  path.stroke()
}
There are a few things to go through here:
- Create a circle path using the constructor
init(ovalIn:), set the fill and stroke color, and then draw the path. - Create a path for the used space circle segment. First, calculate the ending angle based on the used space. Then create the path in four steps:
- Move to the center point of the circle.
- Add an horizontal line from the center to the right side of the circle.
- Add an arc from current point to the calculated angle.
- Close the path. This adds a line from the arc’s end point back to the center of the circle.
- Set the stroke color and stroke the path by calling its
stroke()method.
- Move to the center point of the circle.
- Add an horizontal line from the center to the right side of the circle.
- Add an arc from current point to the calculated angle.
- Close the path. This adds a line from the arc’s end point back to the center of the circle.
You may have noticed a couple of differences compared to Core Graphics:
- There aren’t any reference to the graphics context in the code. That’s because these methods automatically get the current context, and in this case, it’s the view’s context.
- Angles are measured in degrees, not radians. CGFloat+Radians.swift extends CGFloat to do conversions if needed.
Now, add the following code inside draw(_:) to draw the pie chart:
drawPieChart()
Build and run.

Looking good so far!
Drawing Gradients
Cocoa Drawing uses NSGradient to draw a gradient.
You need to draw the gradient inside the used space segment of the circle, and you already know how to do it.
How will you do it? Exactly, clipping areas!
You’ve already created a path to draw it, and you can use it as a clipping path before you draw the gradient.
Add this code at the end of drawPieChart():
if let gradient = NSGradient(starting: pieChartGradientStartColor,
                             ending: pieChartGradientEndColor) {
  gradient.draw(in: path, angle: Constants.pieChartGradientAngle)
}
In the first line, you try to create a gradient with two colors. If this works, you call draw(in:angle:) to draw it. Internally, this method sets the clipping path for you and draws the gradient inside it. How nice is that?
Build and run.

The custom view is looking better and better. There’s only one thing left to do: Draw the available and used space text strings inside the pie chart.
You already know how to do it. Are you up to the challenge? :]
This is what you need to do:
- Use the
bytesFormatterto get the text string for the available space (fileDistribution.availableproperty ) and full space (fileDistribution.capacityproperty). - Calculate the position of the text so that you draw it in the middle point of the available and used segments.
- Draw the text in that position with these attributes:
- Font:
NSFont.pieChartLegendFont - Used space text color:
NSColor.pieChartUsedSpaceTextColor - Available space text color:
NSColor.pieChartAvailableSpaceTextColor
[spoiler title=”Draw Pie Chart Legend”]
Add this code inside the drawPieChart() method:
// 1
let usedMidAngle = endAngle / 2.0
let availableMidAngle = (360.0 - endAngle) / 2.0
let halfRadius = radius / 2.0

// 2
let usedSpaceText = bytesFormatter.string(fromByteCount: fileDistribution.capacity)
let usedSpaceTextAttributes = [
  NSFontAttributeName: NSFont.pieChartLegendFont,
  NSForegroundColorAttributeName: NSColor.pieChartUsedSpaceTextColor]
let usedSpaceTextSize = usedSpaceText.size(withAttributes: usedSpaceTextAttributes)
let xPos = rect.midX + CGFloat(cos(usedMidAngle.radians)) *
  halfRadius - (usedSpaceTextSize.width / 2.0)
let yPos = rect.midY + CGFloat(sin(usedMidAngle.radians)) *
  halfRadius - (usedSpaceTextSize.height / 2.0)
usedSpaceText.draw(at: CGPoint(x: xPos, y: yPos),
                   withAttributes: usedSpaceTextAttributes)

// 3
let availableSpaceText = bytesFormatter.string(fromByteCount: fileDistribution.available)
let availableSpaceTextAttributes = [
  NSFontAttributeName: NSFont.pieChartLegendFont,
  NSForegroundColorAttributeName: NSColor.pieChartAvailableSpaceTextColor]
let availableSpaceTextSize = availableSpaceText.size(withAttributes: availableSpaceTextAttributes)
let availableXPos = rect.midX + cos(-availableMidAngle.radians) *
  halfRadius - (availableSpaceTextSize.width / 2.0)
let availableYPos = rect.midY + sin(-availableMidAngle.radians) *
  halfRadius - (availableSpaceTextSize.height / 2.0)
availableSpaceText.draw(at: CGPoint(x: availableXPos, y: availableYPos),
                        withAttributes: availableSpaceTextAttributes)
This code does the following:
- Calculates the angles where you’ll draw used and available texts.
- Creates the text attributes and calculates the x and y position of the used space text – then it draws.
- Creates the text attributes and calculates the x and y position of the available space, and then it draws.
Now, build and run and see the final result of your handiwork.

[/spoiler]
Congratulations! You’ve built a beautiful app using Core Graphics and Cocoa Drawing!