Advanced Collection Views in OS X Tutorial
Become an OS X collection view boss! In this tutorial, you’ll learn how to implement drag and drop with collection views, fine-tune selection and highlighting, implement sticky section headers, and more. By Gabriel Miro.
3.4 (5) · 1 Review
Fix the UI
The current implementation of drag-and-drop in SlidesPro doesn't support drop across sections. Also, multi-selection is supported only for a drop outside SlidesPro. To disable in UI, these unsupported capabilities change the else part of the second if statement to:
  func collectionView(collectionView: NSCollectionView, validateDrop draggingInfo: NSDraggingInfo, proposedIndexPath
    proposedDropIndexPath: AutoreleasingUnsafeMutablePointer<NSIndexPath?>, dropOperation proposedDropOperation: UnsafeMutablePointer<NSCollectionViewDropOperation>) -> NSDragOperation {
    if proposedDropOperation.memory == NSCollectionViewDropOperation.On {
      proposedDropOperation.memory = NSCollectionViewDropOperation.Before
    }
    if indexPathsOfItemsBeingDragged == nil {
      return NSDragOperation.Copy
    } else {
      let sectionOfItemBeingDragged = indexPathsOfItemsBeingDragged.first!.section
      // 1
      if let proposedDropsection = proposedDropIndexPath.memory?.section where sectionOfItemBeingDragged == proposedDropsection && indexPathsOfItemsBeingDragged.count == 1 {
        return NSDragOperation.Move
      } else {
        // 2
        return NSDragOperation.None
      }
    }
  }
- The drop is enabled only when the source and target sections match and exactly one item is selected.
- Otherwise, it prevents the drop by returning
.None
Build and run. Try dragging an item from one section to another. The drop indicator does not present itself, meaning a drop is impossible.
Now drag a multi-selection. While inside the bounds of the collection view there is no drop indicator; however, drag it to Finder, and you'll see that a drop is allowed.
More Fun With Selection and Highlighting
In the previous section, you noticed an issue with highlighting.
For the sake of sanity in this discussion, the item being moved will be Item-1. After Item-1 lands at a new position it stays highlighted, and the Add and Remove buttons are enabled, but the selection is empty.
To confirm this is true, select any item -- Item-2. It highlights as expected, but Item-1 stays highlighted. It should have been deselected and the highlight removed when you selected Item-2.
Click anywhere between the items to deselect everything. Item-2's highlight goes away, the Add and Remove buttons are disabled, as they should be for no selection, but Item-1 is still highlighted.
selectionIndexPaths property. To debug, you can insert print statements to show the value of this property.
So what's going wrong here?
Apparently, the collection view successfully deselects Item-1, but the collectionView(_:didDeselectItemsAtIndexPaths: ) delegate method is not called to remove the highlight and disable the buttons.
In NSCollectionView.h, the comments for the above method and its companion for the select action say, "Sent at the end of interactive selection…". Hence, these notifications are sent only when you select/deselect via UI.
Here's your answer, Sherlock: The deselection behavior that should occur when you're moving an item is performed programmatically via the deselectItemsAtIndexPaths(_:) method of NSCollectionView.
You'll need to override this method.
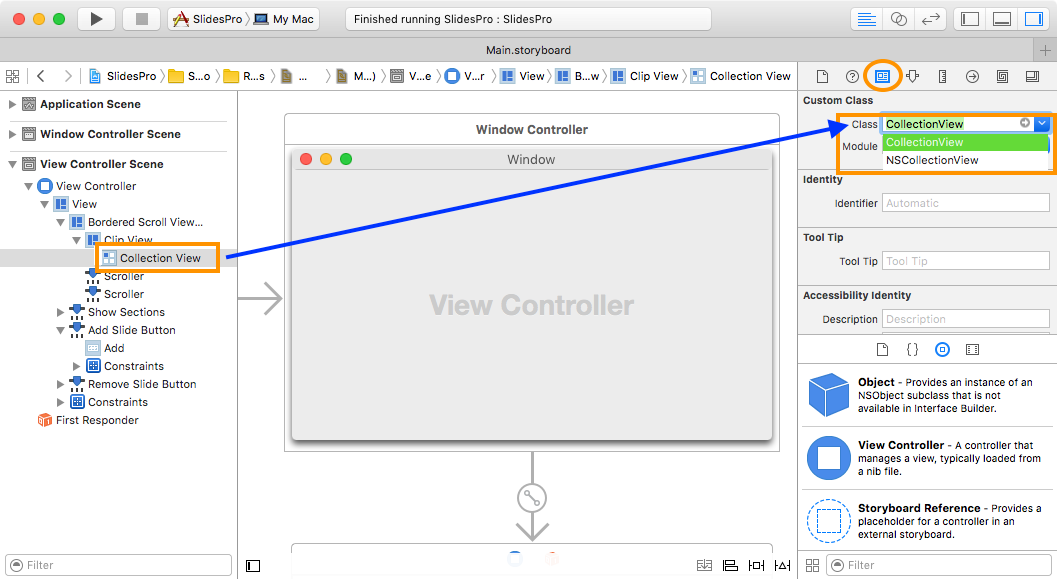
Go to File \ New \ File… and create a new Cocoa Class by the name CollectionView make it a subclass of NSCollectionView and put it in the Views group.
The template may add a drawRect(_:) -- make sure to delete it.

Add the following method to CollectionView:
  override func deselectItemsAtIndexPaths(indexPaths: Set<NSIndexPath>) {
    super.deselectItemsAtIndexPaths(indexPaths)
    let viewController = delegate as! ViewController
    viewController.highlightItems(false, atIndexPaths: indexPaths)
  }
The method calls its super implementation followed by a call to highlightItems(_:atIndexPaths:) of its delegate, allowing ViewController to highlight/unhighlight items and enable/disable buttons respectively.
Open Main.storyboard and select the Collection View. In the Identity Inspector, change Class to CollectionView.
Build and run.
Move an item inside the collection to a different location. Nothing shows as highlighted and buttons disable as expected. Case closed.
Animation in Collection Views
NSCollectionView, as a subclass of NSView, can perform animations via the animator proxy. It's as easy as adding a single word in your code before an operation such as removal of items.
At the end of the removeSlide(_:) method in ViewController, replace this:
collectionView.deleteItemsAtIndexPaths(selectionIndexPaths)
With this:
collectionView.animator().deleteItemsAtIndexPaths(selectionIndexPaths)
Build and run.
Select several items and click the Remove button. Watch as the items glide to take up their new positions on the screen.
The default duration is a quarter of a second. To experience a really cool and beautiful effect, add a setting for the duration of the animation at a higher value. Place it above the line you just added:
    NSAnimationContext.currentContext().duration = 1.0
    collectionView.animator().deleteItemsAtIndexPaths(selectionIndexPaths)
Build and run, and then remove some items. Cool effect, isn't it?
You can do the same for insertItemsAtIndexPaths when you're adding items, as well as for moveItemAtIndexPath when moving an item.
Sticky Headers
When you scroll a collection view with section headers, the first element of a given section that vanishes at the top of the screen is its header.
In this section, you'll implement Sticky Headers, so the top-most section header will pin itself to the top of the collection view. It will hold its position until the next section header bumps it out of the way.

To make this effect reality, you'll subclass NSCollectionViewFlowLayout.
Go to File \ New \ File… and create a new Cocoa Class named StickyHeadersLayout as a subclass of NSCollectionViewFlowLayout, and put it in the Layout group.

In ViewController, change the first line of configureCollectionView() to:
let flowLayout = StickyHeadersLayout()
Now implement sticky headers by adding the following method to the empty body of the StickyHeadersLayout class:
  override func layoutAttributesForElementsInRect(rect: NSRect) -> [NSCollectionViewLayoutAttributes] {

    // 1
    var layoutAttributes = super.layoutAttributesForElementsInRect(rect)

    // 2
    let sectionsToMoveHeaders = NSMutableIndexSet()
    for attributes in layoutAttributes {
      if attributes.representedElementCategory == .Item {
        sectionsToMoveHeaders.addIndex(attributes.indexPath!.section)
      }
    }

    // 3
    for attributes in layoutAttributes {
      if let elementKind = attributes.representedElementKind where elementKind == NSCollectionElementKindSectionHeader {
        sectionsToMoveHeaders.removeIndex(attributes.indexPath!.section)
      }
    }

    // 4
    sectionsToMoveHeaders.enumerateIndexesUsingBlock { (index, stop) -> Void in
      let indexPath = NSIndexPath(forItem: 0, inSection: index)
      let attributes = self.layoutAttributesForSupplementaryViewOfKind(NSCollectionElementKindSectionHeader, atIndexPath: indexPath)
      if attributes != nil {
        layoutAttributes.append(attributes!)
      }
    }

    for attributes in layoutAttributes {
      // 5
      if let elementKind = attributes.representedElementKind where elementKind == NSCollectionElementKindSectionHeader {
        let section = attributes.indexPath!.section
        let attributesForFirstItemInSection = layoutAttributesForItemAtIndexPath(NSIndexPath(forItem: 0, inSection: section))
        let attributesForLastItemInSection = layoutAttributesForItemAtIndexPath(NSIndexPath(forItem: collectionView!.numberOfItemsInSection(section) - 1, inSection: section))
        var frame = attributes.frame

        // 6
        let offset = collectionView!.enclosingScrollView?.documentVisibleRect.origin.y

        // 7
        let minY = CGRectGetMinY(attributesForFirstItemInSection!.frame) - frame.height

        // 8
        let maxY = CGRectGetMaxY(attributesForLastItemInSection!.frame) - frame.height

        // 9
        let y = min(max(offset!, minY), maxY)

        // 10
        frame.origin.y = y
        attributes.frame = frame

        // 11
        attributes.zIndex = 99
      }
    }

    // 12
    return layoutAttributes
  }
Okay, there's a lot happening in there, but it makes sense when you take it section by section:
- The super method returns an array of attributes for the visible elements.
- The
NSMutableIndexSetfirst aggregates all the sections that have at least one visible item. - Remove all sections from the set where the header is already in
layoutAttributes, leaving only the sections with “Missing Headers” in the set. - Request the attributes for the missing headers and add them to
layoutAttributes. - Iterate over
layoutAttributesand process only the headers. - Set the coordinate for the top of the visible area, aka scroll offset.
- Make it so the header never goes further up than one-header-height above the upper bounds of the first item in the section.
- Make it so the header never goes further down than one-header-height above the lower bounds of the last item in the section.
- Let's break this into 2 statements:
-
maybeY = max(offset!, minY): When the top of the section is above the visible area this pins (or pushes down) the header to the top of the visible area. -
y = min(maybeY, maxY): When the space between the bottom of the section to the top of the visible area is less than header height, it shows only the part of the header's bottom that fits this space.
-
- Update the vertical position of the header.
- Make the items "go" under the header.
- Return the updated attributes.
-
maybeY = max(offset!, minY): When the top of the section is above the visible area this pins (or pushes down) the header to the top of the visible area. -
y = min(maybeY, maxY): When the space between the bottom of the section to the top of the visible area is less than header height, it shows only the part of the header's bottom that fits this space.
Add the following method to StickyHeadersLayout:
  override func shouldInvalidateLayoutForBoundsChange(newBounds: CGRect) -> Bool {
    return true
  }
You always return true because you want the to invalidate the layout as the user scrolls.
Build and run.
Scroll the collection to see your sticky headers in action.