CALayer Tutorial for iOS: Getting Started
In this article, you’ll learn about CALayer and how it works. You’ll use CALayer for cool effects like shapes, gradients and particle systems. By Ron Kliffer.
Color Blending With CAGradientLayer
CAGradientLayer makes it easy to blend two or more colors, which makes it especially well suited to backgrounds. You configure it by assigning:
- An array of
CGColors. - A
startPointto specify where the gradient layer should begin. - An
endPointto specify where the gradient layer should end.
Bear in mind that startPoint and endPoint are not explicit points. Rather, you define them in the unit coordinate space and map them to the layer’s bounds when you draw them. In other words:
- An x value of 1 means the point is at the right edge of the layer.
- A y value of 1 means the point is at the bottom edge of the layer.
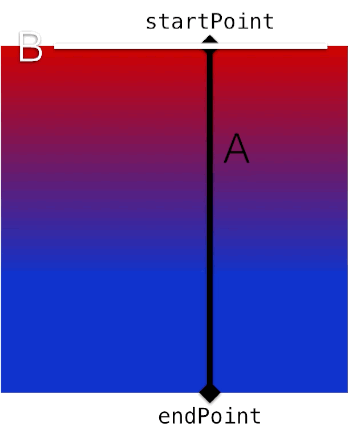
CAGradientLayer has a type property that lets you change the gradient pattern. The default, and most commonly used, is axial (linear). This means that if you draw a line (A) between startPoint and endPoint, the gradations would occur along an imaginary line (B) that is perpendicular to A, and all points along B would be the same color:
Alternatively, you can control the gradient pattern with the locations property. locations takes an array of values between 0 and 1. These values specify relative stops where the gradient layer should use the next color in the colors array. If left unspecified, the stop locations are evenly spaced by default.
locations, its count must match the count of colors or undesirable things will happen. So beware!Open CAGradientLayerViewController.swift and add the following code to setUpGradientLayer():
gradientLayer.frame = viewForGradientLayer.bounds
gradientLayer.colors = colors
gradientLayer.locations = locations.map { NSNumber(value: $0) }
gradientLayer.startPoint = CGPoint(x: 0.5, y: 0.0)
gradientLayer.endPoint = CGPoint(x: 0.5, y: 1.0)
In this code, you assign an array of colors to the layer and you set start and end points.
Build and run, select CAGradientLayer from the menu, and look at the result:

So colorful! Layer Player provides you with controls to change start and end points, colors and locations. Have fun trying them out to see what you get.
For your next step, you’ll add a loading animation to Layer Player.
Creating a Loading Animation with CAReplicatorLayer
CAReplicatorLayer duplicates a layer a specified number of times. This allows you to create some surprisingly cool effects!
Each layer copy can have its own color and positioning changes. And you can delay its drawing to give an animation effect to the overall replicator layer.
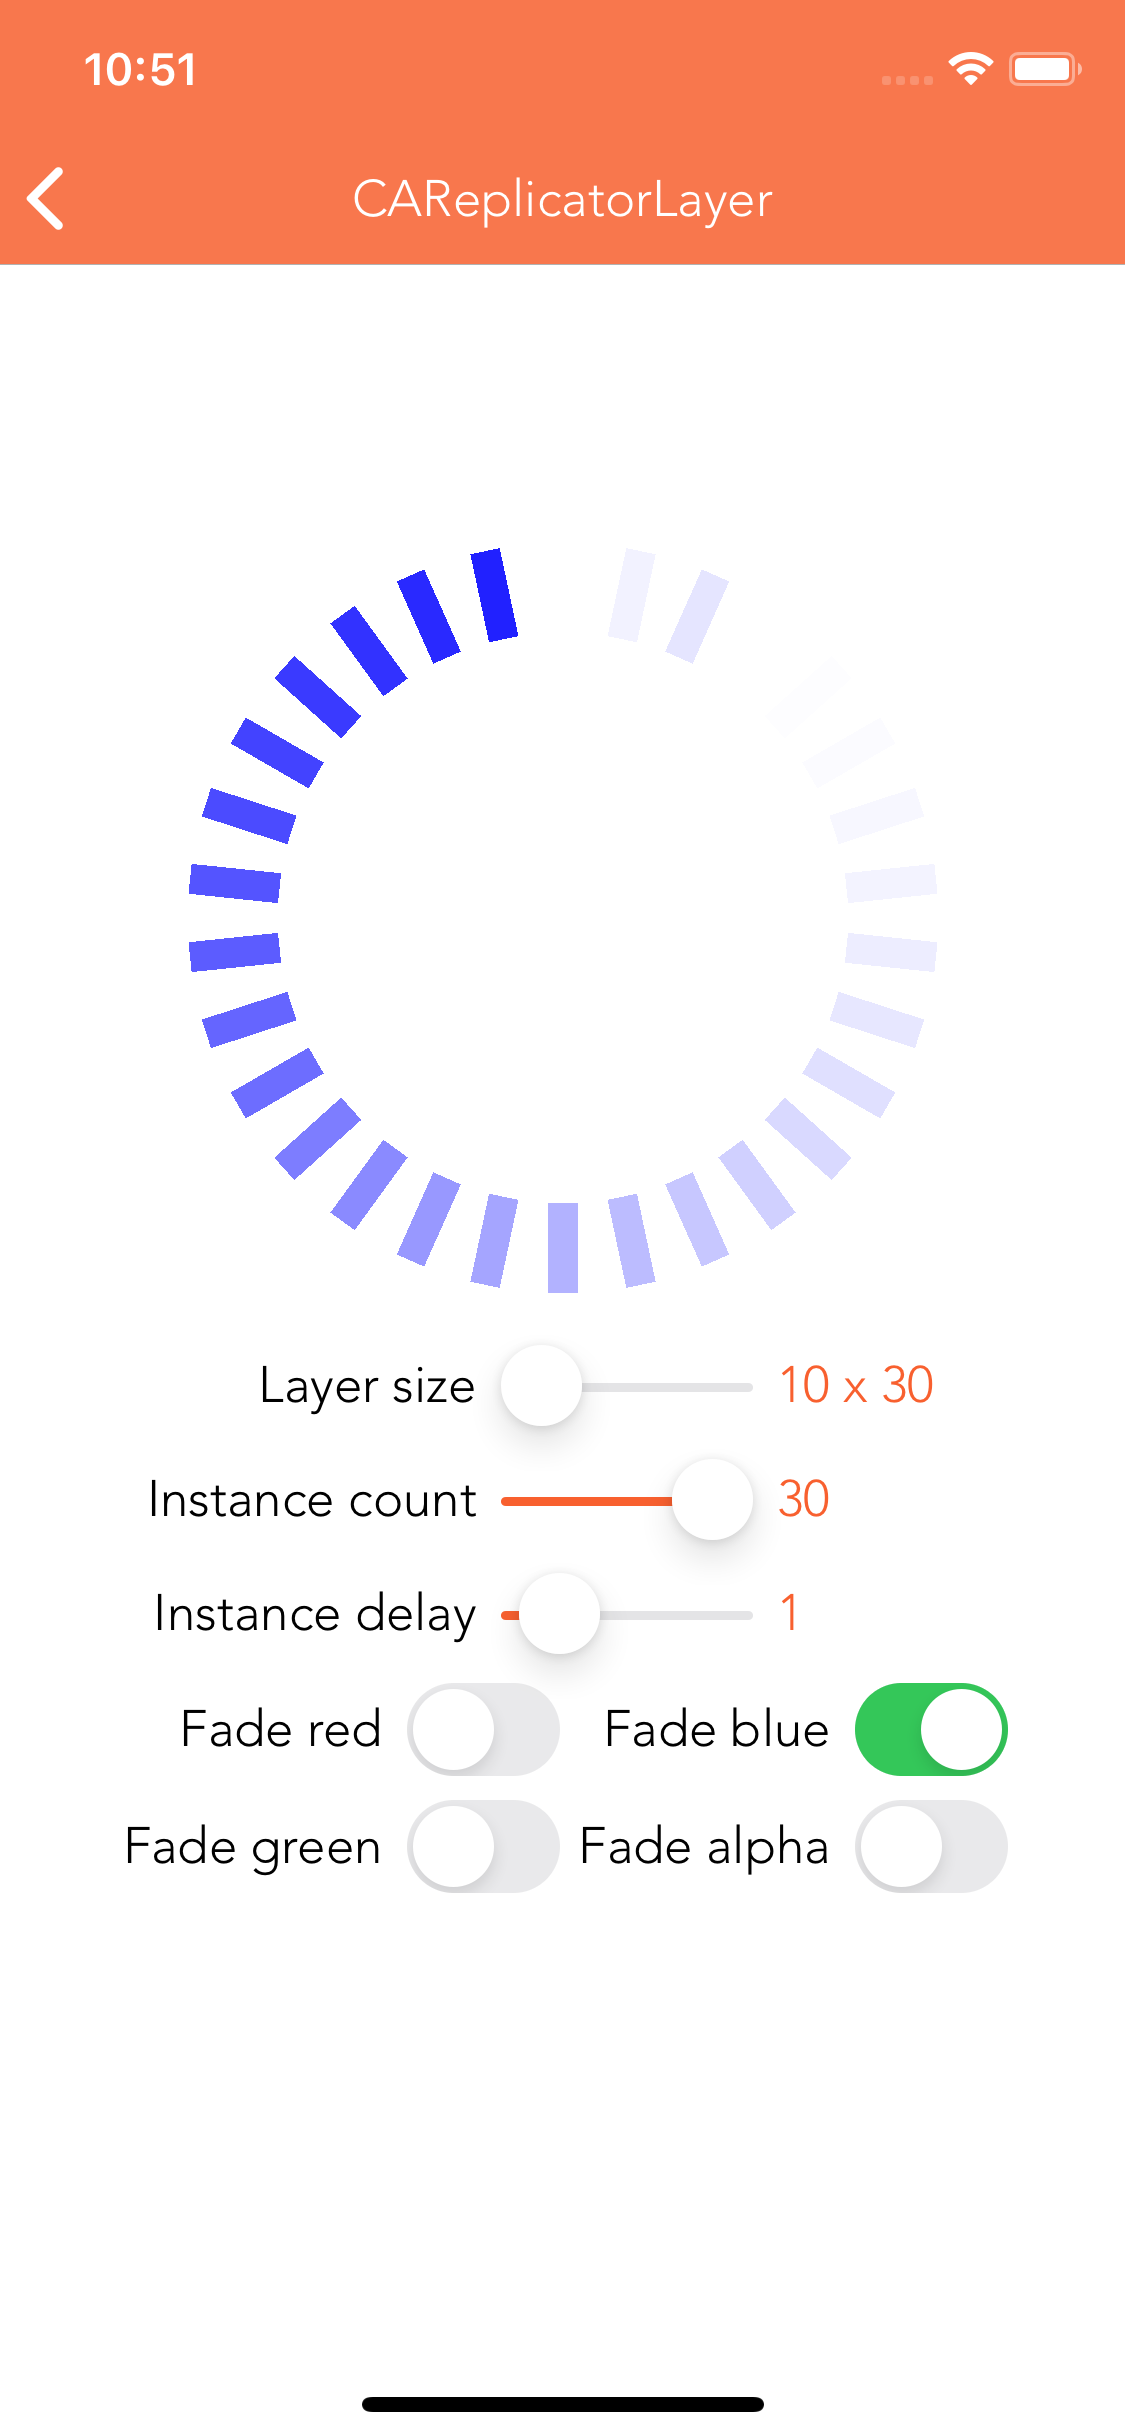
Build and run and select CAReplicatorLayer from the menu. You’ll see several controls… but nothing to control:

You’ll start by configuring the layers to replicate.
Configuring Replicator Layers
Go back to Xcode and open CAReplicatorLayerViewController.swift. There are three methods to fill under // MARK: - Layer setup.
First, add the following to setUpReplicatorLayer():
// 1
replicatorLayer.frame = viewForReplicatorLayer.bounds

// 2
let count = instanceCountSlider.value
replicatorLayer.instanceCount = Int(count)
replicatorLayer.instanceDelay =
  CFTimeInterval(instanceDelaySlider.value / count)

// 3
replicatorLayer.instanceColor = UIColor.white.cgColor
replicatorLayer.instanceRedOffset = offsetValueForSwitch(offsetRedSwitch)
replicatorLayer.instanceGreenOffset = offsetValueForSwitch(offsetGreenSwitch)
replicatorLayer.instanceBlueOffset = offsetValueForSwitch(offsetBlueSwitch)
replicatorLayer.instanceAlphaOffset = offsetValueForSwitch(offsetAlphaSwitch)

//4
let angle = Float.pi * 2.0 / count
replicatorLayer.instanceTransform =
  CATransform3DMakeRotation(CGFloat(angle), 0.0, 0.0, 1.0)

//5
viewForReplicatorLayer.layer.addSublayer(replicatorLayer)
In this code, you configure the instances of a replicator layer:
- First, you set the layer’s frame.
- You set the number of replications to create and the time delay between creations.
- You define the base color for all the replicated instances and the delta value to add to each color component. Each defaults to 0, which effectively preserves color value across all instances. However, in this case, the instance color was originally set to white. This means red, green and blue are 1.0 already. If you set red to 0, for example, and set green and blue to negative numbers, then red would become the prominent color. Similarly, add the alpha offset to the alpha of each successive replicated instance.
- Now, you rotate each instance to create a circle effect.
- Finally, you add the layer to the view’s layer.
Setting Position and Fade
Next, create an instance layer for the replicator layer to use. Add the following to setUpInstanceLayer:
let layerWidth = CGFloat(layerSizeSlider.value)
let midX = viewForReplicatorLayer.bounds.midX - layerWidth / 2.0
instanceLayer.frame = CGRect(
  x: midX,
  y: 0.0,
  width: layerWidth,
  height: layerWidth * lengthMultiplier)
instanceLayer.backgroundColor = UIColor.white.cgColor
replicatorLayer.addSublayer(instanceLayer)
This code sets the instance frame. Here, the first instance will be drawn at center x and at the top of viewForReplicatorLayer‘s bounds. You then set the instance’s color and add the instance layer to the replicator layer.
Now for the fade animation. Add the following to setUpLayerFadeAnimation:
fadeAnimation.fromValue = 1.0
fadeAnimation.toValue = 0.0
fadeAnimation.repeatCount = Float(Int.max)
Here, you use fadeAnimation, a CABasicAnimation, to change the instance’s opacity from 1 (opaque) to 0 (transparent).
Build and run and enjoy what your code now does:
Layer Player includes controls to manipulate most of these properties. Change the values and see how they affect the animation!
Now that you’ve created a fun animated circle, you’ll use another property of CALayer to draw a star.
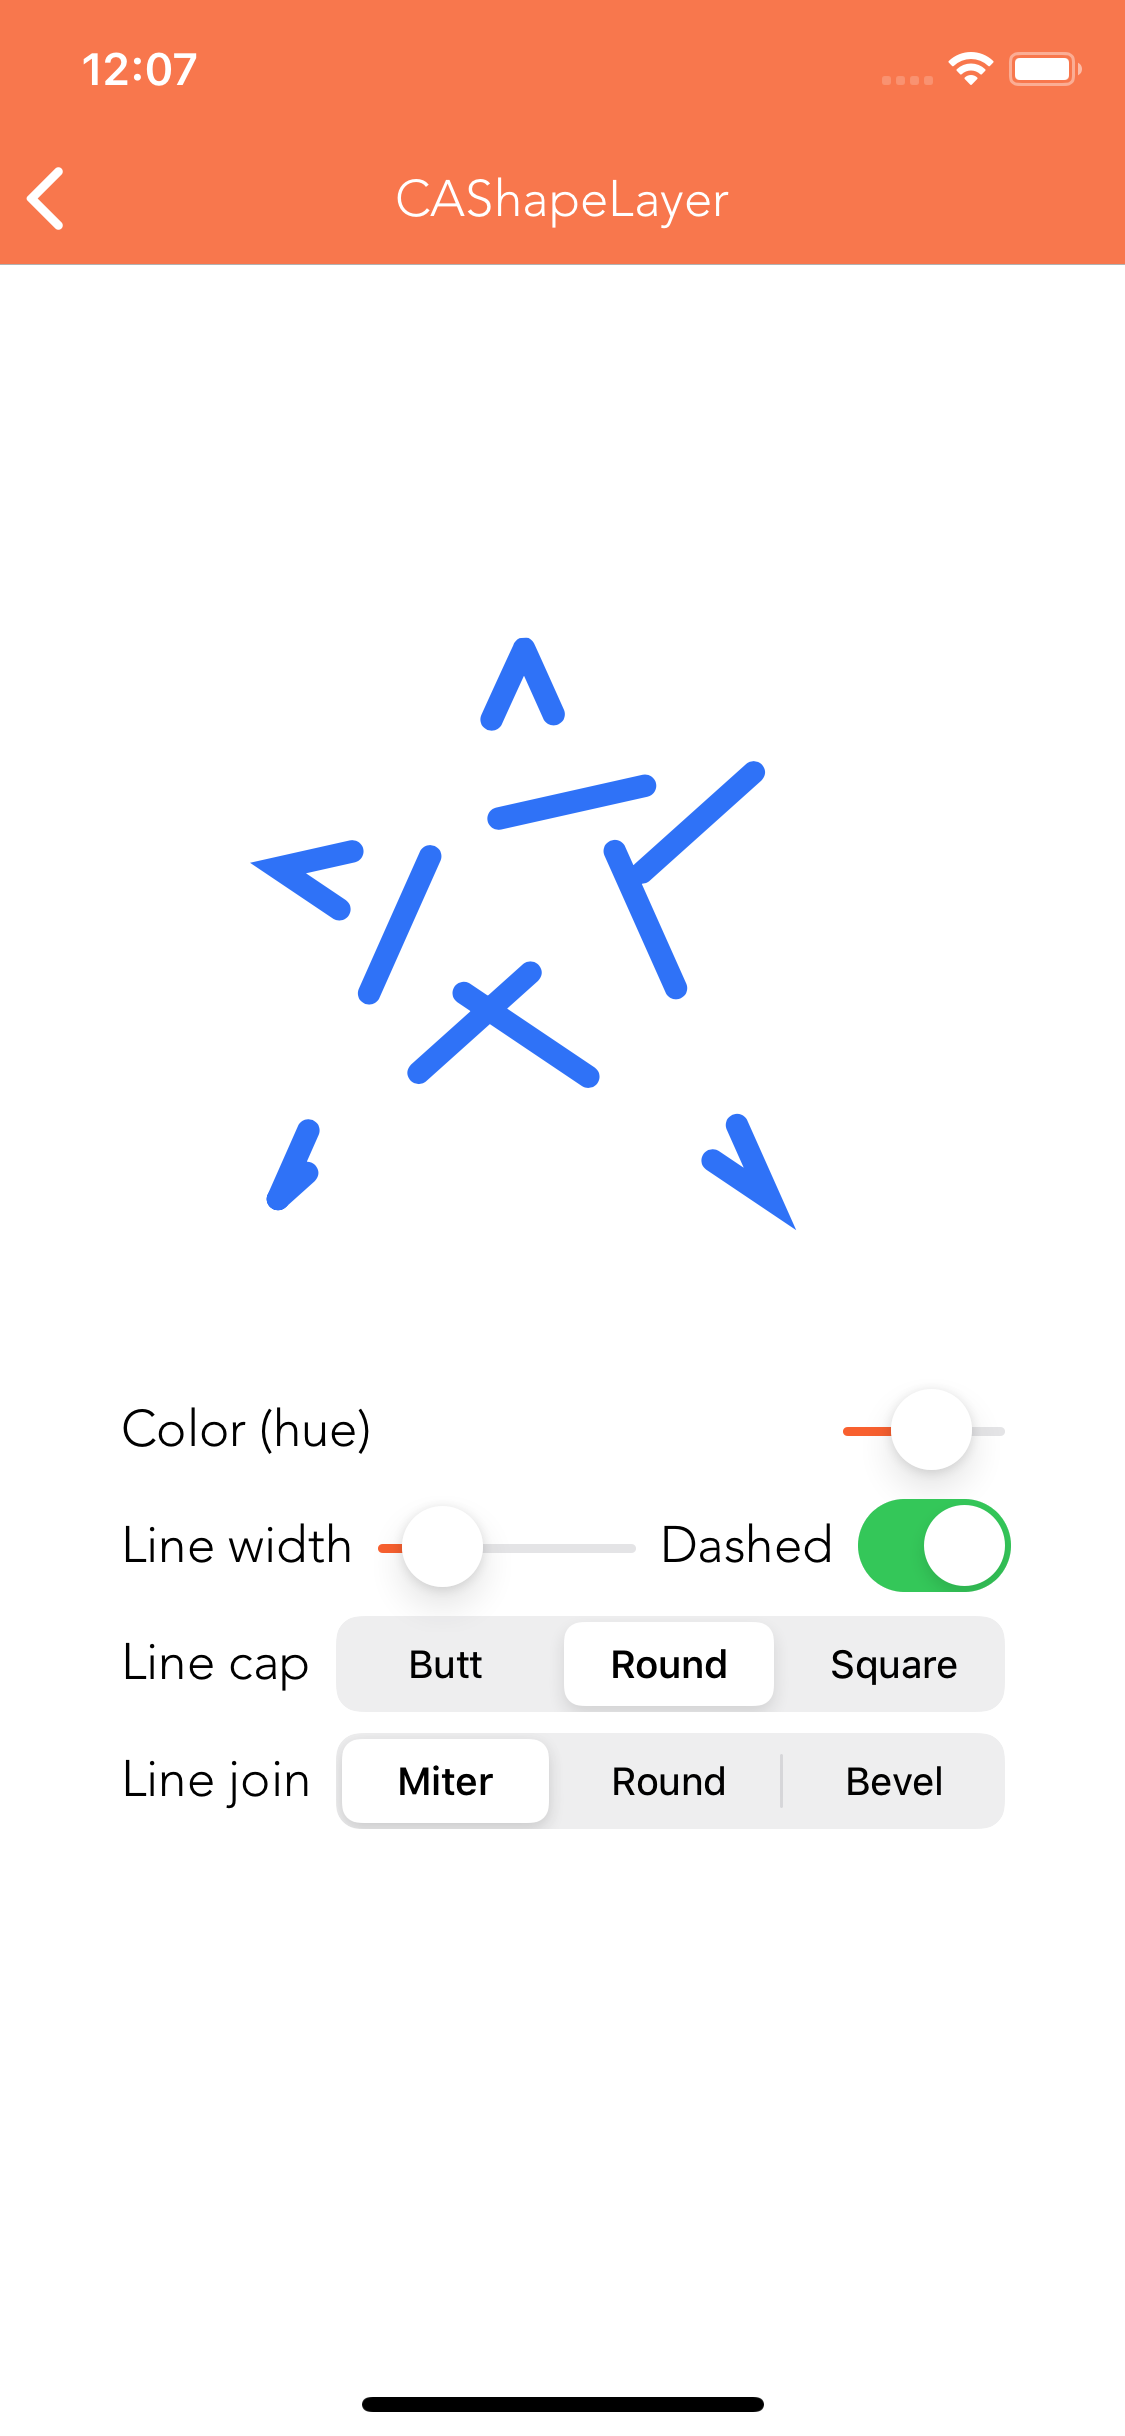
Drawing a Star With CAShapeLayer
CAShapeLayer uses scalable vector paths to draw lines, shapes and patterns — and it’s much faster than using images! Another benefit is that you don’t need to provide images at regular, @2x and @3x sizes. Hooray!
Additionally, you have a variety of properties at your disposal to customize your graphics. For example, you can adjust line thickness, color, dashing and specify how the lines join. And when your lines make shapes, you can change how they’re filled.
Now it’s time to draw an orange star! First, Open CAShapeLayerViewController.swift and add the following to setUpShapeLayer():
// 1
shapeLayer.path = openPath.cgPath

// 2
shapeLayer.lineCap = .butt
shapeLayer.lineJoin = .miter
shapeLayer.miterLimit = 4.0

// 3
shapeLayer.lineWidth = CGFloat(lineWidthSlider.value)
shapeLayer.strokeColor = swiftOrangeColor.cgColor
shapeLayer.fillColor = UIColor.white.cgColor

// 4
shapeLayer.lineDashPattern = nil
shapeLayer.lineDashPhase = 0.0

viewForShapeLayer.layer.addSublayer(shapeLayer)
Going through this:
-
CAShapeLayertakes aCGPaththat defines how to draw it on the screen. You’ll draw that path soon. -
lineJoinandlineCapdefine how lines in the path intersect and end. - Set the path line width and color.
-
lineDashPatternandlineDashPhaseallow you to draw dashed lines. In this case, you’ll draw simple lines without dashes.
Next you’ll draw the path itself. Add the following to setUpPath():
openPath.move(to: CGPoint(x: 30, y: 196))

openPath.addCurve(
  to: CGPoint(x: 112.0, y: 12.5),
  controlPoint1: CGPoint(x: 110.56, y: 13.79),
  controlPoint2: CGPoint(x: 112.07, y: 13.01))

openPath.addCurve(
  to: CGPoint(x: 194, y: 196),
  controlPoint1: CGPoint(x: 111.9, y: 11.81),
  controlPoint2: CGPoint(x: 194, y: 196))

openPath.addLine(to: CGPoint(x: 30.0, y: 85.68))
openPath.addLine(to: CGPoint(x: 194.0, y: 48.91))
openPath.addLine(to: CGPoint(x: 30, y: 196))
This draws your star shape.
Build and run and select CAShapeLayer to see the result:
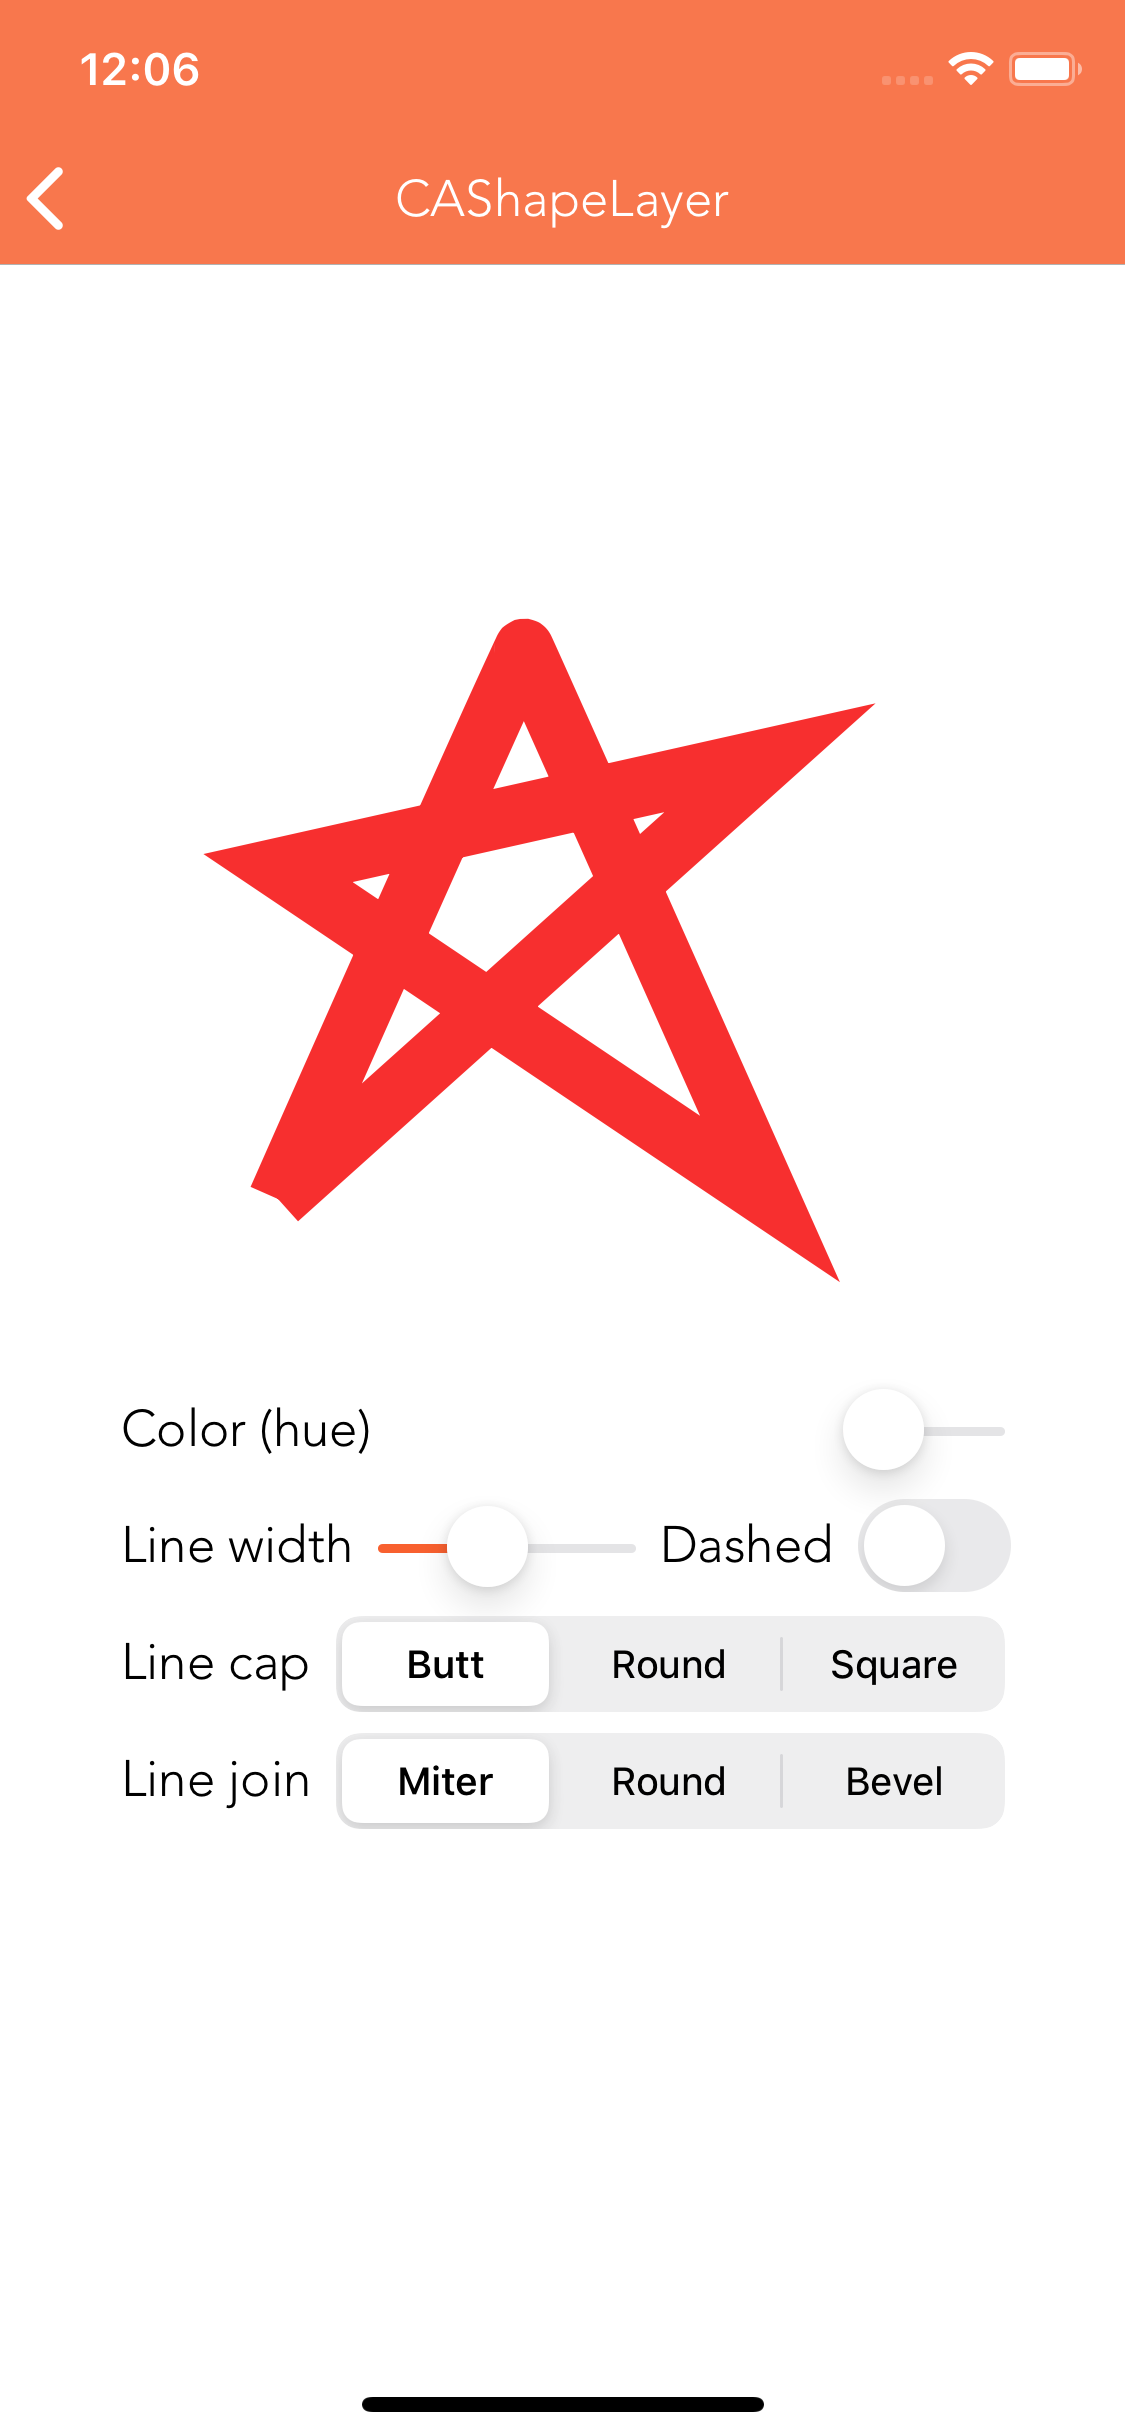
Layer Player includes controls to manipulate many of CAShapeLayer‘s properties. Play with these controls to adjust your star:
CALayer doesn’t only let you draw 2D figures, but 3D shapes as well. That’s what you’ll do in the next section.