Regular Expressions Tutorial: Getting Started
In this tutorial, you’ll learn how to implement regular expressions in an iOS app using Swift 4.2. By Tom Elliott.
Validating Data
Many apps will have some kind of user input, such as a user entering an email address or phone number. You’ll want to perform some level of data validation on this user input, both to ensure data integrity and to inform the user of any mistakes entering the data.
Regular expressions are perfect for many kinds of data validation since they are excellent at pattern matching.
There are two things you need to add to your app: the validation patterns themselves and a mechanism to validate the user’s input with those patterns.
As an exercise, try to come up with the regular expressions to validate the following text strings (don’t worry about case sensitivity):
- First name: Should consist of standard English letters and between 1 and 10 characters in length.
- Middle initial: Should consist of one single English letter.
- Last name: Should consist of standard English letters plus the apostrophe (for names such as O’Brian), the hyphen (for names such as Randell-Nash) and be between two and 20 characters in length.
- Super Villain name: Should consist of Standard English letters, plus the apostrophe, the period, the hyphen, digits and spaces, as well as between two and 20 characters in length. This allows names such as Ra’s al Ghul, Two-Face and Mr. Freeze.
- Password: Should have at least eight characters, including one uppercase character, one lowercase character, one number and one character that isn’t a letter or digit. This one is tricky!
Of course, you can use the iRegex playground in your materials folder to try out your expressions as you develop them.
How did you do with coming up with the required regular expressions? If you’re stuck, just go back to the cheat sheet at the top of this tutorial and look for the bits that will help you in the scenarios above.
The spoiler below shows the regular expressions you’ll use. But do try to figure them out yourself first and check your results before reading further!
[spoiler]
  "^[a-z]{1,10}$",    // First name
  "^[a-z]$",          // Middle Initial
  "^[a-z'\\-]{2,20}$",  // Last Name
  "^[a-z0-9'.\\-\\s]{2,20}$"  // Super Villain name
  "^(?=\\P{Ll}*\\p{Ll})(?=\\P{Lu}*\\p{Lu})(?=\\P{N}*\\p{N})(?=[\\p{L}\\p{N}]*[^\\p{L}\\p{N}])[\\s\\S]{8,}$" // Password validator
[/spoiler]
Open AccountViewController.swift and add the following code to viewDidLoad():
textFields = [
  firstNameField,
  middleInitialField,
  lastNameField,
  superVillianNameField,
  passwordField
]

let patterns = [ "^[a-z]{1,10}$",
                 "^[a-z]$",
                 "^[a-z'\\-]{2,20}$",
                 "^[a-z0-9'.\\-\\s]{2,20}$",
                 "^(?=\\P{Ll}*\\p{Ll})(?=\\P{Lu}*\\p{Lu})(?=\\P{N}*\\p{N})(?=[\\p{L}\\p{N}]*[^\\p{L}\\p{N}])[\\s\\S]{8,}$" ]

  regexes = patterns.map {
    do {
      let regex = try NSRegularExpression(pattern: $0, options: .caseInsensitive)
      return regex
    } catch {
      #if targetEnvironment(simulator)
      fatalError("Error initializing regular expressions. Exiting.")
      #else
      return nil
      #endif
    }
  }
This creates an array of the text fields in the view controller and an array of string patterns. It then uses Swift’s map function to create an array of NSRegularExpression objects, one for each pattern. If creating the regular expressions from the patterns fails, you fatalError in the Simulator so you can catch it quickly when developing the app, but ignore in production as you don’t want your app to crash for your users!
To create the regular expression to validate the first name, you first match from the beginning of the string. Then, you match a range of characters from A-Z before finally matching the end of the string ensuring that it is between one to 10 characters in length.
The next two patterns — middle initial and last name — follow the same logic. In case of the middle initial, you don’t need to specify the length — {1} — since ^[a-z]$ matches on one character by default. The super villain name pattern is also similar but starting to look a bit more complicated as you add in support for the special characters: apostrophe, hyphen, and period.
Note that you’re not worrying about case sensitivity, here — you’ll take care of that when instantiating the regular expression.
Now, what about that password validator? It’s important to stress that this is simply an exercise to show how regexes can be used and you really shouldn’t use this in a real-world app!
With that said, how does it actually work? First, a reminder on some regex theory:
- (Parentheses) define a capture group that groups together part of your regular expression.
- When a capture group starts with
?=, this denotes that the group is to be used as a positive lookahead, matching the previous pattern only if it is followed by the pattern in the capture group. For example,A(?=B)matches an A, but only if followed by a B. Lookahead is an assertion like^or$, and doesn’t consume any characters itself. -
\p{}matches Unicode characters within a certain category, and\P{}matches Unicode characters not in a certain category. A category might be, for example, all letters (\p{L}), all lowercase letters (\p{Lu}) or numbers (\p{N}).
Using these, break down the regex itself:
-
^and$match the beginning and end of a line, as is usual. -
(?=\P{Ll}*\p{Ll})match (but doesn’t consume) any number of non-lowercase Unicode characters followed by a lowercase Unicode character, in effect matching a string with at least one lowercase character. -
(?=\P{Lu}*\p{Lu})follows a similar pattern to above, but ensures at least one uppercase character. -
(?=\P{N}*\p{N})ensures at least one digit. -
(?=[\p{L}\p{N}]*[^\p{L}\p{N}])ensures at least one character that isn’t a letter or digit by using the carat (^) to negate a pattern. - And finally,
[\s\S]{8,}matches any character eight or more times by matching whitespace or non-whitespace characters.
Phew! Well done!
You can get very creative with regular expressions. There are other ways to solve the above problem, such as using \d instead of [0-9]. However, any solution is perfectly fine as long as it works!
Now that you have the patterns, you need to validate the entered text in each of the text fields.
Still in AccountViewController.swift, find validate(string:withRegex:) and replace the dummy implementation with the following:
let range = NSRange(string.startIndex..., in: string)
let matchRange = regex.rangeOfFirstMatch(
  in: string,
  options: .reportProgress,
  range: range
)
return matchRange.location != NSNotFound
And, directly underneath, in validateTextField(_:), add the following implementation:
let index = textFields.index(of: textField)
if let regex = regexes[index!] {
  if let text = textField.text?.trimmingCharacters(in: .whitespacesAndNewlines) {
    let valid = validate(string: text, withRegex: regex)

    textField.textColor = (valid) ? .trueColor : .falseColor
  }
}
This is very similar to what you did in SearchViewController.swift. Starting off in validateTextField(_:), you grab the relevant regex from the regexes array and trim any whitespace off the user’s input for the text field.
Then, in validate(string:withRegex:) you create a range for the whole text and check for a match by testing the result of rangeOfFirstMatch(in:options:range:). This is probably the most efficient way to check for a match, since this call exits early when it finds the first match. However, there are other alternatives such as numberOfMatches(in:options:range:) if you need to know the total number of matches.
Finally, in allTextFieldsAreValid() replace the dummy implementation with:
for (index, textField) in textFields.enumerated() {
  if let regex = regexes[index] {
    if let text = textField.text?.trimmingCharacters(in: .whitespacesAndNewlines) {
      let valid = text.isEmpty || validate(string: text, withRegex: regex)

      if !valid {
        return false
      }
    }
  }
}

return true
Using the same validate(string:withRegex:) method from above, this method simply tests if every non-empty text field is valid.
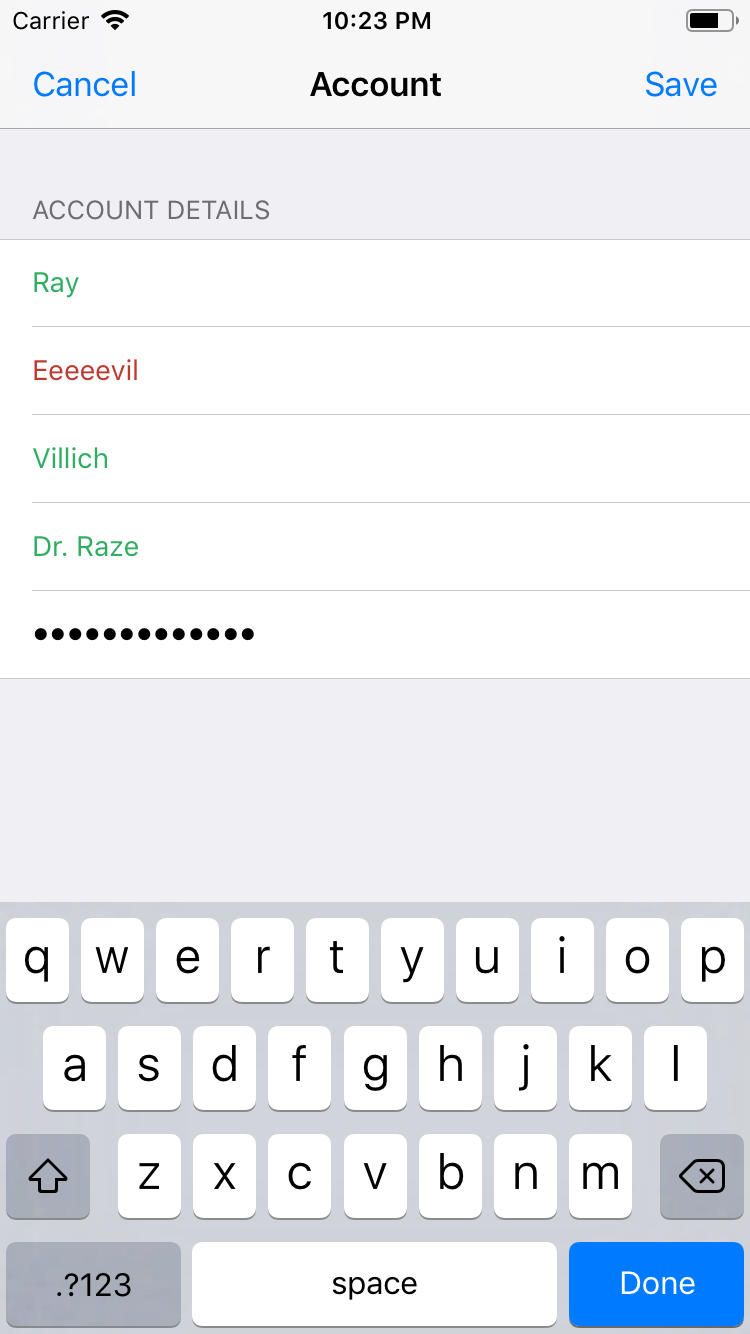
Run the project, click on the Account icon button at the top-left, and try entering some information into the sign-up form. When you complete each field, you should see its text turn green or red depending on whether or not it’s valid, as in the screen shot below:
Try and save your account. Notice that you can only do this when all the text fields validate correctly. Relaunch the app. This time, when the app starts up, you are presented with a sign-up form before you can see the secret plans in the diary. Type in the password you just created and click Login.
loginAction in LoginViewController only checks the password as stored on the device rather than stored securely on a server. This is not secure in any way.