How to Create a Simple Game in Unreal Engine 4
In this Unreal Engine 4 tutorial, you will create a first-person endless game. You will learn how to generate random obstacles and restart the game. By Tommy Tran.
4.1 (49) · 1 Review
Spawning Subsequent Tunnels
Add a SpawnTunnelAtSpawnPoint node and connect it to the Is Valid pin of the IsValid node.

Here is the final graph:
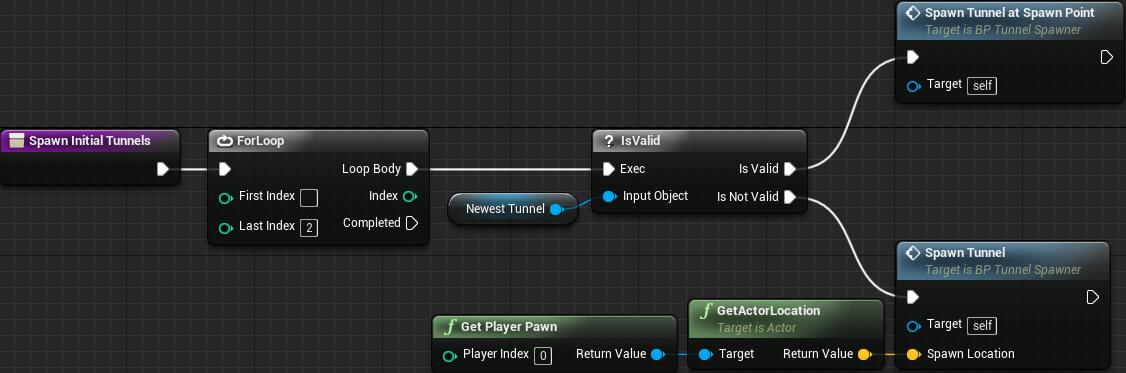
Summary:
- The ForLoop node will execute a total of three times
- On the first loop, it will spawn a tunnel at the player’s location
- During the subsequent loops, it will spawn a tunnel at the SpawnPoint of the newest tunnel
Next, go to the Event Graph and delete the SpawnTunnel node. Afterwards, add a SpawnInitialTunnels node after Event BeginPlay.

Now, when the game starts, it will spawn three tunnels.
Click Compile, go back to the main editor and then press Play. The tunnel is now much longer!

The game isn’t very challenging at the moment so let’s add some obstacles.
Creating Obstacles
Here are the meshes you will use as obstacles:

Open BP_Tunnel and go to the Components panel. Add a Static Mesh component and name it WallMesh.
Go to the Details panel and change its Static Mesh property to SM_Hole_01.
Next, set its Location property to (2470, 0, 0). This will place it at the end of the tunnel.

To make the game more interesting, the walls will also be rotating. Add a new Float variable and name it RotateSpeed. Set the Default Value to 30.
Switch to the Event Graph and locate the Event Tick node. Create the following setup:

This will make WallMesh rotate every frame by the supplied amount.
Click Compile and then go back to the main editor. Press Play to see the spinning walls.

Let’s spice it up by adding some variations to the walls.
Creating Wall Variations
Instead of creating a new Blueprint for every variation, you can just randomize WallMesh.
Open BP_Tunnel and create a new function called RandomizeWall. Afterwards, create the following graph:

As its name suggests, the Set Static Mesh node will set WallMesh to the supplied mesh.
To make a list of static meshes, you can use a Select node.
Left-click and drag the New Mesh pin. Release left-click on an empty area and then add a Select node.

The Select node allows you to set a list of options. The Index input determines what option the Select node outputs.
Since there are four wall meshes available, you need to create two more Option pins. You can do this by right-clicking the Select node and selecting Add Option Pin. Do this until you have four Option pins.

Next, set each option to the following:
- Option 0: SM_Hole_01
- Option 1: SM_Hole_02
- Option 2: SM_Hole_03
- Option 3: SM_Hole_04

Now, let’s select a random option.
Randomizing the Wall
You can use a Random Integer in Range node to get a random number. This node will return a value that is >= Min and <= Max.
Add a Random Integer in Range node and connect it to the Index pin of the Select node.

Set the Max value to 3. This will give you four possible numbers: 0, 1, 2 and 3.

To create a bit more randomization, let’s add a random rotation to WallMesh. Add the following after the Set Static Mesh node:

This will add a random rotation between 0 and 360 degrees to WallMesh.
Here is the final graph:
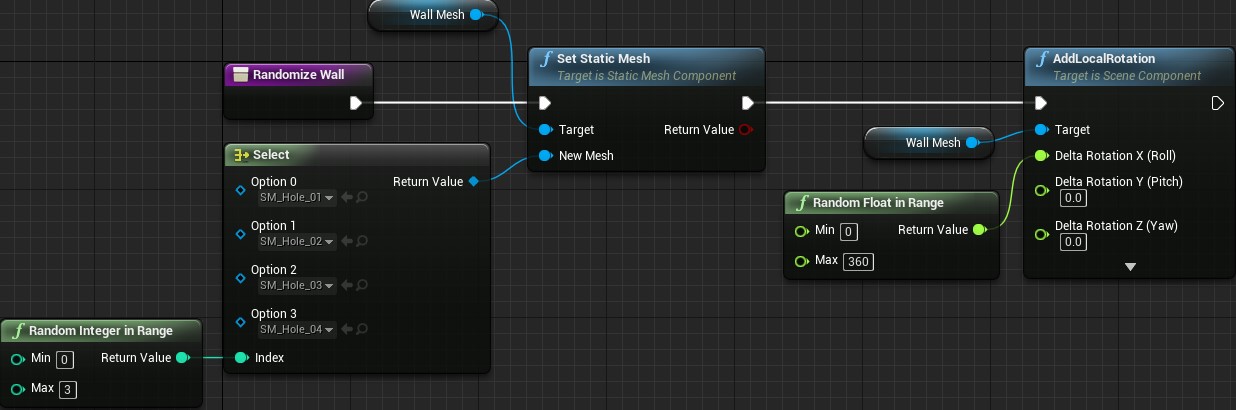
Summary:
- The Select node provides a list of meshes
- A random mesh is chosen using the Random Integer in Range node
- The Set Static Mesh node sets the WallMesh to the chosen mesh
- The AddLocalRotation node adds a random rotation offset to WallMesh
Click Compile and then close the RandomizeWall graph.
Switch to BP_TunnelSpawner and open the SpawnTunnel graph. Add the highlighted node:

Now, whenever a tunnel spawns, it will have a random wall mesh.
Close the SpawnTunnel graph and then click Compile. Go back to the main editor and press Play to see all the wall variations!

If you hit a wall, you will stop moving forward. However, if you move around and go through a hole, you will start moving forward again.
The next step is to disable forward movement when the player collides with a wall.
Handling Wall Collisions
To enable or disable forward movement, you can use a Boolean variable. These only have two states: true and false.
Open BP_Player and then create a new Boolean variable named IsDead.
Next, go to the Event Tick node and create a Branch node.
Afterwards, get a reference to IsDead and connect it to the Condition pin of the Branch node.

Connect the Event Tick node to the Branch node. Afterwards, connect the False pin of the Branch node to the AddActorWorldOffset node.
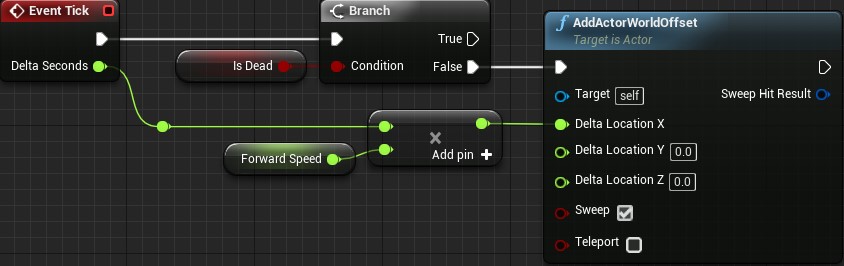
Now, whenever IsDead is set to true, the player will stop moving forward.
Next, let’s set the IsDead variable when the player hits a wall.
Setting the IsDead Variable
Click Compile and then switch to BP_Tunnel. In the Components panel, right-click on WallMesh and select Add Event\Add OnComponentHit. This will add the following node to your Event Graph:

This node will execute whenever another Actor collides with WallMesh.
First, you need to check if the Actor that collided with WallMesh is the player.
Left-click and drag the Other Actor pin. Release left-click on an empty area and select Cast to BP_Player from the menu.

Next, left-click and drag the BP_Player pin of the Cast to BP_Player node. Release left-click on an empty space and then add a Set Is Dead node.
Set IsDead to true by left-clicking the checkbox.

Click Compile and then go back to the main editor. Press Play and try hitting a wall. If you move around to a hole, you will no longer move through it.

In the next section, you will display a restart button when the player hits a wall.
Displaying a Restart Button
The widget that you will display is named WBP_Restart. You can find it in the UI folder. This is what it looks like:

To display or hide the widget, you need a reference to it. Open BP_Player and then create a new variable named RestartWidget. Change the Variable Type to WBP_Restart\Object Reference.

Next, go to the Event Graph and locate the Event BeginPlay node.
Add a Create Widget node and set the Class value to WBP_Restart.
Afterwards, add a Set Restart Widget node and then connect everything like so:

Now, when the player spawns, it will create an instance of WBP_Restart. The next step is to make a function that displays this instance.