Core Graphics Tutorial: Arcs and Paths
In this tutorial, you’ll learn how to draw arcs and paths. In particular, you’ll enhance each footer of a grouped table view by adding a neat arc on the bottom, a linear gradient and a shadow that fits the curve of the arc. All of that by using the power of Core Graphics! By Lorenzo Boaro.
Drawing Arcs and Creating Paths
The first thing you add is a way to convert degrees to radians. To do it, you’ll use the Foundation Units and Measurements APIs introduced by Apple in iOS 10 and macOS 10.12.
Open Extensions.swift and paste the following code at the end of the file:
typealias Angle = Measurement<UnitAngle>

extension Measurement where UnitType == UnitAngle {
  init(degrees: Double) {
    self.init(value: degrees, unit: .degrees)
  }

  func toRadians() -> Double {
    return converted(to: .radians).value
  }
}
In the code above, you define an extension on the Measurement type restricting its usage to angle units. init(degrees:) only works with angles in terms of degrees. toRadians() allows you to convert degrees to radiants.
radians = degrees * π / 180.Remaining in Extensions.swift file, find the extension block for CGContext. Before its last curly brace, paste the following code:
static func createArcPathFromBottom(
  of rect: CGRect,
  arcHeight: CGFloat,
  startAngle: Angle,
  endAngle: Angle
) -> CGPath {
  // 1
  let arcRect = CGRect(
    x: rect.origin.x,
    y: rect.origin.y + rect.height,
    width: rect.width,
    height: arcHeight)

  // 2
  let arcRadius = (arcRect.height / 2) + pow(arcRect.width, 2) / (8 * arcRect.height)
  let arcCenter = CGPoint(
    x: arcRect.origin.x + arcRect.width / 2,
    y: arcRect.origin.y + arcRadius)
  let angle = acos(arcRect.width / (2 * arcRadius))
  let startAngle = CGFloat(startAngle.toRadians()) + angle
  let endAngle = CGFloat(endAngle.toRadians()) - angle

  let path = CGMutablePath()
  // 3
  path.addArc(
    center: arcCenter,
    radius: arcRadius,
    startAngle: startAngle,
    endAngle: endAngle,
    clockwise: false)
  path.addLine(to: CGPoint(x: rect.maxX, y: rect.minY))
  path.addLine(to: CGPoint(x: rect.minX, y: rect.minY))
  path.addLine(to: CGPoint(x: rect.minY, y: rect.maxY))
  // 4
  return path.copy()!
}
There’s quite a bit going on here, so this is how it breaks down:
- This function takes a rectangle of the entire area and a float of how big the arc should be. Remember, the arc should be at the bottom of the rectangle. You calculate
arcRectgiven those two values. - Then, you figure out the radius, center, start and end angles with the math discussed above.
- Next, you create the path. The path will consist of the arc and the lines around the edges of the rectangle above the arc.
- Finally, you return immutable copy of the path. You don’t want the path to be modified from outside the function.
CGContext extension, createArcPathFromBottom(of:arcHeight:startAngle:endAngle:) returns a CGPath. This is because the path will be reused many times. More on that later.Now that you have a helper method to draw arcs in place, it’s time to replace your rectangular footer with your new curvy, arced one.
Open CustomFooter.swift and replace draw(_:) with the following code:
override func draw(_ rect: CGRect) {
  let context = UIGraphicsGetCurrentContext()!

  let footerRect = CGRect(
    x: bounds.origin.x,
    y: bounds.origin.y,
    width: bounds.width,
    height: bounds.height)

  var arcRect = footerRect
  arcRect.size.height = 8

  context.saveGState()
  let arcPath = CGContext.createArcPathFromBottom(
    of: arcRect,
    arcHeight: 4,
    startAngle: Angle(degrees: 180),
    endAngle: Angle(degrees: 360))
  context.addPath(arcPath)
  context.clip()

  context.drawLinearGradient(
    rect: footerRect,
    startColor: .rwLightGray,
    endColor: .rwDarkGray)
  context.restoreGState()
}
After the customary Core Graphics setup, you create a bounding box for the entire footer area and the area where you want the arc to be.
Then, you get the arc path by calling createArcPathFromBottom(of:arcHeight:startAngle:endAngle:), the static method you just wrote. You can then add the path to your context and clip to that path.
All further drawing will be restricted to that path. Then, you can use drawLinearGradient(rect:startColor:endColor:) found in Extensions.swift to draw a gradient from light gray to darker gray.
Again, build and run the app. If all works correctly, you should see the following screen:

Looks decent, but you need to polish it up a bit more.
Clipping, Paths and the Even-Odd Rule
In CustomFooter.swift add the following to the bottom of draw(_:):
context.addRect(footerRect)
context.addPath(arcPath)
context.clip(using: .evenOdd)
context.addPath(arcPath)
context.setShadow(
  offset: CGSize(width: 0, height: 2),
  blur: 3,
  color: UIColor.rwShadow.cgColor)
context.fillPath()
OK, there’s a new, and very important, concept going on here.
To draw a shadow, you enable shadow drawing, then fill a path. Core Graphics will then fill the path and also draw the appropriate shadow underneath.
But you’ve already filled the path with a gradient, so you don’t want to overwrite that area with a color.
Well, that sounds like a job for clipping! You can set up clipping so that Core Graphics will only draw in the portion outside the footer area. Then, you can tell it to fill the footer area and draw the shadow. Since its clipped, the footer area fill will be ignored, but the shadow will show through.
But you don’t have a path for this — the only path you have is for the footer area, not the outside.
You can easily get a path for the outside based on the inside through a neat ability of Core Graphics. You simply add more than one path to the context and then add clipping using a specific rule provided by Core Graphics.
When you add more than one path to a context, Core Graphics needs some way to determine which points should and shouldn’t be filled. For example, you could have a donut shape where the outside is filled but the inside is empty, or a donut-hole shape where the inside is filled but the outside is empty.
You can specify different algorithms to let Core Graphics know how to handle this. The algorithm you’ll use in this tutorial is EO, or even-odd.
In EO, for any given point, Core Graphics will draw a line from that point to the outside of the drawing area. If that line crosses an odd number of points, it will be filled. If it crosses an even number of points, it will not be filled.
Here’s a diagram showing this from the Quartz2D Programming Guide:
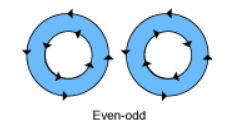
So, by calling the EO variant, you’re telling Core Graphics that, even though you’ve added two paths to the context, it should treat it as one path following the EO rule. So, the outside part, which is the entire footer rect, should be filled, but the inner part, which is the arc path, should not. You tell Core Graphics to clip to that path and only draw in the outside area.
Once you have the clipping area set up, you add the path for the arc, set up the shadow and fill the arc. Of course, since it’s clipped, nothing will actually be filled, but the shadow will still be drawn in the outside area!
Build and run the project and, if all goes well, you should now see a shadow underneath the footer:

Congratulations! You’ve created custom table view footers using Core Graphics!