Real-Time Communication with Streams Tutorial for iOS
Get down to TCP-level networking and learn about sockets and how to use Core Foundation to build a real-time chat app in this iOS streams tutorial. By Brody Eller.
Handling the Incoming Messages
Here, you’ve set yourself up to do something with the incoming events related to Stream. The event you’re really interested in is .hasBytesAvailable, since it indicates there’s an incoming message to read.
Next, you’ll write a method to handle these incoming messages. Below the method you just added, add:
private func readAvailableBytes(stream: InputStream) {
  //1
  let buffer = UnsafeMutablePointer<UInt8>.allocate(capacity: maxReadLength)

  //2
  while stream.hasBytesAvailable {
    //3
    let numberOfBytesRead = inputStream.read(buffer, maxLength: maxReadLength)

    //4
    if numberOfBytesRead < 0, let error = stream.streamError {
      print(error)
      break
    }

    // Construct the Message object
  }
}
- First, you set up a buffer into which you can read the incoming bytes.
- Next, you loop for as long as the input stream has bytes to read.
- At each point, you'll call
read(_:maxLength:), which will read bytes from the stream and put them into the buffer you pass in. - If the call to read returns a negative value, some error occurred and you exit.
You need to call this method in the case where the input stream has bytes available, so go to .hasBytesAvailable in the switch statement inside stream(_:handle:) and call the method you're working on below the print statement.
readAvailableBytes(stream: aStream as! InputStream)
At this point, you've got a sweet buffer full of bytes!
Before you finish this method, you'll need to write another helper to turn the buffer into a Message object.
Put the following method definition below readAvailableBytes(stream:).
private func processedMessageString(buffer: UnsafeMutablePointer<UInt8>,
                                    length: Int) -> Message? {
  //1
  guard
    let stringArray = String(
      bytesNoCopy: buffer,
      length: length,
      encoding: .utf8,
      freeWhenDone: true)?.components(separatedBy: ":"),
    let name = stringArray.first,
    let message = stringArray.last
    else {
      return nil
  }
  //2
  let messageSender: MessageSender =
    (name == self.username) ? .ourself : .someoneElse
  //3
  return Message(message: message, messageSender: messageSender, username: name)
}
- First, you initialize a
Stringusing the buffer and length that's passed in. You treat the text as UTF-8, tellStringto free the buffer of bytes when it's done with them and then split the incoming message on the : character, so you can treat the sender's name and the message as separate strings. - Next, you figure out if you or someone else sent the message based on the name. In a production app, you'd want to use some kind of unique token, but for now, this is good enough.
- Lastly, you construct a
Messagewith the parts you've gathered and return it.
To use your Message construction method, add the following if-let to the end of the while loop in readAvailableBytes(stream:), right underneath the last comment:
if let message =
    processedMessageString(buffer: buffer, length: numberOfBytesRead) {
  // Notify interested parties
}
At this point, you're all set to pass Message off to someone... but who?
Creating the ChatRoomDelegate Protocol
Well, you really want to tell ChatRoomViewController.swift about the new message, but you don't have a reference to it. Since it holds a strong reference to ChatRoom, you don't want to explicitly create a circular dependency and make a ChatRoomViewController.
This is the perfect time to set up a delegate protocol. ChatRoom doesn't care what kind of object wants to know about new messages, it just wants to tell someone.
At the top of ChatRoom.swift, add the simple protocol definition:
protocol ChatRoomDelegate: class {
  func received(message: Message)
}
Next, to the top of the ChatRoom class, add a weak optional property to hold a reference to whomever decides to become the ChatRoom's delegate:
weak var delegate: ChatRoomDelegate?
Now, you can go back to ChatRoom.swift and complete readAvailableBytes(stream:) by adding the following inside the if-let for message, underneath the last comment in the method:
delegate?.received(message: message)
To finish, go back to ChatRoomViewController.swift and add the following extension, which conforms to this protocol, right below MessageInputDelegate:
extension ChatRoomViewController: ChatRoomDelegate {
  func received(message: Message) {
    insertNewMessageCell(message)
  }
}
The starter project includes the rest of the plumbing for you, so insertNewMessageCell(_:) will take your message and add the appropriate cell to the table.
Now, assign the view controller to be chatRoom's delegate by adding the following line right after the call to super in viewWillAppear(_:):
chatRoom.delegate = self
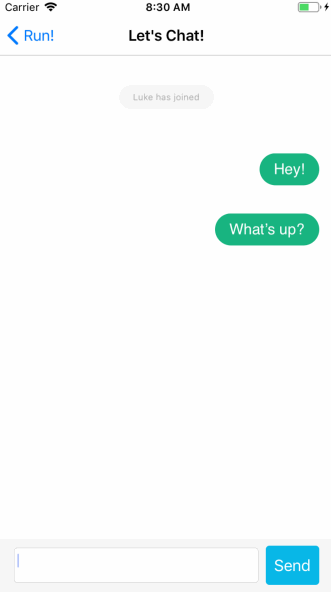
Once again, build and run your app and enter your name into the text field, then tap return.

🎉 The chat room now successfully shows a cell stating that you've entered the room. You've officially sent a message to and received a message from a socket-based TCP server.
Sending Messages
Now that you've set up ChatRoom to send and receive messages, it's time to allow users to send actual text back and forth.
In ChatRoom.swift, add the following method to the bottom of the class definition:
func send(message: String) {
  let data = "msg:\(message)".data(using: .utf8)!

  _ = data.withUnsafeBytes {
    guard let pointer = $0.baseAddress?.assumingMemoryBound(to: UInt8.self) else {
      print("Error joining chat")
      return
    }
    outputStream.write(pointer, maxLength: data.count)
  }
}
This method is just like joinChat(username:), which you wrote earlier, except that it prepends msg to the text you send to denote it as an actual message.
Since you want to send messages when the inputBar tells the ChatRoomViewController that the user has tapped Send, go back to ChatRoomViewController.swift and find MessageInputDelegate.
Here, you'll see an empty method called sendWasTapped(message:) that gets called at just such a time. To send the message, pass it along to the chatRoom:
chatRoom.send(message: message)
And that's all there is to it! Since the server will receive this message and then forward it to everyone, ChatRoom gets notified of a new message the same way as when you join the room.
Build and run your app, then go ahead and try the messaging out for yourself.

If you want to see someone chatting back, go to a new Terminal window and enter:
nc localhost 80
This will allow you to connect to the TCP server on the command line. Now, you can issue the same commands the app uses to chat from there.
iam:gregg
Then, send a message:
msg:Ay mang, wut's good?
Congrats, you've successfully written a chat client!