Cocos2D-X Tutorial for iOS and Android: Getting Started
In this Cocos2D-X tutorial, you’ll learn how to use Cocos2D-X and C++ to produce a cross-platform “Hello World” app that will run under both iOS and Android. By .
Update 5/13/2013 Fully updated for Cocos2D-X 2.1 and iOS 6. (original post by Jean-Yves Mengant, update by Jorge Jordán).
Cocos2D is an amazing and easy to use framework, but since it’s written in Objective-C you can only write games with it for iOS and the Mac.
Wouldn’t it be great if you could use the same easy to use Cocos2D API, but have it run on Android as well? This way you could greatly extend the market for your app, without adding a lot of extra work!
Well, this is possible with the Cocos2D-X game framework! Cocos2D-X is a C++ port of the Cocos2D API, so you can use the API you know and love. And since it’s in C++, it works on many platforms – from iOS to Android to Windows to Linux and more!
In this Cocos2D-X tutorial, you’ll learn how to use Cocos2D-X and C++ to produce a cross-platform “Hello World” app that will run under both iOS and Android.
And in a few days, I’ll post a follow-up Cocos2D-X tutorial that will show you a practical game example – a cross platform space shooter!
So grab your iPhone and/or Android device, and let’s get started!
Hello, Cocos2D-X for iOS!
Before you go any further, make sure you download the latest version of Cocos2D-X.
Unzip the file in to a folder somewhere on your hard drive. Note the full path to that folder – it will be referred as $COCOS2DX_HOME.
Now that you’ve got the code, let’s install the templates! You can do this with a script that’s inside $COCOS2DX_HOME. To run it, just quit Xcode, open a shell terminal and type:
cd $COCOS2DX_HOME
./install-templates-xcode.sh -f -u
Note: In the above, for the first line, you need to replace $COCOS2DX_HOME with the actual path to where you extracted the files. Simply typing in $COCOS2DX_HOME as part of the command will do nothing.
The installation will simply proceed without any further intervention from you. Once the templates are installed, run Xcode and create a New Project. You should see a new Cocos2d-x temples section in the project template dialog. Don’t worry, the Cocos2d-X templates don’t conflict with the classic Cocos2D templates, so you can continue to create new projects using Cocos2D, when needed.
Let’s try the new templates out! Open up Xcode (4.6 if using the last version) and create a new project, selecting the iOS\cocos2d-x\cocos2dx template:
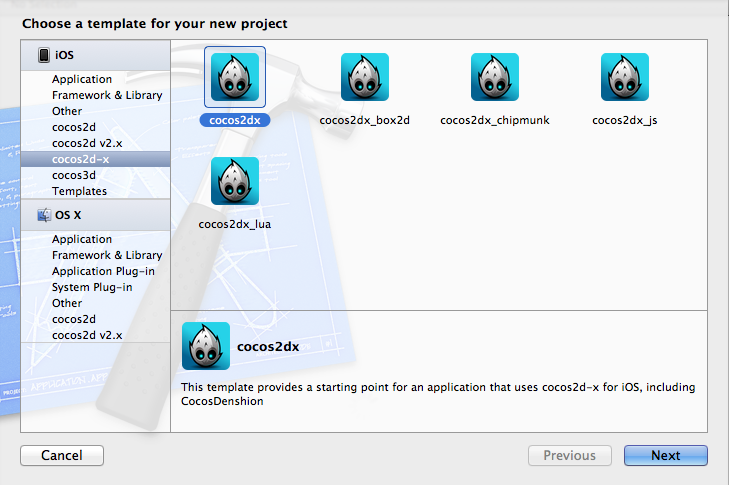
Click Next, name the project Cocos2DxFirstIosSample, choose iPhone for Device Family, click Next and then click Create.
Now press the Run button to see the Cocos2d-x Hello World app running:

Pretty easy, eh? While you’re at it, take a look at the project files in Xcode – particularly Classes\HelloWorldScene.h and Classes\HelloWorldScene.cpp. If you’re familiar with Cocos2D, this should look familiar to you – the same Cocos2D API, but in C++!
Setting up Eclipse for Cocos2D-X Development
You’re now done with the Xcode setup part and you need to have a look at the Android Cocos2D-X configuration with Eclipse.
This Cocos2D-X tutorial assumes that you have a fully-functional Android Eclipse standard development environment. If you don’t, follow through the Getting Started With Android Development tutorial first, which provides a step-by-step guide to setting up a dedicated Eclipse Android development platform.
But wait… A standard Eclipse Android environment is dedicated to Java development only, and Cocos2D-X is based on C++!
Don’t worry, Eclipse has been around for 10 years, so there are tons of plugins out there to extend its core functionality beyond just Java development.
This includes some plugins for C/C++ development! Let’s install them now. Open up Eclipse and perform the following steps:
- From the Eclipse IDE main toolbar, go to Help/Install New Software
- Open the Work with combo box and select the item containing your Eclipse version name (Juno if using the last version of Eclipse).
- Find Programming Languages in the plugin tree (you’ll only see the plugin tree if you checked the Group items by category checkbox – otherwise, you might have to search the list a bit …) and check C/C++ Development Tools.
- Click Next and walk through the rest of the wizard, and wait for the components to download and install. At the end of the install process Eclipse will ask you to restart, click Yes.
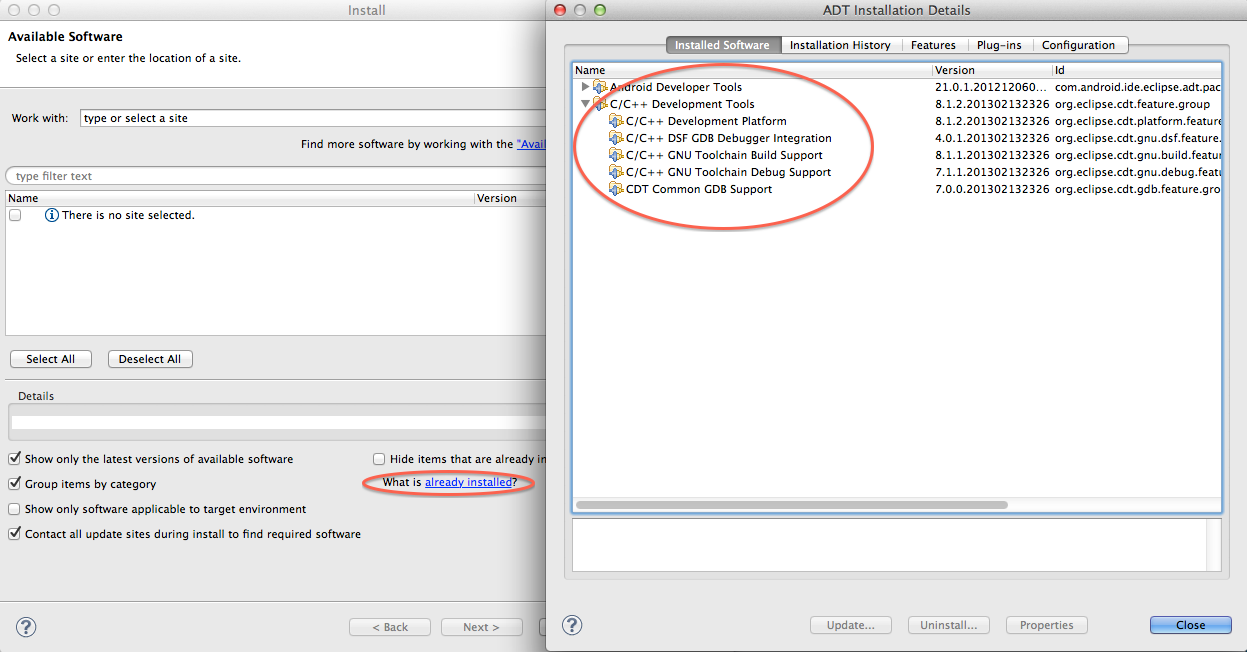
- To ensure that the installation was successful, from the Eclipse IDE main toolbar, go to Help/Install New Software
- Select the already installed link and check the installation of the following components.
You will now be able to develop C/C++ projects using Eclipse!
Setup the Android NDK (Native Development Toolkit)
Initially, Android development was done exclusively in Java, and most of the Android apps on the market today are Java-based.
However, these days you can write Android apps in C/C++ with the Native Development Toolkit (NDK)! This was introduced by Google in June 2009 as a way to allow components written in C/C++ to be accessed via the standard Java Native Interface (JNI).
Installing the NDK is straightforward:
- Download the latest version of the NDK here (choose the MacOSX platform).
- Unzip the tar.bz2 file to the location of your choice. This location will be referred from now on as $NDKROOT.
The NDK brings to the Android environment a C/C++ compilation toolchain, able to cleanly compile/link (using the GCC 4.7 compiler) and build a ready-to-install APK-signed package.
Having this compilation toolchain in place allows you to integrate external C/C++ libraries (like Cocos2d-x) into Eclipse. These libraries, compiled as external dynamic libraries bound inside an APK, communicate with the “legacy Java Android architecture” though the JNI (Java Native Interface).
The compilation toolchain can be used in two ways :
- Standalone mode: uses the arm-linux-androideabi-g++ directly in your custom make file. This will increase your project complexity/maintainability. I recommend you avoid this mode unless you have no alternative.
- Integrated mode: uses the $NDKROOT/ndk-build shell tool, which is a highly-customized make file dedicated to NDK library builds. This is the preferred way to go and the mode you will use in this Cocos2D-X tutorial.
Explaining the JNI and NDK would take too long, and is out of the scope of this Cocos2D-X tutorial. There is a lot of documentation about JNI available on the web. The only book seriously covering this topic is available for free here.
If you need more information about the NDK, there is a very good book available that covers NDK C/C++ development: Android Native Development Kit Beginner’s Guide by Sylvain Ratabouil. This book covers NDK programming in depth and should rather be called “From Beginner to Expert.”
The NDK itself also comes with very detailed documentation, located under $NDKROOT/docs.