How to Integrate AdWhirl into a Cocos2D Game
This is a blog post by iOS Tutorial Team member Ibrahim Kteish, a student inspired by the iPhone with a passion for creating iOS software, and the cofounder of istockplus.com. If you want to make an ad-based game, your first thought might be “well, I’ll just enable iAd!” Although iAd is a great ad network […] By .
Creating an AdWhirl Account
It’s easy to get started with AdWhirl. Simply visit adwhirl.com and click the “Sign Up Now” button:

You’re then presented with a sign up page. Simply fill in the text fields with your data, enter the captcha, and select the checkbox, as shown below:

Once you’ve clicked register you will get a message saying to check your email as shown in the next screenshot:
Go ahead and find the email sent to you, click the link, and you will get a confirmation message as shown below:

Click log in, and fill in the dialog boxes to log into your new account. You’ll arrive at a page where you can add and track your applications:

Congrats, you now have an AdWhirl account! Let’s go ahead and an app next.
Adding an App
From the Apps tab, you can see all of the apps that you’ve integrated with AdWhirl.
Click the Add Application button to add a new app, as shown in the next screenshot:

You’ll then be presented with the following page:

Enter the name and App Store URL of your app (if your app isn’t released yet, you can leave the URL field blank), and choose iPhone for the Platform field.
Optionally, you can set additional preferences of how ads should display in this app:
- Refresh Rate: determines how many seconds before a new ad appears.
- Transition Animation: describes how to execute an animation from the old state to the new state over time.
- Allow Location Access: if this is on, will ask allow AdWhirl to attempt to get location data for the user. The problem is this will cause a popup to the user asking if it’s OK for the app to get their location, and if the app doesn’t need it this will be suspicious and annoying to the user.
For this tutorial, let’s leave all of those options at the default settings. Click Add App, and your app will be created in the AdWhirl system (you might have to refresh the page):

Click on the app name that you just created, and you’ll see the app’s SDK key listed to the right of its name:
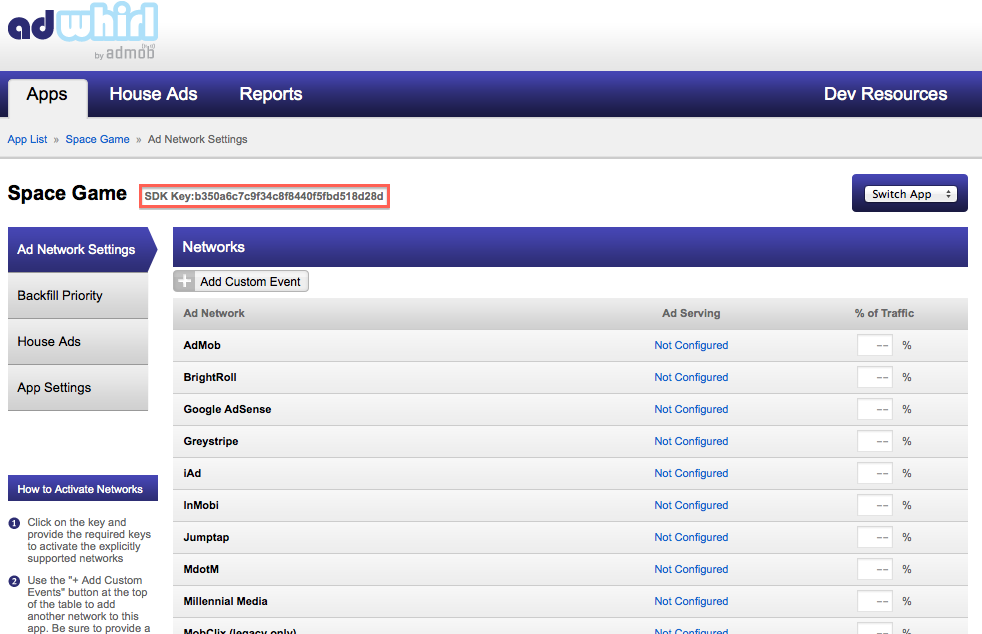
This key is quite important – you’ll be pasting this into the SDK code to identify your app to AdWhirl’s servers.
Configuring Ad Networks
The next step is to configure the parameters for each ad network that you want to serve ads to your app. In this tutorial, we’re just going to configure the AdMob and iAd accounts we set up, but you can enable more ad networks if you want in your own apps!
Let’s start by setting up AdMob. Find the AdMob entry, click the Configure button next to it, and you’ll be prompted to enter your AdMob publisher ID. Enter the Publisher ID you get from earlier in the tutorial:

Next find the iAd entry, click the Configure button next to it, and you’ll be prompted to enter your Apple ID. Enter your Apple ID to continue:

Once you’ve done this, you can turn the network on or off using the On-Off button, and choose the percent of traffic that you want to assign to each network as the next screenshot shown (AdMob On iAd Off).

The way this works is AdWhirl chooses an ad network based on the traffic allocation percentages you’ve applied. When it’s time to serve an add, these allocation percentages tell AdWhirl where to send ad requests on the first attempt. If an ad request fails, AdWhirl will try another network according to the backfill priorities you set (which we’ll configure in a minute), one after another until an ad is found or the list is exhausted.
Note that even if a network has a 0% allocation, it may still get some requests through backfill. To ensure that no ad requests ever go to a network, make sure to switch it off using the On-Off button.

Note that your allocation percentages must add up to 100% before you’ll be able to save these settings as next screenshot shown.

As always when you are done with Ad Network Settings, click on Save changes.
Last but not least, go to Backfill priority as shown in the screenshot below – you’ll use this page to tell AdWhirl what priorities to follow in case an initial ad request is unfilled by one of your networks. AdWhirl uses low numbers to represent high priority:

Creating House Ads
House Ads (formerly known as custom ads) are ads of your own creation that you display in your apps. You can use these to cross-promote your other apps, apps of your friends, or anything else you might want to use them for.
To create a House Ad in your AdWhirl account, click the House Ads tab along the top of the screen App as shown in the next screenshot.

Click the “Add House Ad” button and the next screenshot appears:

Fill in the information as you desire. After creating your ad, be sure to go back to your Ad Network Settings screen, turn on House Ads, and edit the traffic percentages and backfill priority as you would like.
Integrating the AdWhirl SDK
At this point, you should have the AdMob SDK (if you don’t, you can get it by clicking “Get Publisher Code” from your Space Game app settings in AdMob, or download it here).
But you haven’t downloaded the AdWhirl SDK yet, so go ahead and download it now. Obviously choose the iPhone SDK, as shown below:

We’re going to integrate AdWhirl into one of the tutorials from this site – specifically the game from the Space Shooter tutorial. If you purchased the Space Game Starter Kit you will be particularly happy we chose this game to base it on, since it will be really easy apply this tutorial to the Starter Kit! :]
So go ahead and download the space game from the tutorial. Unzip and run it in Xcode and make sure everything is working properly. Note that this game requires the accelerometer, so you might want to try it on your device if you want to play.
Next, go ahead and unzip the AdWhirl SDK. Once you unzip the file, drag only the AdWhirl subfolder into the group in your project. Verify that “Copy items into destination group’s folder (if needed)” is checked, and click Add as shown in the next screenshot.

Once you’ve added the AdWhirl folder to your project Add the following frameworks as shown in the next screenshot:
- AddressBook.framework
- CoreLocation.framework
- MapKit.framework (weak-linked for OS 2.X support)
- MediaPlayer.framework
- MessageUI.framework (weak-linked for OS 2.X support)
- SystemConfiguration.framework
- iAd.framework (required for iAd, weak-linked for OS 3.X support)
- libsqlite3.dylib
- libz.dylib

The final step is to remove the adapters in AdWhirl/adapters that we don’t need. Open that folder and remove all of the files except for the ones we need (iAd, AdMobs, and AdNetworkAdapter), as shown below:

Now that we have the AdWhirl SDK brought into your project, let’s bring in the AdMob SDK. Unzip the file, and drag the GoogleAdMobAdsSDK folder into the space game project. Make sure “Copy items into destination group’s folder (if needed)” is selected, and click Finish, as shown in the next screenshot:

Compile and run your project on your device to make sure everything works so far, and finally let’s start coding!
Using the AdWhirl SDK
Open HelloWorldLayer.h and make the following modifications:
// Add to top of file
#import "AdWhirlView.h"
#import "AdWhirlDelegateProtocol.h"
#import "AppDelegate.h"
#import "RootViewController.h"

enum GameStatePP {
    kGameStatePlaying,
    kGameStatePaused
};

// Mark class as implementing AdWhirlDelegate
@interface HelloWorldLayer : CCLayer <AdWhirlDelegate>

// Add inside @interface
RootViewController *viewController;
AdWhirlView *adWhirlView;

enum GameStatePP _state;

// Add after @interface
@property(nonatomic,retain) AdWhirlView *adWhirlView;
@property(nonatomic) enum GameStatePP state;
Here we import the header files we need for AdWhirl, and the AppDelegate and RootViewController (since we’ll be adding a view to the view controller to display the ad view).
Then we create an enumeration called GameStatePP to keep track of the two different game states we’re going to have – playing or paused.
We also mark the class as implementing AdWhirlDelegate, and create some instance variables and properties.
Next, switch to HelloWorldLayer.m and make the following modifications:
// Add after @implementation
@synthesize state = _state, adWhirlView;

// Add at end of init
self.state = kGameStatePlaying;

// Add in dealloc
self.adWhirlView.delegate = nil;
self.adWhirlView = nil;
This is just the basic setup code to synthesize our properties, initialize the game state, and cleanup in dealloc. Time to move onto the fun stuff!
Implementing AdWhirlDelegate
Now we will implement the Adwirl Delegate methods. Go to the end of HelloWorldLayer.m and the following 2 methods before the @end :
- (void)adWhirlWillPresentFullScreenModal {

    if (self.state == kGameStatePlaying) {

        [[SimpleAudioEngine sharedEngine] pauseBackgroundMusic];

        [[CCDirector sharedDirector] pause];
    }
}

- (void)adWhirlDidDismissFullScreenModal {

    if (self.state == kGameStatePaused)
        return;

    else {
        self.state = kGameStatePlaying;
        [[SimpleAudioEngine sharedEngine] resumeBackgroundMusic];
        [[CCDirector sharedDirector] resume];

    }
}
The first method is called when an ad is about to presented full-screen. Since we don’t want to mess up the player’s game, we pause the game here while the ad displays. Note we check here to see if the game is already paused before attempting to pause.
The second method is called when the user closes the ad, so it resumes the game if it is paused.
Next, let’s implement the methods to return the adWhirl application key and the view controller AdWhirl will present its ads in. Add the following methods next:
- (NSString *)adWhirlApplicationKey {
    return @"xxxxxxxxxxxxxxxxxxxxxxxxxxxxxxxx";
}

- (UIViewController *)viewControllerForPresentingModalView {
    return viewController;
}
Replace the “xxx” in the adWhirlApplicationKey with the application key you got from AdWhirl (under “SDK Key”).
Next, implement the following methods to respond to receiving an ad and displaying it in the proper orientation:
-(void)adjustAdSize {
	//1
	[UIView beginAnimations:@"AdResize" context:nil];
	[UIView setAnimationDuration:0.2];
	//2
	CGSize adSize = [adWhirlView actualAdSize];
	//3
	CGRect newFrame = adWhirlView.frame;
	//4
	newFrame.size.height = adSize.height;

   	//5
    CGSize winSize = [CCDirector sharedDirector].winSize;
    //6
	newFrame.size.width = winSize.width;
	//7
	newFrame.origin.x = (self.adWhirlView.bounds.size.width - adSize.width)/2;

    //8
	newFrame.origin.y = (winSize.height - adSize.height);
	//9
	adWhirlView.frame = newFrame;
	//10
	[UIView commitAnimations];
}

- (void)adWhirlDidReceiveAd:(AdWhirlView *)adWhirlVieww {
    //1
    [adWhirlView rotateToOrientation:UIInterfaceOrientationLandscapeRight];
	//2
    [self adjustAdSize];

}
There’s a good amount of code here, so let’s explain it step by step, starting with the adjustAdSize method (which makes the ad appear on the bottom center of the screen):
- Here we use the beginAnimations:context: to start animating the ad view. You call this on a UIView before changing one or more of its property values, such as its size, position, or opacity, to make those changes appear animated.
- Get the actual size of the Ad and assign it in adSize.
- Declare newFrame so we can assign a new size.
- Set newFrame height equal to adSize height.
- Declare winSize to hold window size parameters.
- Set newFrame width to equal window width.
- Position newFrame so that it is centered on the screen.
- Position newFrame so that it appears on the bottom of the screen.
- Set the adWhirlView’s frame to the new position we just calculated.
- Calls the commitAnimations class method to end the animation block.
If you want your ad to appear in a different location, you can modify this code.
The adWhirlDidReceiveAd method works as follows:
- Because of Space game in on landscape mode, we have to set the interface orientation to that. If your game in Portrait mode just comment the first line of code.
- call adjustAdSize() method.
Just two methods left! Add the following 2 methods:
-(void)onEnter {
    //1
    viewController = [(AppDelegate *)[[UIApplication sharedApplication] delegate] viewController];
    //2
    self.adWhirlView = [AdWhirlView requestAdWhirlViewWithDelegate:self];
    //3
    self.adWhirlView.autoresizingMask = UIViewAutoresizingFlexibleLeftMargin|UIViewAutoresizingFlexibleRightMargin;

    //4
    [adWhirlView updateAdWhirlConfig];
    //5
	CGSize adSize = [adWhirlView actualAdSize];
    //6
    CGSize winSize = [CCDirector sharedDirector].winSize;
    //7
	self.adWhirlView.frame = CGRectMake((winSize.width/2)-(adSize.width/2),winSize.height-adSize.height,winSize.width,adSize.height);
    //8
	self.adWhirlView.clipsToBounds = YES;
    //9
    [viewController.view addSubview:adWhirlView];
    //10
    [viewController.view bringSubviewToFront:adWhirlView];
    //11
    [super onEnter];
}

-(void)onExit {
    if (adWhirlView) {
        [adWhirlView removeFromSuperview];
        [adWhirlView replaceBannerViewWith:nil];
        [adWhirlView ignoreNewAdRequests];
        [adWhirlView setDelegate:nil];
        self.adWhirlView = nil;
    }
    [super onExit];
}
According to Cocos2d CCNode class reference, onEnter is called when you first enter a scene (i.e. when the transition starts), and onExit is called when you exit a scene (i.e. when the transition ends).
In onEnter, the first thing we need to do is get the root view controller. There’s only one catch: the current cocos2d project templates do not assign the new root view controller to the UIWindow’s property, so normally it’s unavailable unless you expose it in the AppDelegate class itself.
So go ahead and open AppDelegate.h and quickly declare a property for it:
@property (nonatomic, retain) RootViewController *viewController;
And switch to AppDelegate.m and synthesize this property:
@synthesize viewController;
Next, let’s return to onEnter and discuss it line by line:
- Gets the view for the ad from AdWhirl and sets the layer as its delegate.
- Sets the autosizing mask to center the ad.
- Retrieves the configuration from adwhirl.com.
- Gets the actual size of the Ad and assign it in adSize instance.
- Declare winSize to hold window size parameters.
- Sets the posion of AdWhirlView to the center bottom.
- Makes sure any content is clipped to the ad view’s bounds.
- Adds the ad view as a subview of the view controller.
- Brings it to the front.
- Calls onEnter from the superclass.
The onExit method just does cleanup – if an ad is visible, it removes it from the superview, makes it ignore any further ad requests, and sets the delegate to nil.
Compile and run, and you should see ads now in your game!
