How to Make a Game Like Jetpack Joyride using LevelHelper and SpriteHelper [Cocos2D Edition] – Part 1
This is a post by special contributor Bogdan Vladu, an iOS application developer and aspiring game developer living in Bucharest, Romania. Update 1/9/2013: This tutorial is now deprecated. We now have a newer, updated version of this tutorial, check it out! In this tutorial series, we will create a game similar to Jetpack Joyride using […] By .
Preparing for LevelHelper
Let’s create two folders in the Resource folder of our Xcode project. While we don’t really need to do this, keeping our project organized will make our work easier!
In Finder, navigate to your Xcode project, open its Resources folder, and create two subfolders named “Images” and “Levels”. Important: Create these in Finder, not Xcode!
You should end up with something like this:

Creating a LevelHelper Project
Now that the project setup is complete, we can finally start creating our level with LevelHelper!
Beginning with version 1.4, LevelHelper will keep things organized in projects. This means level files are part of the project rather than individual files, as they used to be.
So let’s create a new project with LevelHelper. Open it up and go to File\New Project:

A new sheet window will appear. In the Project Name field, enter “RocketMouse,” the name of our project. Leave the Screen Size as the default, “iPhone Landscape (480×320).”
Note: When you want to create a game for all models of iPhone and iPad, you generally want to choose iPhone with Landscape or Portrait orientation. LevelHelper will automatically use SD on iPhone2G/3G/3GS and HD on iPhone4/4S and iPad1/iPad2.
If you want to create a game only for iPad, use the iPad template and inside SpriteHelper, unselect “Save SD” when creating the sprite sheets.
For iPad there is also an option to not stretch graphics. That won’t work for this tutorial, because we will be using continuous scrolling parallaxes.
Under “SpriteHelper scenes and image files directory,” choose the Images folder you just created inside the Resource folder, and click Open.

Under “Path to source code,” select the RocketMouse folder from inside the RocketMouse project folder. This is the folder that contains the LevelHelper folder. Click Open.

This setting tells LevelHelper where to go to automatically generate code, when needed.
Under “Engine” select “Cocos2d With Box2d.” Here you are selecting what code you want LevelHelper to automatically generate for you. For this tutorial, we will use Cocos2d With Box2d, but as you can see LevelHelper supports several other engines/configurations as well!
Make sure that the “Auto generate code when needed” option is selected. This tells LevelHelper to generate the code when there’s been an update to the code, or after you’ve added new tags to your project.

Under “LevelHelper scenes directory,” choose the Levels folder you just created inside the Resource folder, and click Open.

The final Project setting window should look something like this:

Note: Next to every major feature inside LevelHelper there is a “?” button. Click it to view a movie explaining that feature.
When you’re done, click the Create New Project button. A new window will appear asking you to save the project to a file.
Save the new file in the same folder as the Xcode project (RocketMouse.xcodeproj).

Now the LevelHelper window should look something like this:
![]()
But we have no image, no nothing! Time to start adding our art.
Adding Art to Our LevelHelper Project
To add our art, we need to use SpriteHelper, so go ahead and open it up.
Now navigate to where you saved the art pack for this tutorial. Select the particular files shown in the screenshot below (not all of them, just the ones shown), and drag them inside SpriteHelper.

In the Sheet Editor window on the right, uncheck the Crop option. Crop removes transparent space on sprites, but for some of our animations the sprites use transparency for placement so we don’t want the transparency modified.
For animations, it’s almost always best to uncheck Crop (to be renamed “Trim” in the next update).
Now click the Pack Sprites button at the bottom of the Sheet Editor window.

The resulting scene should look similar to this (sprites may be packed differently):

Save the scene inside the Images folder inside the Resource folder. Go to File\Save As.
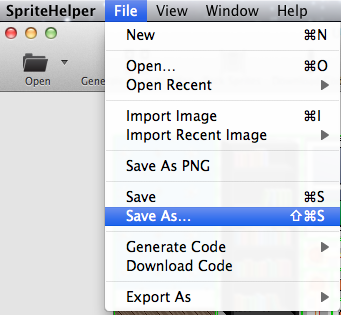
In the Save dialogue window, name the scene “objects” and click Save.

If you look inside the LevelHelper window now, you’ll see that the art has automatically been added for you.
LevelHelper keeps track of all the changes inside the Levels and Images folders, just as we told it to when we created the project. Every time you add, remove or modify a file inside those folders, LevelHelper will automatically update its content.

Note: If you do not see the art in LevelHelper, click the bar above project settings and make sure the path to the Images folder is correct, and that the path does not contain any spaces.
Creating a Basic Level
Let’s start by creating a level with a scrolling floor and wallpaper background.
We first want to create a continuous scrolling parallax that will move from right to left. To do this, let’s decide how big our parallax will be. You can make it as big as you want.
Let’s make our game world the size of 8 screen sizes. Click the Game World Size button.

In the Width field, enter 3840. This is 8 multiplied by 480 (the width of the iPhone screen).

Now let’s create the background. Drag “bg” sprite into the level, and place it right at the beginning of the first screen. The first screen should be on the left side, and is demarcated by a red border.
![]()
Now we’re going to duplicate the sprite so that it covers all of our screens. With the background sprite selected, set the clone direction as in the image below so that you clone in the right direction.
Then click the green + sign. This is the clone button. (Alternatively, you could press Command+D). Continue pressing this button until the background sprite covers all sections of all eight screens. Do not go any further.
Note: You can scroll the level in LevelHelper by holding control as you drag the level, and you can zoom in and out by holding the option key as you scroll the mouse wheel.
![]()
It should look like this:

Let’s add these images to a continuous scrolling parallax. Navigate to the Parallax tab (the one that says “P”) and press the New Parallax button.

With the parallax selected, check the Continuous Scrolling option. Now select all the background sprites in the level, and click the Add Selected Scene Sprite(s) button in the parallax section.
![]()
There are still some adjustments to make to our continuous scrolling parallax. First, set the Speed preliminarily to 2.5 (we will change this later to match the movement speed of the mouse). Make sure that the Direction is set to Right to Left.
Now select all sprites in the parallax list and set the Movement Ratio to “1” and “0.” This ratio and the speed determine the rate at which the sprites will move through the parallax.

In this case, the sprites will move at the rate of 1*2.5 (ratio*speed). If we want other sprites to move at a different rate, we can modify the ratio accordingly (e.g. 0.4*2.5).
If you run Scene Tester right now (download and install it if you need to), it will move the continuous parallax, continuously!

Let’s save this level and run it in our Xcode project. Inside LevelHelper, go to File\Save Level As.

In dialogue box, enter “level01” and click Save.

By saving the level, we caused LevelHelper to update the Levels section. Navigate to the Sprites section and then go the Levels to see the level file. By double clicking on a level, you can open that level inside LevelHelper.

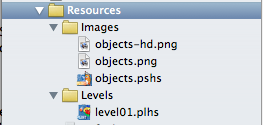
Now let’s move back to Xcode. Open your RocketMouse Xcode project if it’s not already. Right click or Control-click on the Resources folder inside Xcode, and select Add Files To “RocketMouse.”

A new window will appear. Navigate to the Resources folder on your hard drive and select both the Images and the Levels folders. Then press the Add button to copy them to the Resources folder in Xcode.

Your new Resources folder inside Xcode should look like this:
Now navigate to HelloWorldScene.mm in Xcode. Select it and look for where in the code the level is loaded.

Replace the level name in this section of code with your level name, in this case “level01.” The new line of code should read:
lh = [[LevelHelperLoader alloc] initWithContentOfFile:@"level01"];
Now compile and run.
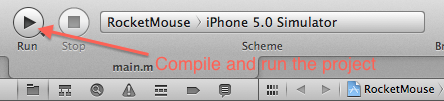
That’s all it takes to run your level – pretty cool eh? However, when running the level you will notice some artifacts:
![]()
This is caused by pixel perfect sprites (no overlap between them) moving next to each other constantly. How to fix this? Cocos2d to the rescue.
Navigate to libs/cocos2d/ccConfig.h:

In ccConfig.h, look for these three lines of code near the top of the file, around line 54:
#ifndef CC_FIX_ARTIFACTS_BY_STRECHING_TEXEL
#define CC_FIX_ARTIFACTS_BY_STRECHING_TEXEL 0
#endif
Change the 0 to 1:
#ifndef CC_FIX_ARTIFACTS_BY_STRECHING_TEXEL
#define CC_FIX_ARTIFACTS_BY_STRECHING_TEXEL 1
#endif
Now when you run the project, you shouldn’t see any artifacts.
You can download the project as it stands up to this point here.