How to Make a Game Like Jetpack Joyride using LevelHelper and SpriteHelper [Cocos2D Edition] – Part 2
This is a post by special contributor Bogdan Vladu, an iOS application developer and aspiring game developer living in Bucharest, Romania. Update 1/9/2013: This tutorial is now deprecated. We now have a newer, updated version of this tutorial, check it out! Welcome back to our Jetpack Joyride tutorial series! In this tutorial series, we are […] By .
Creating Tags to Perform Collisions
In order to perform collisions between our sprites, we need to have a way to register collisions between sprites of one type with sprites of other types.
We will need to separate our sprites into types using tags. So all dog sprites will have the tag “DOG” and all cat sprites will have the tag “CAT.”
To create the tags, inside LevelHelper click the Define Tags button.
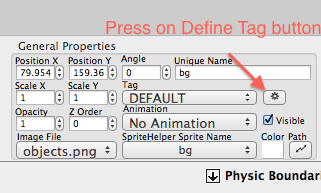
In the Define Tags window, set the name for the new tag and click the Add button to create it. Create the following tags: DOG, CAT, LASER, COIN, PLAYER.

Now that we have the tags defined, we need to assign the tags to sprites.
Select all the dog sprites from the list of sprites on the left. Then under General Properties, assign the DOG tag to all of those sprites.

Repeat the process for all the sprites. Assign PLAYER to the mouse sprite, CAT to all the cat sprites, LASER to all the laser sprites, and COIN to all the coin sprites.
When you’re done, save the level with Command-S.
A project with all of our progress so far can be downloaded here.
Coding the Game Logic
We are now (finally) ready to start coding our game. So let’s move back to Xcode, open our project and start the real fun.
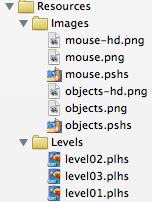
First let’s be sure to include the new art (mouse.png). At this point your resources folder should look something like the following:
In order control the movement of the parallax and allow the player to jump, we need to have a few variables that will point to the objects created by LevelHelper. Add these lines in HelloWorldScene.h inside the class definition.
LHParallaxNode* paralaxNode;
LHSprite*   player;
b2Body*     playerBody;

LHSprite*   rocketFlame;
Then outside the class definition, right before the @end and after +(id)scene;, add the following method signature:
-(void) retrieveRequiredObjects;
Inside HelloWorldScene.mm, define the new method wherever you see fit, but make sure it’s inside the class declaration. In my case, I placed it right after the init method.
-(void) retrieveRequiredObjects
{
    //Retrieve pointers to parallax node and player sprite.
    paralaxNode = [lh paralaxNodeWithUniqueName:@"Parallax_1"];
    NSAssert(paralaxNode!=nil, @"Couldn't find the parallax!");

    player = [lh spriteWithUniqueName:@"player"];
    NSAssert(player!=nil, @"Couldn't find the player!");

    playerBody = [player body];
    NSAssert(playerBody!=nil, @"Error taking the body from the player LHSprite.");

    rocketFlame = [lh spriteWithUniqueName:@"flame"];
    NSAssert(rocketFlame!=nil, @"Couldn't find flame sprite!");

    [rocketFlame setVisible:NO]; //You can do it in LH, but I do it here so you guys can see it in LH
}
Here we are taking pointers to the parallax by giving the unique name of the parallax assigned in LevelHelper.

Then we’re taking the pointer to the player sprite, also by giving the unique name. You might need to modify the unique name to read “player” as shown in the screenshot below if it isn’t set to that already.

Similarly, you should change the unique name of the flame to “flame” so it matches the code.
When you use spriteWithUniqueName to look up a sprite, you get a LHSprite* instance, which is a class derived from CCSprite. From this LHSprite* instance we take the pointer to the Box2d body of the player, because we will need to make the body jump later.
We then take the pointer to the flame sprite and make it invisible. We only need to see the flame when the player is flying. (We could also have done this inside LevelHelper by unchecking the Visible option in the General Properties section.)
Now that we have defined this new method, let’s call it (after we’ve loaded the level).
lh = [[LevelHelperLoader alloc] initWithContentOfFile:@"level03"]; // or level02 if you never changed it

[lh addObjectsToWorld:world cocos2dLayer:self];

if([lh hasPhysicBoundaries])
    [lh createPhysicBoundaries:world];

if(![lh isGravityZero])
    [lh createGravity:world];

// Add this
[self retrieveRequiredObjects]; // Retrieve all objects after we’ve loaded the level.
Compile and run the code, and if the flame is invisible when you run it, you know it’s working so far! :]

Making the Player Fly
Now that we have retrieved the player from the loaded level, let’s make him fly!
Add the following inside the HelloWorldScene.h class definition:
float  playerVelocity;
bool   playerWasFlying;
bool   playerShouldFly;
We will use this to make the mouse fly when the user touches the screen.
Now inside HelloWorldScene.mm, replace the touch functions with the following:
- (void)ccTouchesBegan:(NSSet *)touches withEvent:(UIEvent *)event
{

    playerVelocity = 0.5f;
    playerShouldFly = true;
    [rocketFlame setVisible:YES];
    [player startAnimationNamed:@"mouseFly"];
}
////////////////////////////////////////////////////////////////////////////////
- (void)ccTouchesMoved:(NSSet *)touches withEvent:(UIEvent *)event
{

}
////////////////////////////////////////////////////////////////////////////////
-(void) cancelPlayerFly
{
    playerShouldFly = false;
    [rocketFlame setVisible:NO];
    playerWasFlying = true;
    playerVelocity = 0.0f;
}
- (void)ccTouchesEnded:(NSSet *)touches withEvent:(UIEvent *)event
{
    [self cancelPlayerFly];
}
- (void)ccTouchesCancelled:(NSSet *)touches withEvent:(UIEvent *)event
{
    [self cancelPlayerFly];
}
Inside the ccTouchesBegan method, we’re saying that when the user touches the screen, the player should start flying, the rocket flame should become visible and the flying animation should start on the player sprite.
Next we start the animation name “mouseFly” on the player LHSprite* instance that we retrieved in the retrieveRequiredObjects method.
When the player stops touching the screen, or the touch is canceled, we stop making the player fly by calling the new method “cancelPlayerFly.” We also hide the flame because the player is no longer flying.
But this isn’t enough. We set up when to show the player flying, but we haven’t implemented the actual flight. That requires adding the following at the end of the “tick” method:
if(playerShouldFly)
{
    playerBody->ApplyLinearImpulse(b2Vec2(0, playerVelocity), playerBody->GetWorldCenter());

    playerVelocity += 0.01f;

    if(playerVelocity > 1.5f)
        playerVelocity = 1.5f;
}
Here, we check if the player should fly and if the test is true, we apply a linear impulse with a horizontal direction (on Y) on the mouse box2d body.
We then make the velocity bigger and bigger, so the player will look like they are taking off from the ground, gaining speed with time.
If the player’s velocity reaches a certain speed (1.5), we stop the speed from increasing further.
Compile and run the game, and now you can make the mouse fly by touching the screen!
