How to Make a Game Like Jetpack Joyride using LevelHelper and SpriteHelper [Cocos2D Edition] – Part 4
This is a post by special contributor Bogdan Vladu, an iOS application developer and aspiring game developer living in Bucharest, Romania. Update 1/9/2013: This tutorial is now deprecated. We now have a newer, updated version of this tutorial, check it out! Hello again, and welcome to the fourth and final installment of the tutorial series […] By .
Displaying the Score
We’re going to implement a dynamic way of showing the score. Instead of having a fixed display at the top or bottom of the screen, we’re going to show the score in a temporary pop-up window each time the user scores.
Begin by adding the following inside HelloWorldScene.h:
CCLabelTTF *scoreText;
Now define this new method somewhere before the init method inside HelloWorldScene.mm:
-(void) setupScore
{
    score = 0;

    CGSize winSize = [[CCDirector sharedDirector] winSize];
    scoreText = [CCLabelTTF labelWithString:@"Score: 0" dimensions:CGSizeMake(200, 50) alignment:UITextAlignmentLeft fontName:@"Arial" fontSize:22];
    scoreText.color = ccWHITE;
    scoreText.position = ccp(100, winSize.height-25);
    [self addChild:scoreText z:20];
}
Here we create a new label and assign it to our scoreText variable. We then add this label to the Cocos layer, in our case “self.” And we set the label position to be the top left corner.
Now call this new method inside the init method right after the call to setupAudio:
[self setupScore];
This is good, but right now we’re not showing the actual score to the user. We’re just showing some text. Let’s make the text change when the user gets points.
Modify your scoreHitAtPosition method to look like this:
-(void)scoreHitAtPosition:(CGPoint)position withPoints:(int)points
{
    score += points;
    [scoreText setString:[NSString stringWithFormat:@"Score: %d", score]];

    NSString* curScoreTxt = [NSString stringWithFormat:@"+ %d", points];
    CCLabelTTF *curScore = [CCLabelTTF labelWithString:curScoreTxt fontName:@"Marker Felt" fontSize:24];
    curScore.color = ccWHITE;
    curScore.position = position;
    [self addChild:curScore z:20];

    id opacityAct1 = [CCActionTween actionWithDuration:1 key:@"opacity" from:255 to:0];
    id actionCallFunc = [CCCallFuncN actionWithTarget:self selector:@selector(removeScoreText:)];
    id seq = [CCSequence actionOne:opacityAct1 two:actionCallFunc];
    [curScore runAction:seq];
}
Here we add the new points to the score variable. Then we set the text of our score label to be the newly updated score.
We then create a new label that will be displayed at the position we get in the attribute of this method. As shown in the code, this is the position of the coin or bunny triggering the score update. The coin or bunny vanishes upon collision with the player, and a score display temporarily appears in its place.
We add the new label to the layer (in this case self). We then create two actions. The first action makes the new score label disappear in one second by changing the opacity property of the sprite from 255 (full visibility) to 0 (not visible). The second action calls a new method, removeScoreText.
Lastly, we create a sequence using the two defined actions and run that sequence on the new label sprite.
We still need to define the removeScoreText method called by the second action. Add the following above the scoreHitAtPosition method:
-(void)removeScoreText:(CCLabelTTF*)scoreLabel
{
    [scoreLabel removeFromParentAndCleanup:YES];
}
This new method just removes the score display from the layer.
Run the game now and see how nicely this works. Every time the player makes contact with a coin or a bunny, a label pops up showing the updated score, displays for one second, then disappears.

Adding An Outside Layer
Now for our last tweak: an “outdoor” scene that will be visible scrolling through the windows in the level, adding a nice sense of depth to the gameplay.
Open SpriteHelper and create a new scene with File\New. Then open Finder, navigate to the ArtPack folder, select the bgWindow, window_background, and window_foreground images, and drag then on the SpriteHelper window.

Press Pack Sprites to pack the new sprites. Because one of the images doesn’t have alpha, a new window will ask you if you want to crop the image using a selected color. Choose Don’t Crop.

Select all the sprites and set the “No Physics” option from the Physics tab. Save the scene as “outside” and place it in the Images folder.

Back in LevelHelper, let’s create a new level in order to see the steps. With level03 opened, press Command-Shift-S to save the level as a new level. Give it the name level04 and save it inside the Levels folder.

Now inside the level view, select all the window sprites as well as all the background sprites from under the windows.
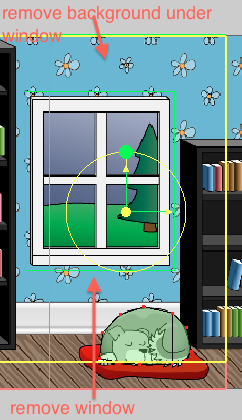
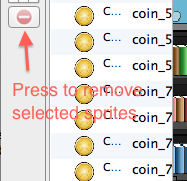
Delete the sprite by pressing the Delete key or clicking the red minus sign button on the left.
After the removal of these sprites, the scene should look something like this:

Double-check that you’ve removed all of the window and under-window background sprites, and save the scene.
Now filter the outside sprites by checking the “filter” option next to outside.png. This will make it so that we only see the sprites from that image in the list above. Set the batch z order for outside.png to -1 to put all the sprites in outside.png behind everything else.
![]()
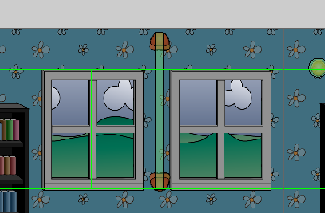
Next, drag the bgWindow sprite and place it in the empty spaces left when you removed the windows and background sprites.
![]()
When you’re ready, select all the new sprites with the window cut (all bgWindow sprites) and set their Z Order to 1.

Add these new sprites to the parallax and set the x component of the movement ratio to 1. Save the level.
Press the Test Level button to run the scene in Scene Tester. You may notice some of the new sprites have “noise.” That’s because some of the positions of the new sprites aren’t lining up correctly with the old sprites.
There are two ways to fix this problem:
- Adjust every mismatch individually by selecting each sprite and moving the sprite using the arrow keys until it lines up correctly with the other sprites.
- Select all of the misaligned sprites and set Scale X in the General Properties menu to 1.01, or a value that cancels the noise.
Save the level when you’re satisfied with how the sprites are positioned.
Now that everything is in place, let’s create a background that will move at a different speed from the rest of the parallax.
First let’s lock the sprites already in the level so that we don’t accidentally move them. To do this, select all the sprites from the list on the left, and click the Lock button.
![]()
Note: To unlock sprites, select them in the list and press the Lock button again.
With the sprites locked, drag the window_background sprite into the scene and place it above the main screen. Make sure that the left vertical border of the window_background sprite is lined up exactly with that of the main screen.

Now make sure the window_background sprite is selected, and duplicate it to the right until the end of the game world by using the green + button (or pressing Command-D). Make sure that you have the correct anchor point selected.

The level should look like this when you’re finished:

Now select all the new window_background sprites and add them to the parallax. Set the x component of the movement ratio to 0.3.

Repeat this process for the window_foreground sprite.
Drag it into the scene and position it above and in alignment with the window_background sprites:

Clone it until the end of the game world:

Add it to the parallax and set the x component of the movement ratio to 0.7:

Now select all the window_background sprites and drag them down onto the main scene so that you can see them through the window.
Repeat the process for the window_foreground sprites. Drag all of the sprites down until you can see them through the window.

Save the level when you’re done.
Running Scene Tester now, you should see the outside world moving at a different speed than the inside world. This makes it seem to the user that they are never seeing quite the same outside image through the window, making the game world feel more three-dimensionally “real.”
The last thing we have to do is add the new level and images to our Xcode project. Drop the new level (“level04”) into the Levels folder in Xcode. Your new Levels folder should look like this:

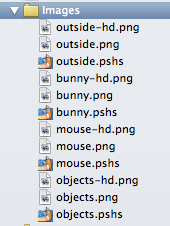
Then add the new image files (outside.png, outside-hd.png, outside.pshs) to the Images folder. Your new Images folder in Xcode should look like this:
Inside HelloWorldScene.mm, change the loading level code so that it loads the level04 file:
lh = [[LevelHelperLoader alloc] initWithContentOfFile:@"level04"];
There’s nothing left but to run the game and enjoy!
