How to Make a Game Like Jetpack Joyride using LevelHelper and SpriteHelper [Corona Edition] – Part 1
This is a post by special contributor Bogdan Vladu, an iOS application developer and aspiring game developer living in Bucharest, Romania. In this tutorial series, we will create a game similar to Jetpack Joyride using Corona SDK. (Prefer Cocos2D? Check out the Cocos2D version of this tutorial!) If you haven’t played Jetpack Joyride yet, you […] By .
Adding Art to Our LevelHelper Project
To add our art, we need to use SpriteHelper, so go ahead and open it up.
Now navigate to where you saved the art pack for this tutorial. Select the particular files shown in the screenshot below (not all of them, just the ones shown), and drag them inside SpriteHelper.

In the Sheet Editor window on the right, uncheck the Crop option. Crop removes transparent space on sprites, but for some of our animations the sprites use transparency for placement so we don’t want the transparency modified.
For animations, it’s almost always best to uncheck Crop (to be renamed “Trim” in the next update).
Now click the Pack Sprites button at the bottom of the Sheet Editor window.

The resulting scene should look similar to this (sprites may be packed differently):

Save the scene inside the Images folder inside the Resource folder. Go to File\Save As.
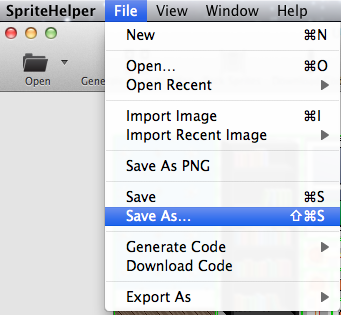
In the Save dialogue window, name the scene “objects” and click Save.

If you look inside the LevelHelper window now, you’ll see that the art has automatically been added for you.
LevelHelper keeps track of all the changes inside the Levels and Images folders, just as we told it to when we created the project. Every time you add, remove or modify a file inside those folders, LevelHelper will automatically update its content.

Note: If you do not see the art in LevelHelper, click the bar above project settings and make sure the path to the Images folder is correct, and that the path does not contain any spaces.
Creating a Basic Level
Let’s start by creating a level with a scrolling floor and wallpaper background.
We first want to create a continuous scrolling parallax that will move from right to left. To do this, let’s decide how big our parallax will be. You can make it as big as you want.
Let’s make our game world the size of 8 screen sizes. Click the Game World Size button.

In the Width field, enter 3840. This is 8 multiplied by 480 (the width of the iPhone screen).

Now let’s create the background. Drag “bg” sprite into the level, and place it right at the beginning of the first screen. The first screen should be on the left side, and is demarcated by a red border.
![]()
Now we’re going to duplicate the sprite so that it covers all of our screens. With the background sprite selected, set the clone direction as in the image below so that you clone in the right direction.
Then click the green + sign. This is the clone button. (Alternatively, you could press Command+D). Continue pressing this button until the background sprite covers all sections of all eight screens. Do not go any further.
Note: You can scroll the level in LevelHelper by holding control as you drag the level, and you can zoom in and out by holding the option key as you scroll the mouse wheel.
![]()
It should look like this:

Let’s add these images to a continuous scrolling parallax. Navigate to the Parallax tab (the one that says “P”) and press the New Parallax button.

With the parallax selected, check the Continuous Scrolling option. Now select all the background sprites in the level, and click the Add Selected Scene Sprite(s) button in the parallax section.
![]()
There are still some adjustments to make to our continuous scrolling parallax. First, set the Speed preliminarily to 2.5 (we will change this later to match the movement speed of the mouse). Make sure that the Direction is set to Right to Left.
Now select all sprites in the parallax list and set the Movement Ratio to “1” and “0.” This ratio and the speed determine the rate at which the sprites will move through the parallax.

In this case, the sprites will move at the rate of 1*2.5 (ratio*speed). If we want other sprites to move at a different rate, we can modify the ratio accordingly (e.g. 0.4*2.5).
If you run Scene Tester right now (download and install it if you need to), it will move the continuous parallax, continuously!

Let’s save this level and run it in our Corona project. Inside LevelHelper, go to File\Save Level As.

In dialogue box, enter “level01” and click Save.

By saving the level, we caused LevelHelper to update the Levels section. Navigate to the Sprites section and then go the Levels to see the level file. By double clicking on a level, you can open that level inside LevelHelper.

Now navigate to main.lua. Open it and look for where in the code the level is loaded.
Replace the level name in this section of code with your level name, in this case “level01.” The new line of code should read:
loader = LevelHelperLoader:initWithContentOfFile("level01.plhs")
Now run the project in the Corona Simulator.
That’s all it takes to run your level – pretty cool eh?
Creating the Full Level
Let’s go back to LevelHelper and add the remaining art so that we have a final level to play with.
Drag the small bookshelf onto the main screen. Drag it around until you are satisfied with its placement relative to the background sprite.
With the bookshelf sprite selected in the level, click the Clone And Align button in order to make multiple clones of this sprite.

Set the number of clones to 7, and set offset X to 500 and offset Y to 0.
You should see a series of blue or purple outlines indicating how the sprites will be set in the level. Click the Make Clones button when you are satisfied.
Note: Right clicking on any stepper button will reset the associated field to the default value.

Now let’s repeat the process to add the rest of the art.
Add in the big bookshelf, the cat, the dog and the window sprites and place them according to your preferences.
I’ve opted to put the dog under each window, because dogs like to look out the window. I’ve placed the cat next to each mouse hole, for obvious reasons. And I’ve placed the bookshelves randomly in the level.
My final level looks like this:

If you enable the Show Polygon Shapes option inside LevelHelper, you’ll see that all sprites have physics shapes on them.

Previously (in LevelHelper 1.3), we had to disable this behavior for each sprite inside LevelHelper. Now we can make it so that what we update in the SpriteHelper scene will also be updated in the level file.
If for our sprites we have “Handled by SpriteHelper” selected each time we do a change in the corresponding SpriteHelper document, the change will be immediately visible in the level. We no longer need to reopen that level or modify the previously added sprites in the level.
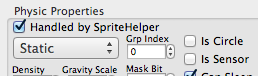
Fortunately “Handled By SpriteHelper” is the default setting, so we shouldn’t need to do anything to enable it. Let’s open up the SpriteHelper document and modify the settings on the sprites.
We can do this by opening SpriteHelper and then opening that document, but there’s an easier way:
I will do this process the long way so that you learn everything. In the list of sprites on the left side of the LevelHelper interface, select a sprite and Control-Click (or right click) on it. Now select Show SpriteHelper Scene.
![]()
This will take you to the SpriteHelper Scenes section and select the corresponding scene file for you. (this is very helpful, because sometimes it’s hard to remember from which scene a sprite came.)
Now Control-Click (or right click) on the scene and select “Open In SpriteHelper.”

This will open the needed scene in SpriteHelper, where we can select the sprite we want to modify and select “No Physics” under the Physics tab.

Make sure to save the scene when you’re done.
Now if you go back to LevelHelper, you’ll see that the physics shapes have disappeared. Save the level as new one by pressing Command-Shift-S. Give it the name “level02.”
If you run Scene Tester now (press “Test Level” button), you’ll see that only the background sprite will move.
Let’s add the other sprites to the parallax. To do this, first select all sprites except the background sprites that have already been added to the parallax.
![]()
Now go to the Parallax tab, select your parallax and add the selected sprites.
Select the sprites from the list of sprites in the parallax, and set the Movement Ratio to 1 and 0.
![]()
If you run Scene Tester now, all sprites should move with the same speed continuously.
Notice that the shape objects for the dog and cat sprites are basic quads.

Let’s make the shapes trace the dog and cat, so that they move with the correct physic behavior.
To do this, open the SpriteHelper scene as we did in the previous step by selecting the dog sprite and navigating to the correct scene file.
Inside SpriteHelper, select the dog sprite, navigate to the Physics section and click the Create Shape button.

Now click and trace the shape around the dog. Click Finish Shape when you are done.
Notes:
In SpriteHelper you can pan the view with 2 finger on the trackpad and move, or by holding Option key and drag with the mouse.
To zoom in or out you can use the popular pinch gesture on the trackpad or the mouse wheel.

Note: You can change a shape by clicking the “Edit Shape” button and then dragging the points as needed. You can add new points by clicking on the shape line. You can remove points by holding the Control key and clicking on a point.
Repeat the process for the cat. When you’re done, make sure to save the scene.
Run in the Corona simulator. Now your level is looking a lot more interesting!
