watchOS 4 Tutorial Part 2: Tables
In this second part of our watchOS 4 tutorial series, learn how to add tables into your watchOS app! By Audrey Tam.
Populating the Table
The first thing you need to do is create a subclass of WKInterfaceController to control the table.
Right-click on the Watch Extension group in the Project navigator, and choose New File…. In the dialog that appears, select watchOS\Source\WatchKit Class, and click Next. Name the new class ScheduleInterfaceController. Make sure it’s subclassing WKInterfaceController, and that Language is set to Swift:

Click Next, and then Create.
When the new file opens in the code editor, delete the three empty method stubs, so you’re left with just the import statements and the class definition.
Re-open Watch\Interface.storyboard, and select the new interface controller. In the Identity inspector, change Custom Class\Class to ScheduleInterfaceController:

With the interface controller still selected, open the assistant editor, and make sure it’s displaying ScheduleInterfaceController. Next, Control-drag from Table in the document outline to inside the class declaration of ScheduleInterfaceController, to create an outlet:

Name the outlet flightsTable, make sure the type is set to WKInterfaceTable, and click Connect.
Now you’ve set the custom class and created an outlet to the table, it’s finally time to populate the thing!
Close the assistant editor, open ScheduleInterfaceController.swift, and add the following, just below the outlet:
var flights = Flight.allFlights()
Here you’re simply adding a property that holds all the flight information as an array of Flight instances.
Next, add the following implementation of awake(withContext:):
override func awake(withContext context: Any?) {
  super.awake(withContext: context)
  flightsTable.setNumberOfRows(flights.count, withRowType: "FlightRow")
}
Here, you’re informing the table to create an instance of the row you just built in Interface Builder, for each flight in flights. The number of rows is equal to the size of the array, and the row type is the identifier you set in the storyboard.
Build and run. You’ll see a table populated with several rows, all with our Air Aber pink plane:
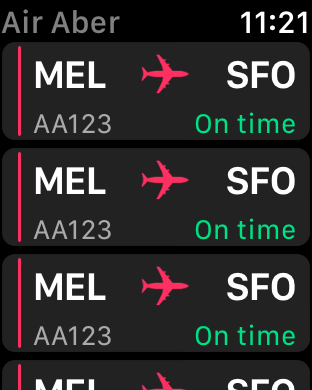
But hey! The title is dark gray, not Air Aber’s vibrant pink corporate color. You’ll fix that now.
Open Watch\Interface.storyboard, select the Air Aber interface controller. In the File inspector, change Global Tint to #FA114F.

Build and run. That’s much better!
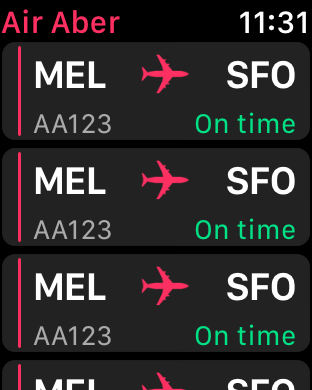
But now, you’ll notice the rows all display the placeholder text you set in Interface Builder. You’ll fix this next, by adding a row controller to configure the labels for each row.
Adding a Row Controller
WatchKit tables are much simpler than iOS tables: no data source or delegates here! You just need to create a row controller class which, despite its name, is a subclass of NSObject.
Right-click on the Watch Extension group in the Project navigator and choose New File…. In the dialog that appears, select watchOS\Source\WatchKit Class, and click Next. Name the new class FlightRowController. Make sure it’s subclassing NSObject — not WKInterfaceController! — and that Language is set to Swift:

Click Next, and then Create.
When the new file opens in the code editor, add the following to the top of the class:
@IBOutlet var separator: WKInterfaceSeparator!
@IBOutlet var originLabel: WKInterfaceLabel!
@IBOutlet var destinationLabel: WKInterfaceLabel!
@IBOutlet var flightNumberLabel: WKInterfaceLabel!
@IBOutlet var statusLabel: WKInterfaceLabel!
@IBOutlet var planeImage: WKInterfaceImage!
Here, you’re simply adding an outlet for each of the labels you added to the table row. You’ll connect them shortly.
Next, add the following property and property observer, just below the outlets:
// 1
var flight: Flight? {
  // 2
  didSet {
    // 3
    guard let flight = flight else { return }
    // 4
    originLabel.setText(flight.origin)
    destinationLabel.setText(flight.destination)
    flightNumberLabel.setText(flight.number)
    // 5
    if flight.onSchedule {
      statusLabel.setText("On Time")
    } else {
      statusLabel.setText("Delayed")
      statusLabel.setTextColor(.red)
    }
  }
}
Here’s the play-by-play of what’s happening:
- You declare an optional property of type
Flight. Remember, this class is declared in Flight.swift which is part of the shared code you added to the Watch Extension in the previous tutorial. - You add a property observer that is triggered whenever the property is set.
- You exit early if
flightisnil: it’s an optional and you want to proceed with configuring the labels only when you know you have a valid instance ofFlight. - You configure the labels using the relevant properties of
flight. - If the flight is delayed, then you change the text color of the label to red, and update the text accordingly.
With the row controller set up, you now need to update the table row to use it.
Open Watch\Interface.storyboard, and select FlightRow in the document outline. Using the Identity inspector, set Custom Class\Class to FlightRowController.
In the document outline, open all the groups in FlightRow, then right-click on FlightRow to invoke the outlets and actions popup:

You can drag this popup to the right, so you can see all the objects in FlightRow.
First, connect planeImage to the image in the table row and separator to the separator. Next, connect the remaining outlets according to the list below:
-
destinationLabel: SFO -
flightNumberLabel: AA123 -
originLabel: MEL -
statusLabel: On time
The final step is to update ScheduleInterfaceController, so it passes an instance of Flight to each row controller in the table.
Open ScheduleInterfaceController.swift, and add the following to the bottom of awakeWithContext(_:):
for index in 0..<flightsTable.numberOfRows {
  guard let controller = flightsTable.rowController(at: index) as? FlightRowController else { continue }

  controller.flight = flights[index]
}
Here, you’re iterating over each row in the table using a for loop, and asking the table for the row controller at the given index. If you successfully cast the controller, you’re handed back an instance of FlightRowController. Then you set controller.flight to the corresponding flight item in the flights array. This triggers the didSet observer in FlightRowController, and configures all the labels in the table row.
It’s time to see the fruits of your labor: build and run. You’ll see your table rows are now populated with the relevant flight details:
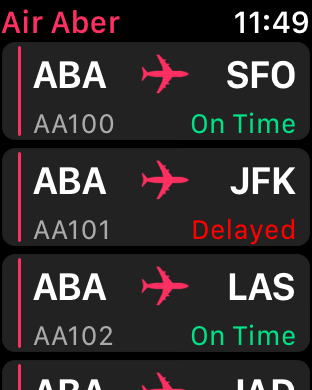
And now for the final part of this tutorial: when a user taps on a table row, ScheduleInterfaceController should pass the corresponding flight as the context to the flight details interface you created in the previous tutorial, then present it.
Responding to Row Selection
The first thing you need to do is override the WKInterfaceTable method that’s responsible for handling table row selection.
Add the following to ScheduleInterfaceController:
override func table(_ table: WKInterfaceTable, didSelectRowAt rowIndex: Int) {
  let flight = flights[rowIndex]
  presentController(withName: "Flight", context: flight)
}
Here, you retrieve the appropriate flight from flights, using the row index passed into this method. You then present the flight details interface, passing flight as the context. Remember the name you pass to presentController(withName:context:) is the identifier you set in the storyboard, in the previous tutorial.
Now, as promised in Part 1, you’ll update FlightInterfaceController, so it uses context to configure its interface.
Open FlightInterfaceController.swift, and find awake(withContext:). Find this statement:
flight = Flight.allFlights().first
And replace it with the following:
if let flight = context as? Flight {
  self.flight = flight
}
Here, you try to cast context to an instance of Flight. If it succeeds, you use it to set self.flight, which will in turn trigger the property observer, and configure the interface.
For the final time in this tutorial, build and run. Tap on a table row, and you’ll now see the flight details interface presented modally, displaying the details of the selected flight:

Congratulations! You’ve now finished implementing your very first table, and have populated it using real data. Nice work!