Overlay Images and Overlay Views with MapKit Tutorial
In this tutorial, you create an app for the Six Flags Magic Mountain amusement park using the latest version of MapKit. If you’re a roller coaster fan in the LA area, you’ll be sure to appreciate this app :] By Cesare Rocchi.
If You Liked It Then You Should Have Put a Pin On It - Annotations
If you've ever searched for a location in the Maps app, then you've seen those colored pins that appear on the map. These are known as annotations, which are created with MKAnnotationView. You can use annotations in your own app — and you can use any image you want, not just pins!
Annotations will be useful in your app to help point out specific attractions to the park visitors. Annotation objects work similarly to MKOverlay and MKOverlayRenderer, but instead you will be working with MKAnnotation and MKAnnotationView.
Create a new class in the Annotations group called PVAttractionAnnotation as a subclass of NSObject.
Then replace PVAttractionAnnotation.h with the following:
#import <Foundation/Foundation.h>
#import <MapKit/MapKit.h>

typedef NS_ENUM(NSInteger, PVAttractionType) {
    PVAttractionDefault = 0,
    PVAttractionRide,
    PVAttractionFood,
    PVAttractionFirstAid
};

@interface PVAttractionAnnotation : NSObject <MKAnnotation>

@property (nonatomic) CLLocationCoordinate2D coordinate;
@property (nonatomic, copy) NSString *title;
@property (nonatomic, copy) NSString *subtitle;
@property (nonatomic) PVAttractionType type;

@end
Here you first import MapKit, then you define an enum for PVAttractionType. This enum lists four types of annotations: rides, foods, first aid, and default.
Next you declare that this class conforms to the MKAnnotation Protocol. Much like MKOverlay, MKAnnotation has a required coordinate property. Finally, you define a handful of properties specific to this implementation.
Okay, now you can move on to the actual implementation of PVAttractionAnnotation.
Modify PVAttractionAnnotation.m as below:
#import "PVAttractionAnnotation.h"

@implementation PVAttractionAnnotation

@end
This is probably the simplest implementation in this whole tutorial! Nothing specific needs to be implemented here; you just need to keep track of some specific properties that are defined on the header. That's it!
Now you need to create a specific instance of MKAnnotation to use for your annotations.
Create another class called PVAttractionAnnotationView under the Annotations group as a subclass of MKAnnotationView. The interface is stock — there is nothing that needs to be added here.
Replace PVAttractionAnnotationView.h with the following:
#import <Foundation/Foundation.h>
#import <MapKit/MapKit.h>

@interface PVAttractionAnnotationView : MKAnnotationView

@end
To flesh out the implementation, add the code below to PVAttractionAnnotationView.m:
#import "PVAttractionAnnotationView.h"
#import "PVAttractionAnnotation.h"

@implementation PVAttractionAnnotationView

- (id)initWithAnnotation:(id<MKAnnotation>)annotation reuseIdentifier:(NSString *)reuseIdentifier {
    self = [super initWithAnnotation:annotation reuseIdentifier:reuseIdentifier];
    if (self) {
        PVAttractionAnnotation *attractionAnnotation = self.annotation;
        switch (attractionAnnotation.type) {
            case PVAttractionFirstAid:
                self.image = [UIImage imageNamed:@"firstaid"];
                break;
            case PVAttractionFood:
                self.image = [UIImage imageNamed:@"food"];
                break;
            case PVAttractionRide:
                self.image = [UIImage imageNamed:@"ride"];
                break;
            default:
                self.image = [UIImage imageNamed:@"star"];
                break;
        }
    }

    return self;
}

@end
Here you override initWithAnnotation:reuseIdentifier:; based on the annotation's type property, you set a different image on the image property of the annotation.
Great! Now that you have created the annotation and its associated view, you can start adding them to your map view!
First you'll first need a few resource files that were referenced in initWithAnnotation:reuseIdentifier: (included in annotation-images.zip), and the property list that defines attraction locations (MagicMountainAttractions.plist). They're included in the resources for this tutorial - copy them to the Images group in your project.
For the curious among you, the plist file contains coordinate information and other details about the attractions at the park:
<?xml version="1.0" encoding="UTF-8"?>
<!DOCTYPE plist PUBLIC "-//Apple//DTD PLIST 1.0//EN" "http://www.apple.com/DTDs/PropertyList-1.0.dtd">
<plist version="1.0">
<array>
<dict>
<key>name</key>
<string>Goliath</string>
<key>location</key>
<string>{34.42635,-118.59712}</string>
<key>type</key>
<string>1</string>
<key>subtitle</key>
<string>Intensity: 8/10</string>
</dict>
<dict>
<key>name</key>
<string>Batman</string>
<key>location</key>
<string>{34.42581,-118.60089}</string>
<key>type</key>
<string>1</string>
<key>subtitle</key>
<string>Intensity: 6/10</string>
</dict>
<dict>
<key>name</key>
<string>Ridler's Revenge</string>
<key>location</key>
<string>{34.42430,-118.60074}</string>
<key>type</key>
<string>1</string>
<key>subtitle</key>
<string>Intensity: 6/10</string>
</dict>
<dict>
<key>name</key>
<string>X2</string>
<key>location</key>
<string>{34.42156,-118.59556}</string>
<key>type</key>
<string>1</string>
<key>subtitle</key>
<string>Intensity: 10/10</string>
</dict>
<dict>
<key>name</key>
<string>Tatsu</string>
<key>location</key>
<string>{34.42150,-118.59741}</string>
<key>type</key>
<string>1</string>
<key>subtitle</key>
<string>Intensity: 7/10</string>
</dict>
<dict>
<key>name</key>
<string>Panda Express</string>
<key>location</key>
<string>{34.42126,-118.595637}</string>
<key>type</key>
<string>2</string>
<key>subtitle</key>
<string>Cost: $$</string>
</dict>
<dict>
<key>name</key>
<string>Cold Stone</string>
<key>location</key>
<string>{34.42401,-118.59495}</string>
<key>type</key>
<string>2</string>
<key>subtitle</key>
<string>Cost: $</string>
</dict>
<dict>
<key>name</key>
<string>First Aid</string>
<key>location</key>
<string>{34.42640,-118.59918}</string>
<key>type</key>
<string>3</string>
<key>subtitle</key>
<string>Call 911 For Emergency</string>
</dict>
</array>
</plist>
Now that you have the above resource files in place, you can leverage your new annotations!
Go back to PVParkMapViewController.m and import your new MKAnnotation and MKAnnotationView classes, as shown in the code snippet below:
#import "PVAttractionAnnotation.h"
#import "PVAttractionAnnotationView.h"
Next, define a new method to add the attraction annotations to the map view.
Then add the following new method (still in PVParkMapViewController.m):
- (void)addAttractionPins {
    NSString *filePath = [[NSBundle mainBundle] pathForResource:@"MagicMountainAttractions" ofType:@"plist"];
    NSArray *attractions = [NSArray arrayWithContentsOfFile:filePath];
    for (NSDictionary *attraction in attractions) {
        PVAttractionAnnotation *annotation = [[PVAttractionAnnotation alloc] init];
        CGPoint point = CGPointFromString(attraction[@"location"]);
        annotation.coordinate = CLLocationCoordinate2DMake(point.x, point.y);
        annotation.title = attraction[@"name"];
        annotation.type = [attraction[@"type"] integerValue];
        annotation.subtitle = attraction[@"subtitle"];
        [self.mapView addAnnotation:annotation];
    }
}
This method reads MagicMountainAttractions.plist and enumerates over the array of dictionaries. For each entry, it creates an instance of PVAttractionAnnotation with the attraction's information, and then adds each annotation to the map view.
Now you need to update loadSelectedOptions to accommodate this new option and execute your new method when it is selected.
Add the following code to loadSelectedOptions (still in PVParkMapViewController.m):
- (void)loadSelectedOptions {
    [self.mapView removeAnnotations:self.mapView.annotations];
    [self.mapView removeOverlays:self.mapView.overlays];
    for (NSNumber *option in self.selectedOptions) {
        switch ([option integerValue]) {
            case PVMapOverlay:
                [self addOverlay];
                break;
            case PVMapPins:
                [self addAttractionPins];
                break;
            default:
                break;
        }
    }
}
You're almost there! Last but not least, you need to implement another delegate method that provides the MKAnnotationView instances to the map view so that it can render them on itself.
Add the code below to PVParkMapViewController.m:
- (MKAnnotationView *)mapView:(MKMapView *)mapView viewForAnnotation:(id<MKAnnotation>)annotation {
    PVAttractionAnnotationView *annotationView = [[PVAttractionAnnotationView alloc] initWithAnnotation:annotation reuseIdentifier:@"Attraction"];
    annotationView.canShowCallout = YES;
    return annotationView;
}
The method above receives the MKAnnotation which is used to create the PVAttractionAnnotationView. The property canShowCallout is set to YES so that when the annotation is touched by the user, a call-out is shown with more information. Finally, the annotation view is returned.
Build and run to see your annotations in action!
Turn on the Attraction Pins to see the result as in the screenshot below:
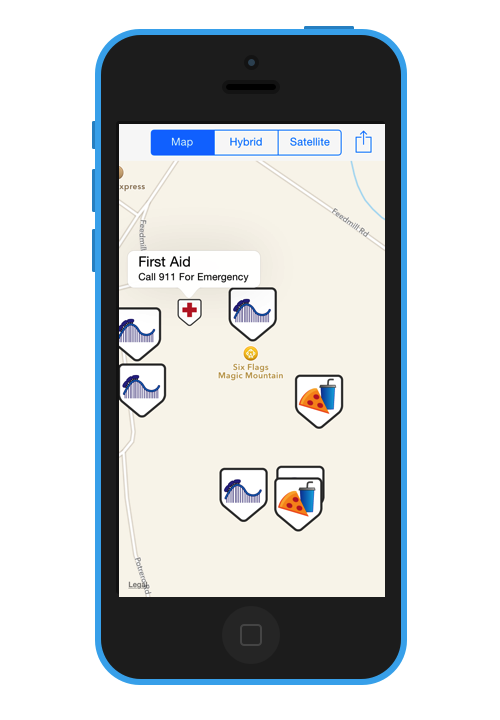
The Attraction pins are looking rather...sharp at this point! :]
So far you've covered a lot of complicated bits of MapKit, including overlays and annotations. But what if you need to use some drawing primitives, like lines, shapes, and circles?
The MapKit framework also gives you the ability to draw directly on a map view! MapKit provides MKPolyline, MKPolygon, and MKCircle for just this purpose.