Objectively Speaking 2: A Crash Course in Objective-C for iOS 6
This is the 2nd post by iOS Tutorial Team Member Linda Burke, an indie iOS developer and the founder of canApps. If you are a software developer skilled in another platform, but want to start learning iPhone development (and hence Objective-C) – this is the tutorial series for you! This tutorial picks up where the […] By .
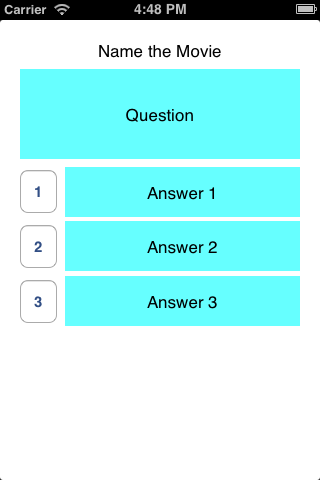
Adding Labels and Buttons To Your View
Drag a new Label from the Object Library and place it underneath the Question label. Change the width and height of the new label to 235 points and 50 points respectively. As before, set the background color of your new label to be Cyan.
Now, move the new label over so that the two right-hand sides of the labels are aligned.
Modify the text of the new label to read Answer 1, and then center align the text. Finally, set the Lines property of the label to 0.
Okay, that does it for displaying the text of the answer. But you still need to provide a button for the player to indicate their answer!
From the Object Library, drag a round rect button to the left hand side of the label. Use the Size Inspector to change the width of the button to be 37 points, and the height to be 50 points. Finally, modify the text of the label to read 1.
Your storyboard should look like this:

Now, you could go and drag in more labels and buttons for the other answers, but since you already have some on the screen, why not just copy and paste the existing labels and buttons for the other two answers?
To do this, hold down the Command button, and using the mouse, select both the button and the label together. Keep the Command button pressed, press C to copy the objects, and then press V to paste the objects.
Release the Command button and drag the two selected elements to a point below the original button and label. Line up the copy per the blue layout lines, then release the mouse button.
Double-click the button and change the text to read 2. Double-click the label and change it to read Answer 2.
Following the same process, copy and paste the button and lable, change the text of the new third button to 3, and change the label text to Answer 3. Your scene should now look like this:

Build and run, and enjoy your app with all it’s cyan glory.
At this point, you have a good start. But there’s a lot more to a great app than just a pretty face — head on in to the next section to add the actual quiz code!
Adding the Quiz Logic
The first thing you’ll need to do is create a new class to hold your quiz info.
Go to File\New File…, choose the iOS\Cocoa Touch Class\Objective-C class template, and click Next. Name the class Quiz, make it a subclass of NSObject, click Next then Create.
You’ll start by creating the property declarations for the variables you’ll need to store your quotes. You’ll add these in the class header file, Quiz.h.
Add the following code to Quiz.h between the @interface and @end lines:
@property (nonatomic, strong) NSMutableArray * movieArray;

- (id)initWithQuiz:(NSString*)plistName;
The property directive above tells the compiler that the variable movieArray is a property of this class, which you can think of as a “public instance variable” in this case. Two attributes are then set on the property: nonatomic and strong.
The nonatomic attribute specifies that the property does not utilize any thread locking behavior. By default, all properties are atomic, and thereby, thread-safe. Nonatomic properties are not thread-safe, but faster. In this tutorial you won’t be accessing this property from multiple thread, so you can pick the non thread-safe (but faster) option.
The strong attribute indicates that a pointer to the specified variable will stay in memory as long as the QuoteQuizViewController object exists, using iOS’s new Automatic Reference Counting feature.
Note: To learn more about memory management and Automatic Reference Counting, check out our Automatic Reference Counting Tutorial.
Okay, now you have a class to hold your quiz info — now to load in the quiz data!
Loading the Property List
You need some sort of mechanism to store your movie quiz questions. You could hard-code the questions into your app, but it’s a better idea to store them in a property list. That way you can easily modify the property list to add or modify quiz data without cracking open your code.
First, you need to create an initialization method for your property list loader.
Add the following code to Quiz.m between @implementation and @end:
- (id)initWithQuiz:(NSString*)plistName
{
    if ((self = [super init]))
    {
        NSString *plistCatPath = [[NSBundle mainBundle] pathForResource:plistName ofType:@"plist"];
        self.movieArray = [NSMutableArray arrayWithContentsOfFile:plistCatPath];
    }
    return self;
}
The id return type means “any object that derives from NSObject”. It’s a standard return type for all object constructors. It’s also used with callbacks when the referring object type is not known.
plistName is the actual name of the property list. The benefit of using a parameter in your method to load up your property list is that this method can now load up any named property list file — and in this way, you increase the reusability of your objects!

Note: Why should you use self when setting and getting data for a property? That’s because self is similar to the “this” keyword in other languages, and refers to the object upon which the method is running. This is now mandatory from Xcode 4.5 — don’t forget or you’ll run into build errors!
Okay, now you need to declare your new shiny class somewhere so that it can be used in your app!
Add the following code to QuoteQuizViewController.h just before @interface:
@class Quiz;
The class directive is known as a forward declaration. It informs the compiler that the Quiz class will be defined later in the compilation process. This is used to resolve circular dependences.
What are circular dependencies, you ask?
Think of it like this: class A depends on class B, but class B has some code that depends on class A. The compiler is unable to resolve this dependency, since it needs to know about both classes at the same time. The class directive tells the compiler: “Hang ten, good buddy, you don’t need to know about this class now. Just know that I’m going to be using it — the definition is coming down the road.”
This keeps the compiler happy and it’s able to continue building your code. :]
You’ll need to keep track of two things here — the Quiz object that represents the running quiz, and some sort of index counter to keep track of which question you’re on.
Add the following code to QuoteQuizViewController.h below the @interface line:
@property (nonatomic, assign) NSInteger quizIndex;
@property (nonatomic, strong) Quiz * quiz;
Now add the following line to the top of QuoteQuizViewController.m in order to import your quiz header file:
#import "Quiz.h"
The first time through your quiz, you will need to set quizIndex to 999, which will tell your app that it needs to start at the beginning. You also need to initialize an instance of Quiz with your custom init method.
Replace viewDidLoad in QuoteQuizViewController.m with the following:
- (void)viewDidLoad
{
    [super viewDidLoad];
    self.quizIndex = 999;
    self.quiz = [[Quiz alloc] initWithQuiz:@"quotes"];
}
In the code above, you instantiate Quiz with your custom init method, and then pass in the name of the property list that you want your class to load. In this case, the file is named “quotes”.
Guess you’d better get cracking and create that file so that your app can load it! :]