Introduction to Android Activities with Kotlin
Learn about one of the most important concepts within Android apps with this introduction to Android activities tutorial, using Kotlin! By Steve Smith.
Registering Broadcast Receivers
Every to-do list needs to have a good grasp on date and time, so a time display should be the next thing you add to your app. Open MainActivity.kt and add the following after the existing property declarations at the top:
private val tickReceiver by lazy { makeBroadcastReceiver() }
Then add a companion object near the top of MainActivity:
companion object {
  private const val LOG_TAG = "MainActivityLog"

  private fun getCurrentTimeStamp(): String {
    val simpleDateFormat = SimpleDateFormat("yyyy-MM-dd HH:mm", Locale.US)
    val now = Date()
    return simpleDateFormat.format(now)
  }
}
And initialize the tickReceiver by adding the following to the bottom of MainActivity:
private fun makeBroadcastReceiver(): BroadcastReceiver {
  return object : BroadcastReceiver() {
    override fun onReceive(context: Context, intent: Intent?) {
      if (intent?.action == Intent.ACTION_TIME_TICK) {
        dateTimeTextView.text = getCurrentTimeStamp()
      }
    }
  }
}
Here, you create a BroadcastReceiver that sets the date and time on the screen if it receives a time change broadcast from the system. You use getCurrentTimeStamp(), which is a utility method in your activity, to format the current date and time.
Note: If you’re not familiar with BroadcastReceivers, you should refer to the Android Developer documentation.
Next add the following methods to MainActivity underneath onCreate()
override fun onResume() {
  // 1
  super.onResume()
  // 2
  dateTimeTextView.text = getCurrentTimeStamp()
  // 3
  registerReceiver(tickReceiver, IntentFilter(Intent.ACTION_TIME_TICK))
}

override fun onPause() {
  // 4
  super.onPause()
  // 5
  try {
    unregisterReceiver(tickReceiver)
  } catch (e: IllegalArgumentException) {
    Log.e(MainActivity.LOG_TAG, "Time tick Receiver not registered", e)
  }
}
Here you do a few things:
- You call
onResume()on the superclass. - You update the date and time
TextViewwith the current time stamp, because the broadcast receiver is not currently registered. - You then register the broadcast receiver in
onResume(). This ensures it will receive the broadcasts for ACTION_TIME_TICK. These are sent every minute after the time changes. - In
onPause(), you first callonPause()on the superclass. - You then unregister the broadcast receiver in
onPause(), so the activity no longer receives the time change broadcasts while paused. This cuts down unnecessary system overhead.
Build and run the app. Now you should now see the current date and time at the top of the screen. Even if you navigate to the add task screen and come back, the time still gets updated.

Persisting State
Every to-do list is good at remembering what you need to do, except for your friend Forget Me Not. Unfortunately, the app is quite forgetful at the moment. See it for yourself.
Open the app and follow these steps.
- Tap ADD A TASK.
- Enter “Replace regular with decaf in the breakroom” as the task description and tap Done. You’ll see your new task in the list.
- Close the app from the recent apps.
- Open the app again.
You can see that it forgot about your evil plans.
Persisting Data Between Launches
Open MainActivity.kt, and add the following properties to the top of the class:
private val PREFS_TASKS = "prefs_tasks"
private val KEY_TASKS_LIST = "tasks_list"
And add the following underneath the rest of your activity lifecycle methods.
override fun onStop() {
  super.onStop()

  // Save all data which you want to persist.
  val savedList = StringBuilder()
  for (task in taskList) {
    savedList.append(task)
    savedList.append(",")
  }

  getSharedPreferences(PREFS_TASKS, Context.MODE_PRIVATE).edit()
      .putString(KEY_TASKS_LIST, savedList.toString()).apply()
}
Here you build a comma separated string with all the task descriptions in your list, and then you save the string to SharedPreferences in the onStop() callback. As mentioned earlier, onStop() is a good place to save data that you want to persist across app uses.
Next add the following to onCreate() below the existing initialization code:
val savedList = getSharedPreferences(PREFS_TASKS, Context.MODE_PRIVATE).getString(KEY_TASKS_LIST, null)
if (savedList != null) {
  val items = savedList.split(",".toRegex()).dropLastWhile { it.isEmpty() }.toTypedArray()
  taskList.addAll(items)
}
Here you read the saved list from the SharedPreferences and initialize taskList by converting the retrieved comma separated string to a typed array.
Note: You used SharedPreferences since you were only saving primitive data types. For more complex data you can use a variety of storage options available on Android.
Now, build and run the app. Add a task, close and reopen the app. Do you see a difference? You are now able to retain tasks in your list!

Configuration Changes
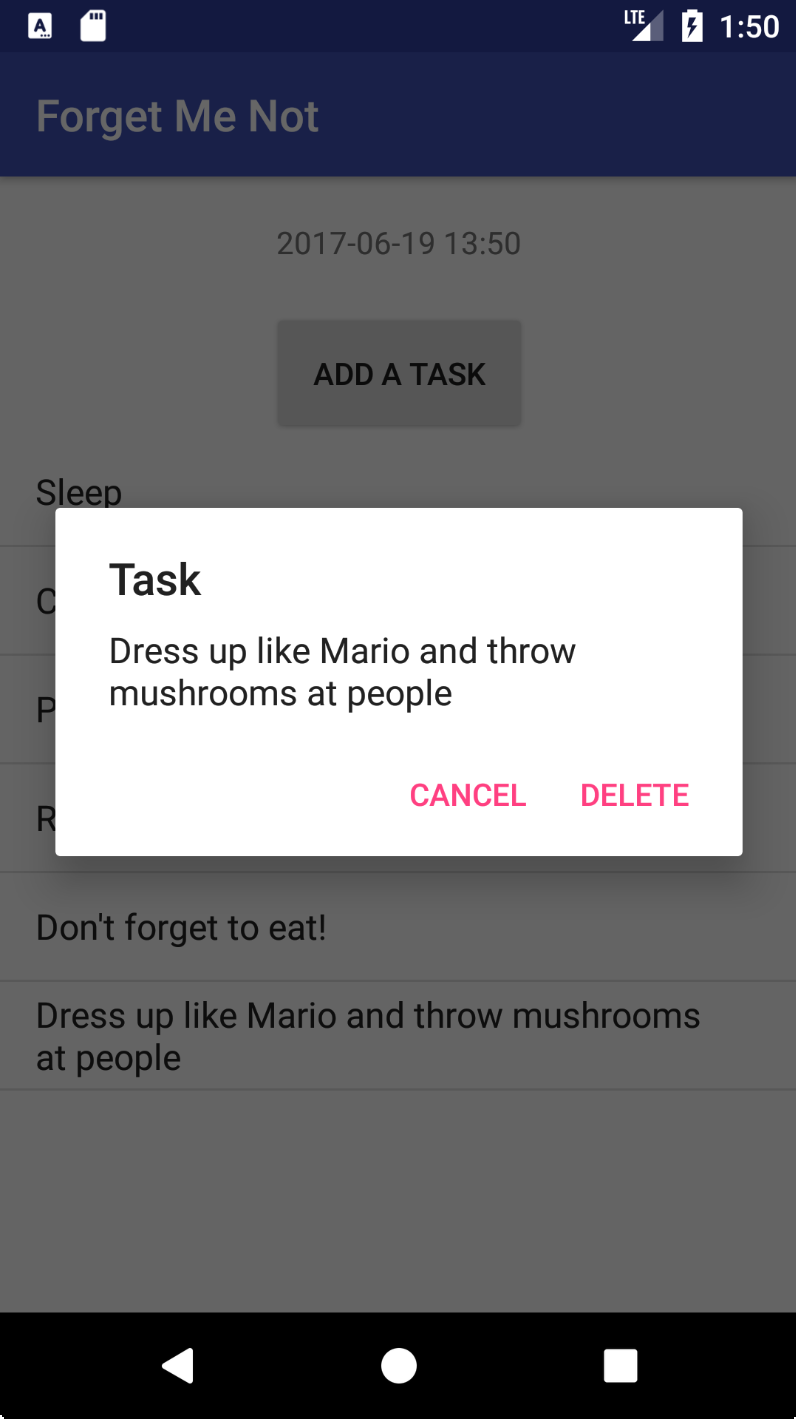
You need the ability to delete entries from Forget Me Not.
Still in MainActivity.kt, at the bottom of the class add:
private fun taskSelected(position: Int) {
  // 1
  AlertDialog.Builder(this)
    // 2
    .setTitle(R.string.alert_title)
    // 3
    .setMessage(taskList[position])
    .setPositiveButton(R.string.delete, { _, _ ->
      taskList.removeAt(position)
      adapter.notifyDataSetChanged()
    })
    .setNegativeButton(R.string.cancel, {
      dialog, _ -> dialog.cancel()
    })
    // 4
    .create()
    // 5
    .show()
}
In a nutshell, you’re creating and showing an alert dialog when you select a task from the list. Here is the step-by-step explanation:
- You create an
AlertDialog.Builderwhich facilitates the creation of anAlertDialog. - You set the alert dialog title.
- You set the alert dialog message to be the description of the selected task. Then you also implement the
PositiveButtonto remove the item from the list and refresh it, and theNegativeButtonto dismiss the dialog. - You create the alert dialog.
- You display the alert dialog to the user.
Update the OnItemClickListener of the taskListView in onCreate():
taskListView.onItemClickListener = AdapterView.OnItemClickListener { _, _, position, _ ->
  taskSelected(position)
}
Your app won’t compile though until you define some strings. It’s good practice to keep text you want in your app separate from the code. The reason is so that you can easily change it, which is especially useful for text that you use in multiple places. It’s also handy for those times you need to translate your app into another language.
To configure the strings, open res/values/strings.xml and within the resources element add:
<string name="alert_title">Task</string>
<string name="delete">Delete</string>
<string name="cancel">Cancel</string>
Build and run the app. Tap on one of the tasks. You’ll see an alert dialog with options to CANCEL or DELETE the task from the list:
Now try rotating the device. (Make sure you have rotation in the device settings set to auto-rotate.)
As soon as you rotate the device, the alert dialog is dismissed. This makes for an unreliable, undesirable user experience — users don’t like it when things just vanish from their screen without reason.