How to Create a Tower Defense Game in Unity – Part 1
In this tutorial, you’ll build a 2D tower defense game using the latest Unity engine. By Jeff Fisher.
Use The Right Prefab
Save the file and switch back to Unity.
To assign the monsterPrefab variable, first select Openspot in the Prefabs folder in the project browser.
In the Inspector, click on the circle to the right of the PlaceMonster (Script) component’s Monster Prefab field, and select Monster from the dialog that appears.

That’s it. Run the scene and build monsters on various x spots with a click or tap.
Success! You can build monsters. However they look like a weird mush because all child sprites of your monster are drawn. You’ll fix this next.
Level Up Those Monsters
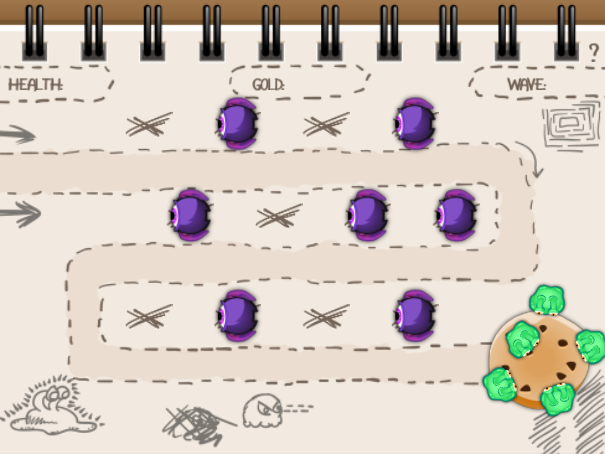
In the image below, you see how your monsters look increasingly horrifying at higher levels.
It’s so fluffy! But if you try to steal its cookie, this monster can turn into a killer.

A script acts as the basis for implementing a leveling system for the monsters. It tracks how powerful the monster should be on each level, and of course, the current level of a monster.
Add this script now.
Select Prefabs/Monster in the Project Browser. Add a new C# script named MonsterData. Open the script in your IDE and add the following code above the MonsterData class.
[System.Serializable]
public class MonsterLevel
{
  public int cost;
  public GameObject visualization;
}
This creates MonsterLevel. It groups the cost (in gold, which you’ll support later) and the visual representation for a specific monster level.
You add [System.Serializable] at the top to make instances of the class editable from the inspector. This allows you to quickly change all values in the Level class — even while the game is running. It’s incredibly useful for balancing your game.
Define Monster Levels
In this case, you’ll store predefined MonsterLevel in a List<T>.
Why not simply use MonsterLevel[]? Well, you’ll need the index of a particular MonsterLevel object several times. While it’s not difficult to write code for that, you’ll use IndexOf(), which implements the functionality for Lists. No need to reinvent the wheel this time. :]
Reinventing the wheel is usually a bad idea (from Michael Vroegop)

At the top of MonsterData.cs, add the following using statement:
using System.Collections.Generic;
This gives you access to generic data structures, so you can use the List<T> class in your script.
Note: Generics are a powerful part of C#. They allow you to define type-safe data structures without committing to a type. This is practical for container classes like lists and sets. To learn more about generics, have a look at Introduction to C# Generics.
Now add the following variable to MonsterData to store a list of MonsterLevel:
public List<MonsterLevel> levels;
Using generics, you ensure the levels List can only ever contain MonsterLevel objects.
Save the file and switch to Unity to configure each stage.
Select Prefabs/Monster in the Project Browser. In the Inspector, you can now see a Levels field in the MonsterData (Script) component. Set its size to 3.
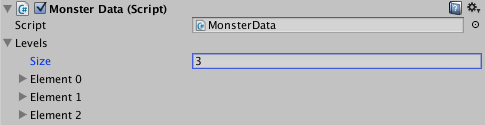
Next, set the cost for each level to the following values:
- Element 0: 200
- Element 1: 110
- Element 2: 120
Now assign the visualization field values.
Expand Prefabs/Monster in the project browser so that you can see its children. Drag and drop the child Monster0 to Element 0‘s visualization field.
Repeat to assign Monster1 to Element 1 and Monster2 to Element 2. See the following GIF that demonstrates this process:

When you select the Prefabs/Monster, the prefab should look like this:
Definition of the monsters’ levels in the inspector.

Define the Current Level
Switch back to MonsterData.cs in your IDE, and add another variable to MonsterData.
private MonsterLevel currentLevel;
In the private variable currentLevel you’ll store the… wait for it … current level of the monster. I bet you did not see that one coming :]
Now set currentLevel and make it accessible to other scripts. Add the following to MonsterData, along with instance variable declarations:
//1
public MonsterLevel CurrentLevel
{
  //2
  get
  {
    return currentLevel;
  }
  //3
  set
  {
    currentLevel = value;
    int currentLevelIndex = levels.IndexOf(currentLevel);

    GameObject levelVisualization = levels[currentLevelIndex].visualization;
    for (int i = 0; i < levels.Count; i++)
    {
      if (levelVisualization != null)
      {
        if (i == currentLevelIndex)
        {
          levels[i].visualization.SetActive(true);
        }
        else
        {
          levels[i].visualization.SetActive(false);
        }
      }
    }
  }
}
Quite a bit of C# there, eh? Take it all it turn:
- Define a property for the private variable
currentLevel. With a property defined, you can call just like any other variable: either asCurrentLevel(from inside the class) or asmonster.CurrentLevel(from outside it). You can define custom behavior in a property's getter or setter method, and by supplying only a getter, a setter or both, you can control whether a property is read-only, write-only or read/write. - In the getter, you return the value of
currentLevel. - In the setter, you assign the new value to
currentLevel. Next you get the index of the current level. Finally you iterate over all the levels and set the visualization to active or inactive, depending on thecurrentLevelIndex. This is great because it means that whenever someone setscurrentLevel, the sprite updates automatically. Properties sure do come handy!
Add the following implementation of OnEnable:
void OnEnable()
{
  CurrentLevel = levels[0];
}
This sets CurrentLevel upon placement, making sure that it shows only the correct sprite.
Note: It's important to initialize the property in OnEnable instead of OnStart, because you call the order methods when prefabs are instantiated.
OnEnable will be called immediately when you create the prefab (if the prefab was saved in an enabled state), but OnStart isn't called until after the object starts running as part of the scene.
You'll need to check this data before you place a monster, so you initialize it in OnEnable.
Save the file and switch to Unity. Run the project and place monsters; now they display the correct and lowest level sprites.

Upgrade Those Monsters
Switch back to your IDE and add the following method to MonsterData:
public MonsterLevel GetNextLevel()
{
  int currentLevelIndex = levels.IndexOf (currentLevel);
  int maxLevelIndex = levels.Count - 1;
  if (currentLevelIndex < maxLevelIndex)
  {
    return levels[currentLevelIndex+1];
  }
  else
  {
    return null;
  }
}
In GetNextLevel you get the index of currentLevel and the index of the highest level provided the monster did not reach the maximal level to return the next level. Otherwise, return null.
You can use this method to figure out whether upgrading the monster is possible.
Add the following method to increase a monster's level:
public void IncreaseLevel()
{
  int currentLevelIndex = levels.IndexOf(currentLevel);
  if (currentLevelIndex < levels.Count - 1)
  {
    CurrentLevel = levels[currentLevelIndex + 1];
  }
}
Here you get the index of the current level, and then you make sure it’s not the maximum level by checking if it’s smaller than levels.Count - 1. If so, set CurrentLevel to the next level.