iOS App Security and Analysis: Part 2/2
Continuing on the iOS app security theme, learn how attackers might access your code and the steps you can take to maintain the security of your app. By Derek Selander.
What’s in a Binary?
You will soon be modifying the binary to do your bidding, but for you to understand how to modify it, you need to first understand how to take it apart and see what exists and where.
From here on out, I will be periodically referencing specific addresses in a binary to illustrate certain concepts. If you are running a version of Xcode other than the current 4.6.3 (or if you are compiling using debug instead of release, or have made any changes to the project at all), the compiler will compile the code differently, resulting in an address that’s different from the one I’m referencing. This is okay – you just need to follow along closely to understand the idea.
Typically, a Mach-O binary (the executable format for OS X and iOS) will begin with a header that contains a list of all the information about the binary and where it is stored. This information is followed by the load commands, which tell you the layout of the file through segments. In addition, these load commands will dictate specific flags for how the file should be interpreted – for example, whether or not the binary is encrypted.
In each segment, there are one or more sections. There are two sections worth noting:
- The Text Section: This section is largely for read-only data. For example, it includes the source code section, the C-type strings section, the constants, etc. The nice thing about read-only data is that if the system is low on memory, it can free up data from these segments and reload them from disk, as needed.
- The Data Section: This section is largely for writable data from the program. This includes the bss section for static variables, the common section for global variables, etc.
The Apple developer documentation has an excellent breakdown of the Mach-O file format.
You will now examine the Meme Collector binary to see all of this in action, beginning with Meme Collector’s header in the binary. In Terminal, make sure you’re in the main application bundle and type:
> otool -h Meme\ Collector
This will print out Meme Collector’s Mach-O header, which should look like this:
Meme Collector:
Mach header
      magic cputype cpusubtype  caps    filetype ncmds sizeofcmds      flags
 0xfeedface       7          3  0x00          2    24       3412 0x01000085
Notice that it has 24 load commands, each with a size of 3412 bytes. Now that you have looked at the header, it’s time to look at those load commands. Type the following into Terminal:
> otool -l Meme\ Collector
You will get a lot of output. Scroll up until you come across the sectname __classname section. Check out the offset, which is 160164 in decimal in the screenshot below. Take note of this address.
Open up a second Terminal window and navigate to your main application bundle. In the second Terminal window, type:
> strings -o Meme\ Collector
The -o flag for the strings command displays the global offset of where the strings are in the binary.

Right above the __objc_classname section is the __objc_methname section. Navigate to the appropriate address offset in the strings dump and view the difference in strings.
The strings immediately preceding the __objc_classname are names of Objective-C methods found in various classes. The strings whose addresses are greater or equal to the __objc_classname offset clearly show classes, while the strings above show methods for various subclasses of NSObject.
As you can see, these load commands neatly segregate the chaos of 1s and 0s found in a Mach-O binary. With this knowledge in hand, you will modify the “code” section next.
Disassembling and Reversing
OK, you’ve made it this far. Now it’s time to bring out the big guns.
In this section, you will learn how to modify the application binary to do your bidding. You often hear about this in the real world when people say that an app has been “cracked.” That is, someone has modified the app to do something it was not meant to do.
You’ll need the help of IDA and a hex editor such as Hex Fiend. IDA is the tool reverse engineers will most likely turn to when inspecting an application binary. It is an incredibly powerful disassembler, debugger, and decompiler. It also costs a fair bit of money to purchase the full version.
If you don’t want to shell out the dinero required for a program that you only heard about 15 seconds ago, IDA offers a demo version with limited functionality. The demo version restricts the type of assembly files you can look at as well as disables all modification features. However, the IDA demo supports x86 assembly, which is what we are using, and since you are so awesome and have made it this far, you will make the necessary modifications by hand in Hex Fiend.
Note: As you’ve learned from the assembly tutorial, an iOS app is an ARM binary. For apps on the Simulator, Xcode compiles the binary for the i386 architecture. This architecture uses x86 assembly. So code for one architecture will not run correctly on the other.
Download the IDA demo and open it up. You’ll be presented with the quick start menu containing an image of Ada Lovelace, who is recognized as the world’s first computer programmer.

Click on the Go button to prepare IDA for disassembly.
In Terminal, you should still be in the main application bundle. Open the containing folder in Finder using the following command:
> open -R .
From Finder, right-click the main application bundle directory and click on Show Package Contents.

Once inside the main application bundle, drag and drop the Meme Collector binary into IDA. The screen below will pop up telling you it has recognized the type of binary.

Make sure your settings match the picture (typically you will not need to change anything) and press OK. IDA will process the binary and figure out the appropriate mapping as it disassembles it.
IDA may ask the following: Objective-C 2.0 structures detected. Do you want to parse them and rename methods? If it does, just hit Yes.
If IDA asks about proximity view, select No.
Once IDA has finished processing the binary, you will be shown the main display. Look at all those buttons! If IDA looks different than the screen below or if you get lost, double-click on start in the function name panel on the left and keep pressing the space key until the correct window shows up.

Fire up the Xcode project as well. Although this won’t be the case with real life attacks, it’s good to see what you’re doing side by side with the source code and assembly. Navigate to MoneyManager.m and view the buyObject: method.
- (BOOL)buyObject:(id<PurchasableItemProtocol>)object
{
    NSUInteger totalMoney = self.money.unsignedIntegerValue;
    NSUInteger cost = [object cost].unsignedIntegerValue;

    if (totalMoney < cost) {
        return NO;
    }

    _money = @(totalMoney - cost);

    return [self saveState];
}
Looking at the logic, if the instance variable _money doesn’t have an adequate amount, it will return false and the transaction will not take place. This conditional statement for being able to purchase something rests entirely upon a bool value: does the user have enough money? If you were to simply “jump” over this check, you could purchase whatever you wanted and _money would not even be a factor in purchases.
Now you can look at the same code in IDA’s disassembler. Switch back to IDA and click on any function in the Functions panel on the left side. Type control+F or go to Edit/Quick Filter to bring up a quick filter text field. Enter buyObject into the filter. One result should show up.
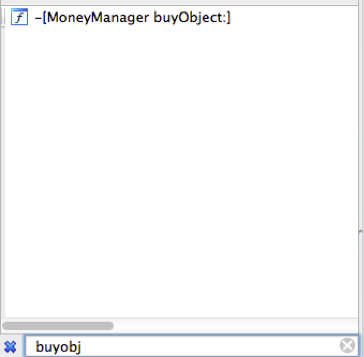
Double-click on it. You are given a disassembled window view that nicely showcases the conditional branch equivalent from the code.

Without knowing anything about x86 assembly, you can accurately assume that the path on the right is probably the path that you want your code to take, based upon the source code in buyObject:.
Look at the jump operand immediately preceding the branching paths. It is a jnb, which stands for Jump if Not Below. It sounds like you should change that to a Jump Always or a jmp instruction.
You need to find where this instruction is so you can change it. Double-click on the jnb operand. It should highlight itself in yellow. Now press space to view this in text view mode.
This will give you a new screen that displays the same information except in linear form, much like a source code viewer. Find the necessary location of the jnb command and note the address in which it resides, next to text: on the selected line. For this tutorial, the address is 0x00018F12. Remember, if you are following along, your address could be different.

The opcode for the jnb short is 0x73_ _, where the blanks represent the relative offset by which you want to move. You need to change the jnb opcode to a jmp short instruction, which is 0xEB_ _.
How can you figure out these values and their opcodes by yourself? They can be determined from Intel’s processor PDF manual, which is a truly exciting, gripping read.
Download Hex Fiend if you have not already. Provided that you put it in your applications directory, you can open your binary through Hex Fiend with the following command:
> open -a /Applications/Hex\ Fiend.app/ Meme\ Collector
The window below will open to let you view your binary through Hex Fiend. Pretty, isn’t it?

Now in Terminal, type:
> otool -l Meme\ Collector | grep -a10 "sectname __text"
As you saw previously, running otool -l displays all of the load commands for the binary. Since you only care about the “code” section (aka the text section), you limit that search. You should get output similar to the below screenshot.

Looking at the __text section name, the starting address is 0x00002a80 with an offset of 6784 in decimal. You can confirm that the text section start address in the binary is indeed 0x2A80 in IDA by scrolling to the very, very top and seeing where the code section begins. Remember, your values may differ slightly – make sure you're looking at the addr (hex) and offset (binary).
All right, now it's time to do a bit of math. You need to translate the offset from the JNB instruction in the text section to the absolute offset of the binary. If you try modifying the 0x18F12 absolute instruction found in the IDA binary, then you’ll likely get a crash somewhere in your app.
Command Location - Text Section Start Address + Offset = Absolute Offset in binary
0x00018F12 - 0x2A80 + 6784  = 0x17F12 (or 98066 in decimal)
If your values are different, I've provided a small tool to do the math for you. Make sure to omit the 0x before hex values.
If your math is correct, this will be the location of the JNB instruction you saw in IDA. In Hex Fiend, bring up the Jump to Offset selector by going to Edit/Jump To Offset. Enter the absolute offset value. If you use a hex value, make sure you tell the program you are using hex by supplying the 0x before the value.
Sure enough, the sought after JNB instruction with the 0x73 opcode is found exactly at 0x17F12:
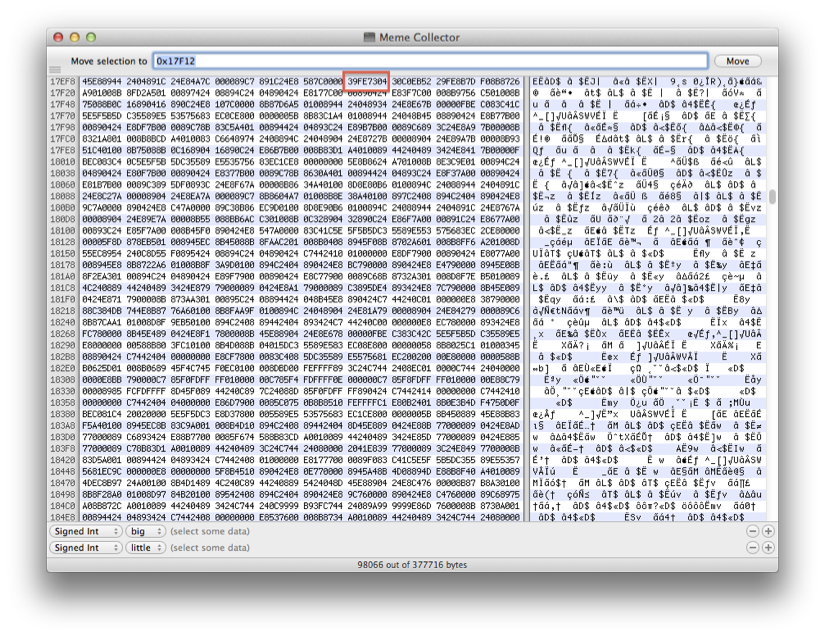
You will now change that to a JMP instruction by replacing 0x73 with 0xEB. Change the 8-byte grouping (also known as a “word”) that was originally 0x39FE7304 to 0x39FEEB04.
Note: Your JNP instruction may occur in any part of a word if your values have been different. Just make sure to look for 73 in the line that Hex Fiend finds after entering the address.
Save the file in Hex Fiend and go to the Simulator. Hard close and then re-launch your app. Proceed to purchase items until you run out of money. Notice what happens to your currency when you purchase an item that is greater than your total currency.
You effectively threw out the conditional check to see if the user had enough money. Even if the user has no money, the transaction still occurs. As a bonus, the value wraps around and updates your meme currency to a whopping 4 billion! Since the _money instance variable is interpreted as an unsigned integer, the value is viewed as a large positive 32-bit number instead of a negative number.