Raspberry Pi Airplay Tutorial
A tutorial that guides you through setting up a Raspberry Pi AirPlay receiver. It then shows you how to use a Raspberry Pi as a web server. By .
Loading the Image onto the Card
In order to copy the image on the card, you’re going to have to use the terminal or command line. Though all the typing is a little intimating at first, in some ways it’s a more powerful interface that a standard GUI interface for some tasks. Don’t be afraid of it, the hardest part is just memorizing the commands but hey, that’s what this tutorial is here for!
Open a Terminal window. You can do this quickly by hitting Command+Space and typing terminal into Spotlight. Run the following command, without the memory card inserted:
df -h
As you can see, the df command shows the free space on each disk. Notice that the command also shows the address of each disk (e.g. /dev/disk0s2).

You’re going to use df to discover the address of your memory card. Insert the memory card now into either the memory card reader on your Mac or into a separate reader that’s connected to your Mac. Run the df –h command again, and you should see something like this:
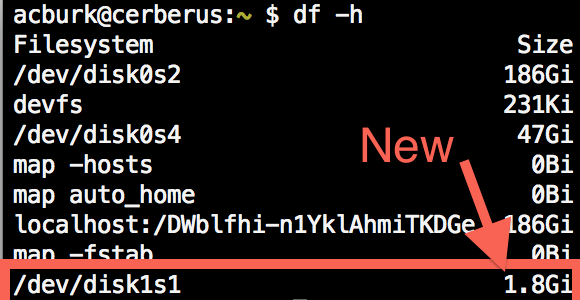
You should see a new disk, something like /dev/disk1s1, that matches the size of your memory card. The description of the new disk is the card’s address. Unmount the memory card’s disk with this command:
sudo diskutil unmount /dev/disk1s1
Next you need to get the device address. This is the address of you memory card “reader”. To do this, take the address you were using before, in my case /dev/disk1s1, remove the s1 portion from the end of it and add r in front of disk so that /dev/disk1s1 becomes /dev/rdisk1. The two addresses are different in that /dev/disk1s1 is the address where first file system partition is mounted. /dev/rdisk1 is the address of the memory card reader device (has nothing to do with the card that is inserted at the time).
You can now write the image file that you downloaded above onto the memory card. Run the following command:
sudo dd bs=5m if=~/Downloads/wheezy-raspbian.img of=/dev/YOURDISKNAME
This is where all the magic happens. You are using the dd command to copy an input stream byte-for-byte. You can’t use a standard drag-and-drop copy to move the files over since special formatting for system boot partitions are different and the Raspberry Pi wouldn’t know that it was a boot partition if you just dragged them over. Let’s take a look at each component of this command:
-
bsspecifies the block size that theddtool uses. Specifying a larger block size helps copy the image faster. -
ifspecifies the input file. You point this to the image file you downloaded earlier. -
ofspecifies the output file. You set this to the disk name you came up with earlier, /dev/rdisk1.
Hit enter to run the command. It will take a few minutes to complete – use this time to start building that rocking playlist you’ll soon be streaming!
When the command is done running, you’ll see something like this:
![]()
Now pop the memory card out of your computer and put it into the Raspberry Pi.

Plug in the Ethernet cable and then the micro-USB cable for power. Connect the other end of the ethernet cable to your router and the micro-USB cable into a computer or power adapter (like the one that comes with an iPhone or iPad).


Now how do you get access to the Raspberry Pi? In this tutorial, you are going to be setting up the Raspberry Pi computer without a monitor, keyboard or mouse. Instead you’re going to remotely log into it from your Mac.
SSHing into Raspberry Pi
SSH stand for Secure SHell and is a way to open a terminal session into a remote computer, letting you run a command just as if you were physically on that computer. This is convenient when you need to makes changes to a computer you don’t have physical access to, or, as in your case, one without a keyboard or monitor.
You’re going to be SSHing into the Raspberry Pi for a couple of reasons:
- Plugging in a mouse, keyboard, and monitor can add a large power drain that can lead to hardware failures and/or erratic behavior.
- SSH is a important and good skill to learn.
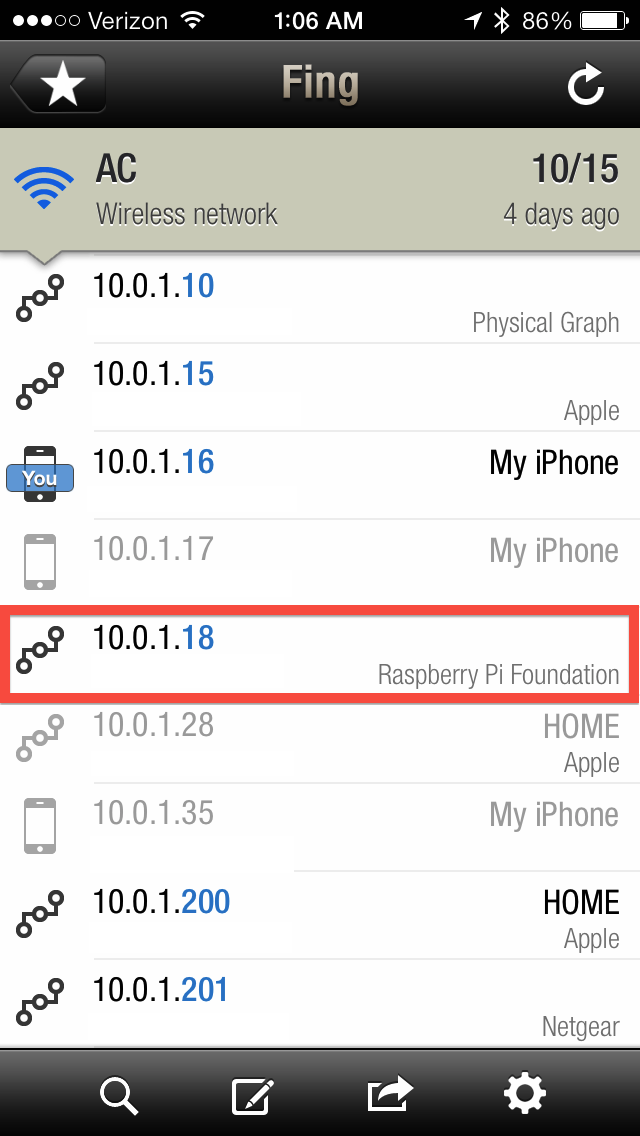
Before you can SSH into your Raspberry Pi, you need to figure out its IP address. This can be tricky, because by default it will use DHCP to automatically obtain an IP address. So you don’t know what it is. There’s a few ways to get the IP address, but I recommend you download an iPhone app called Fing that will do a network scan.
Download Fing and make sure your iPhone/iPad and the Raspberry Pi are on the same network. Run the app and you should see a list of all the devices on the network:
Though I don’t recommend it, if you want to try connecting a monitor, keyboard and mouse to the Raspberry Pi, then you can use ifconfig, a Linux command, to list information about your network connections. If you do decide to go with route, connect a monitor and a keyboard and power it on. Once you’ve got your components connected and power on, you should be taken directly to a login where you should enter your username and password.


Once logged in, you should be left at a terminal command line and should be able to type ifconfig:

It is a little pointless to ssh in if you went through all the trouble to connect a keyboard, mouse, and monitor but it is still a good skill to learn.
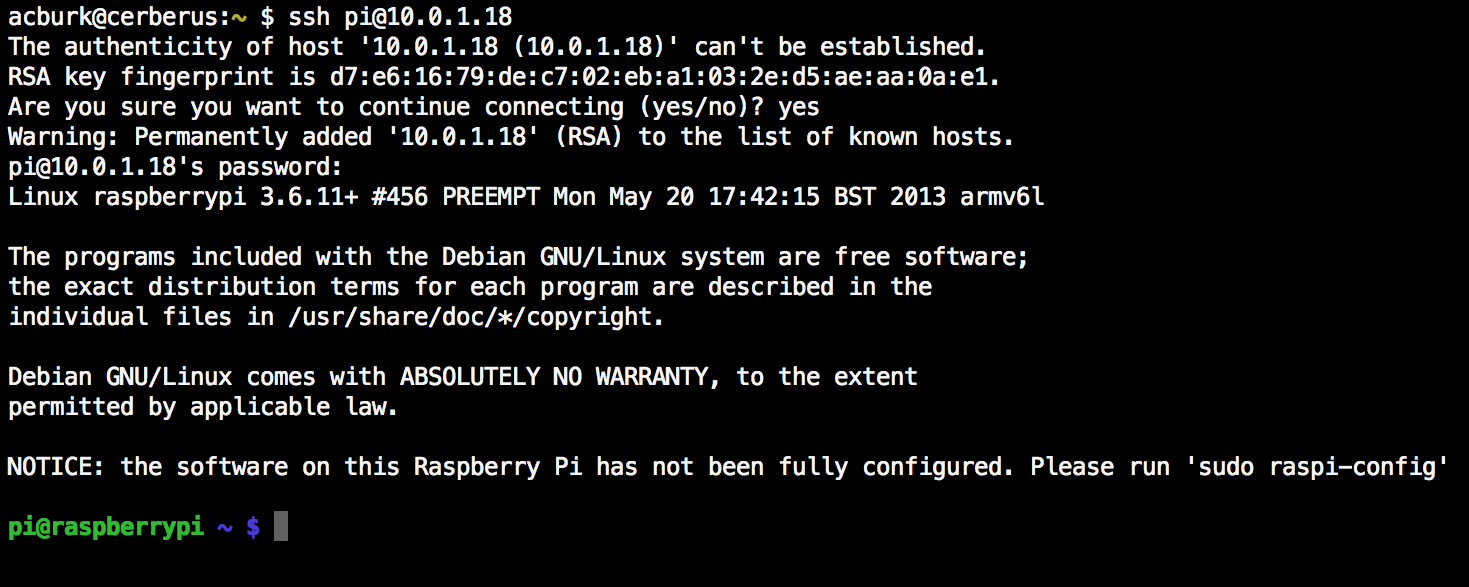
Once you’ve obtained the IP address in one of these ways, you can SSH into the Raspberry Pi. Let’s say your IP address is 192.168.1.10. In the Terminal window, type:
ssh pi@192.168.1.10 //remember to replace with YOUR IP address
You’ll get the following:

Type yes and hit enter. Terminal will now ask you for a password, which by default is raspberry. Enter that password and you should be remotely logged into the Raspberry Pi and ready to go.
Note: If you can’t seem to find your Raspberry Pi on the network, then it might be because it is not booting properly. This can happen if you aren’t supplying enough power to the device. You can check for that by plugging in a monitor via HDMI. If it continually reboots, then power is likely the problem.