iOS 7 Blur Effects with GPUImage
iOS 7 embodies deference, clarity and depth. Using GPUImage, this tutorial looks at one of the most appealing aspects of depth; the iOS 7 blur effect. By Mike Jaoudi.
A Compromise — Blurring Live Video
All right, you might have to concede that live blurring in your apps isn’t possible at the moment. So what is possible right now, given the limitations on live blurring?
Static blurring is an acceptable compromise in many situations. In the previous section, you modified the view to make it appear as if the view was actually blurring the image behind it with a bit of visual trickery. As long as the view behind it doesn’t move, a static blur usually fits the bill. You can also achieve some nice effects by fading in the blurred background.
Do some experimenting and see if you can find some effects to minimize your inability to perform live blurs.
One thing you can do is blur live video. The bottleneck again is capturing the screen, but GPUImage is very powerful and capable of blurring videos, either live video from the camera or pre-recorded video.
Blurring Video With GPUImage
The process for blurring videos with GPUImage is very similar to blurring an image. With images, you take an instance of GPUImagePicture, send it to a GPUImageiOSBlurFilter and then send that on to a GPUImageView.
In a similar fashion, you’ll take an instance of GPUImageVideoCamera or GPUImageMovie, send it to a GPUImageiOSBlurFilter and then send it to a GPUImageView. GPUImageVideoCamera is used for the live camera on the iPhone, while GPUImageMovie is used for prerecorded videos.
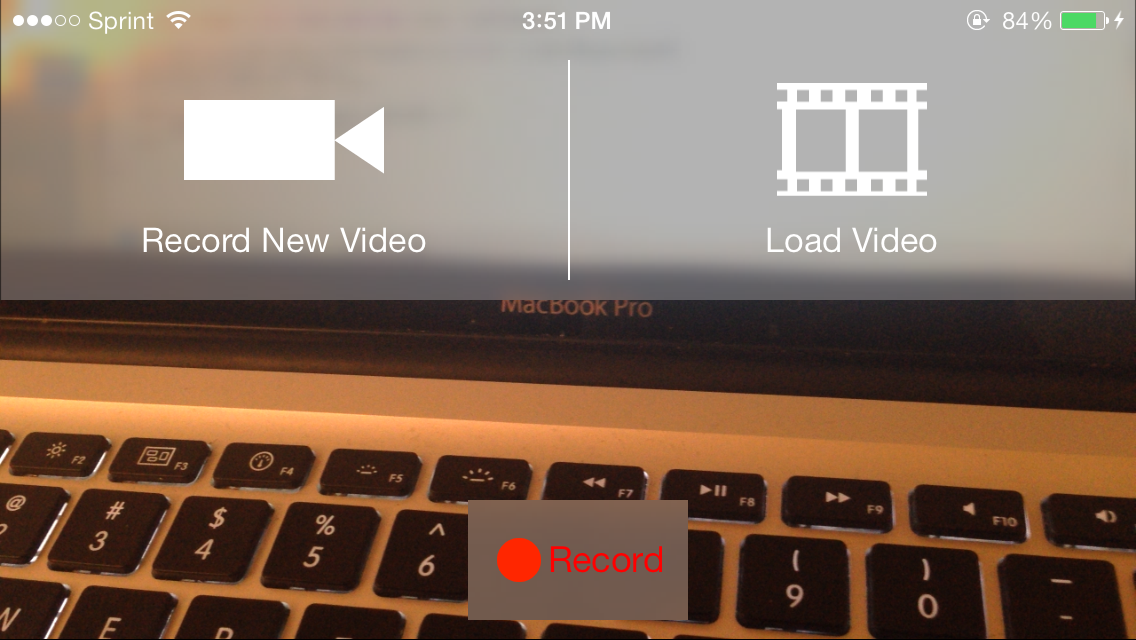
Instances of GPUImageVideoCamera and are already set up in the starter project. Your job is to replace the gray backgrounds for the play and record buttons with a live blurred view of the videos.
The first thing to do is convert those instances of UIView providing the gray background to instances of GPUImageView. Once that is done, you’ll need to adjust the contentRect for each view based on the frame of the view.
This sounds like a lot of work for each view. To make things a little easier, you’ll create a subclass of GPUImageView and put your custom code in there so it can be reused.
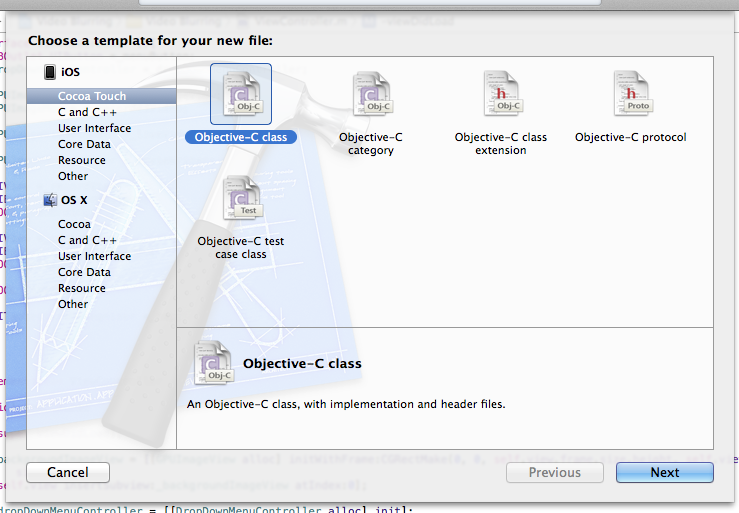
Go to File/New/File…, and select iOS/Cocoa Touch/Objective-C class, as below:
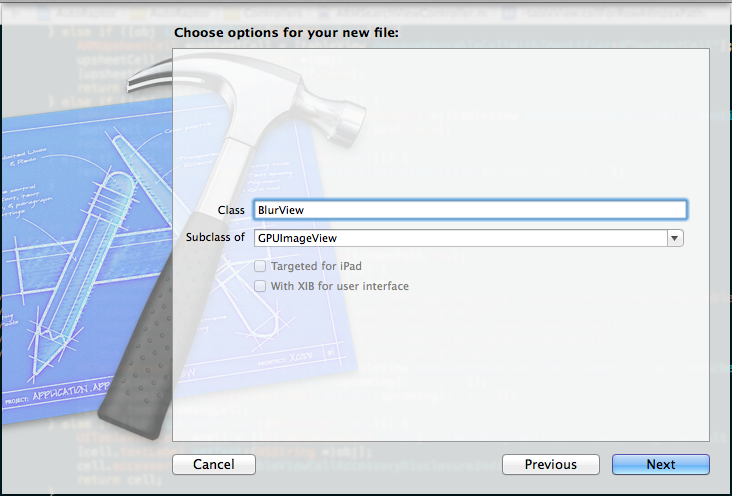
Name the class BlurView and make it a subclass of GPUImageView, like so:
Open ViewController.m and add the following import to the top of the file:
#import "BlurView.h"
Still working in ViewController.m, find the declarations for _recordView and _controlView right after the @implementation declaration and modify them to instantiate BlurViews instead, like so:
    BlurView *_recordView; //Update this!
    UIButton *_recordButton;
    BOOL _recording;

    BlurView *_controlView; //Update this too!
    UIButton *_controlButton;
    BOOL _playing;
Modify viewDidLoad as follows:
    _recordView = [[BlurView alloc] initWithFrame:
                    CGRectMake(self.view.frame.size.height/2 - 50, 250, 110, 60)]; //Update this!
    //_recordView.backgroundColor = [UIColor grayColor]; //Delete this!

    _recordButton = [UIButton buttonWithType:UIButtonTypeCustom];
    _recordButton.frame = CGRectMake(5, 5, 100, 50);
    [_recordButton setTitle:@"Record" forState:UIControlStateNormal];
    [_recordButton setTitleColor:[UIColor redColor] forState:UIControlStateNormal];
    [_recordButton setImage:[UIImage imageNamed:@"RecordDot.png"] forState:UIControlStateNormal] ;
    [_recordButton addTarget:self
                      action:@selector(recordVideo)
            forControlEvents:UIControlEventTouchUpInside];

    [_recordView addSubview:_recordButton];
    _recording = NO;

    _recordView.hidden = YES;
    [self.view addSubview:_recordView];


    _controlView = [[BlurView alloc] initWithFrame:
                     CGRectMake(self.view.frame.size.height/2 - 40, 230, 80, 80)]; //Update this!
    //_controlView.backgroundColor = [UIColor grayColor]; //Delete this!
Now you need to create the blurred image to show in those image views. Head back to the @implementation block and add the following two declarations:
GPUImageiOSBlurFilter *_blurFilter;
GPUImageBuffer *_videoBuffer;
You already know what GPUImageiOSBlurFilter does; what’s new here is GPUImageBuffer. This takes the video output and captures one frame so you can easily blur the image. As an added bonus, this also helps improve the performance of your app!
Normally you would send the output of the video through the blur filter and then onto the background view where it will be displayed. However, when you use a buffer, you send the output of the video to the buffer which then splits it into the background view and the blur filter. Doing this smoothes the video output display.
Add the following code to the very top of viewDidLoad, just below the call to super:
_blurFilter = [[GPUImageiOSBlurFilter alloc] init];

_videoBuffer = [[GPUImageBuffer alloc] init];
[_videoBuffer setBufferSize:1];
Still working in the same file, add the highlighted statements to useLiveCamera:
-(void)useLiveCamera
{
    if (![UIImagePickerController isSourceTypeAvailable: UIImagePickerControllerSourceTypeCamera]) {
        UIAlertView *alert = [[UIAlertView alloc] initWithTitle:@"No camera detected"
                                                        message:@"The current device has no camera"
                                                       delegate:self
                                              cancelButtonTitle:@"Ok"
                                              otherButtonTitles:nil];
        [alert show];
        return;
    }

    _liveVideo = [[GPUImageVideoCamera alloc] initWithSessionPreset:AVCaptureSessionPreset1280x720
                                                     cameraPosition:AVCaptureDevicePositionBack];
    _liveVideo.outputImageOrientation = UIInterfaceOrientationLandscapeLeft;

    [_liveVideo addTarget:_videoBuffer];           //Update this
    [_videoBuffer addTarget:_backgroundImageView]; //Add this
    [_videoBuffer addTarget:_blurFilter];          //And this
    [_blurFilter addTarget:_recordView];           //And finally this

    [_liveVideo startCameraCapture];

    _recordView.hidden = NO;
    _controlView.hidden = YES;
}
This results in a blurred background for the recording controls.
You’ll need to do something similar for the play controls.
Add the following code to loadVideoWithURL:, just below the _recordedVideo.playAtActualSpeed = YES; statement:
[_recordedVideo addTarget:_videoBuffer];
[_videoBuffer addTarget:_backgroundImageView];
[_videoBuffer addTarget:_blurFilter];
[_blurFilter addTarget:_controlView];
Build and run; bring up the recording controls and see how things look:

The good news is that it works — mostly. The bad news is that the entire screen has been scaled down inside the button. This sounds like a similar problem to what you had before. You’ll need to set the contentRect appropriately for the BlurView.
Open BlurView.m and replace the boilerplate initWithFrame: with the following code:
- (id)initWithFrame:(CGRect)frame
{
    self = [super initWithFrame:frame];
    if (self) {
        CGRect deviceSize = [UIScreen mainScreen].bounds;
        self.layer.contentsRect = CGRectMake(frame.origin.x/deviceSize.size.height,
                                             frame.origin.y/deviceSize.size.width,
                                             frame.size.width/deviceSize.size.height,
                                             frame.size.height/deviceSize.size.width);
        self.fillMode = kGPUImageFillModeStretch;
    }
    return self;
}
Each argument of the contentRect must be be between 0.0f and 1.0f. Here you simply take the location of the view and divide it by the size of the screen to get the numbers you need.
Build and run your app, and take a look at your new improved controls:
Congratulations! You have successfully implemented a static blur and a live video blur into your project. You are now fully armed with the knowledge to be able to add these iOS 7 blur effects into your own apps!
Where to Go from Here?
You can download the completed project here.
This tutorial has taught you not only about using iOS 7 blur effects in your app, but also how to make use of the GPUImage framework, which as I hope you’ve seen is a very powerful and capable framework. Importantly, we also touched on why blur, when used properly, is a key aspect of the new iOS 7 design language. Hopefully Apple will provide access to the same API’s they’re using in a future update to the SDK, but until that happens GPUImage is a cracking substitute.
Blurring is just the very beginning of what to you’re able to do using GPUImage. The process discussed in this tutorial can be applied to a wide range of different filters and effects. You can find all of them in the documentation.
Go forth and blur!
Hope you enjoyed the tutorial! If you have any questions or comments, please join the forum discussion below!