How to Write An iOS App that Uses a Node.js/MongoDB Web Service
Learn how to write an iOS app that uses Node.js and MongoDB for its back end. By Michael Katz.
Saving Images in your App
The Location class has two properties: image and imageId. imageId is the backend property that links the entity in the locations collection to the entity in the files collection. If this were a relational database, you’d use a foreign key to represent this link. image stores the actual UIImage object.
Saving and loading files requires an extra request for each object to transfer the file data. The order of operations is important to make sure the file id is property associated with the object. When you save a file, you must send the file first in order to receive the associated id to link it with the location’s data.
Add the following code to the bottom of Locations.m:
- (void) saveNewLocationImageFirst:(Location*)location
{
    NSURL* url = [NSURL URLWithString:[kBaseURL stringByAppendingPathComponent:kFiles]]; //1
    NSMutableURLRequest* request = [NSMutableURLRequest requestWithURL:url];
    request.HTTPMethod = @"POST"; //2
    [request addValue:@"image/png" forHTTPHeaderField:@"Content-Type"]; //3

    NSURLSessionConfiguration* config = [NSURLSessionConfiguration defaultSessionConfiguration];
    NSURLSession* session = [NSURLSession sessionWithConfiguration:config];

    NSData* bytes = UIImagePNGRepresentation(location.image); //4
    NSURLSessionUploadTask* task = [session uploadTaskWithRequest:request fromData:bytes completionHandler:^(NSData *data, NSURLResponse *response, NSError *error) { //5
        if (error == nil && [(NSHTTPURLResponse*)response statusCode] < 300) {
            NSDictionary* responseDict = [NSJSONSerialization JSONObjectWithData:data options:0 error:NULL];
            location.imageId = responseDict[@"_id"]; //6
            [self persist:location]; //7
        }
    }];
    [task resume];
}
This is a fairly busy module, but it's fairly straightforward when you break it into small chunks:
- The URL is the files endpoint.
- Using
POSTtriggershandleUploadRequestoffileDriverto save the file. - Setting the content type ensures the file will be saved appropriately on the server. The
Content-Typeheader is important for determining the file extension on the server. -
UIImagePNGRepresentationturns an instance ofUIImageinto PNG file data. -
NSURLSessionUploadTasklets you sendNSDatato the server in the request itself. For example, upload tasks automatically set theContent-Lengthheader based on the data length. Upload tasks also report progress and can run in the background, but neither of those features is used here. - The response contains the new file data entity, so you save
_idalong with the location object for later retrieval. - Once the image is saved and
_idrecorded, then the main Location entity can be saved to the server.
Add the following code to persist: in Location.m just after the if (!location || location.name == nil || location.name.length == 0) block's closing brace:
- (void) persist:(Location*)location

    //if there is an image, save it first
    if (location.image != nil && location.imageId == nil) { //1
        [self saveNewLocationImageFirst:location]; //2
        return;
    }
This checks for the presence of a new image, and saves the image first. Taking each numbered comment in turn, you'll find the following:
- If there is an image but no image id, then the image hasn’t been saved yet.
- Call the new method to save the image, and exits.
Once the save is complete, persist:will be called again, but at that point imageId will be non-nil, and the code will proceed into the existing procedure for saving the Location entity.
Next replace the stub method loadImage: in Location.m with the following code:
- (void)loadImage:(Location*)location
{
    NSURL* url = [NSURL URLWithString:[[kBaseURL stringByAppendingPathComponent:kFiles] stringByAppendingPathComponent:location.imageId]]; //1

    NSURLSessionConfiguration* config = [NSURLSessionConfiguration defaultSessionConfiguration];
    NSURLSession* session = [NSURLSession sessionWithConfiguration:config];

    NSURLSessionDownloadTask* task = [session downloadTaskWithURL:url completionHandler:^(NSURL *fileLocation, NSURLResponse *response, NSError *error) { //2
        if (!error) {
            NSData* imageData = [NSData dataWithContentsOfURL:fileLocation]; //3
            UIImage* image = [UIImage imageWithData:imageData];
            if (!image) {
                NSLog(@"unable to build image");
            }
            location.image = image;
            if (self.delegate) {
                [self.delegate modelUpdated];
            }
        }
    }];

    [task resume]; //4
}
Here's what's going on in the code above:
- Just like when loading a specific location, the image's id is appended to the path along with the name of the endpoint:
files. - The download task is the third kind of
NSURLSession; it downloads a file to a temporary location and returns a URL to that location, rather than the rawNSDataobject, as the raw object can be rather large. - The temporary location is only guaranteed to be available during the completion block's execution, so you must either load the file into memory, or move it somewhere else.
- Like all
NSURLSessiontasks, you start the task withresume.
Next, replace the current parseAndAddLocations:toArray: with the following code:
- (void)parseAndAddLocations:(NSArray*)locations toArray:(NSMutableArray*)destinationArray
{
    for (NSDictionary* item in locations) {
        Location* location = [[Location alloc] initWithDictionary:item];
        [destinationArray addObject:location];

        if (location.imageId) { //1
            [self loadImage:location];
        }
    }

    if (self.delegate) {
        [self.delegate modelUpdated];
    }
}
This updated version of parseAndAddlocations checks for an imageId; if it finds one, it calls loadImage:.
A Quick Recap of File Handling
To summarize: file transfers in an iOS app work conceptually the same way as regular data transfers. The big difference is that you're using NSURLSessionUploadTask and NSURLSessionDownloadTask objects and semantics that are slightly different from NSURLSessionDataTask.
On the server side, file wrangling is a fairly different beast. It requires a special handler object that communicates with the filesystem instead of a Mongo database, but still needs to store some metadata in the database to make retrieval easier.
Special routes are then set up to map the incoming HTTP verb and endpoint to the file driver. You could accomplish this with generic data endpoints, but the code would get quite complicated when determining where to persist the data.
Testing it Out
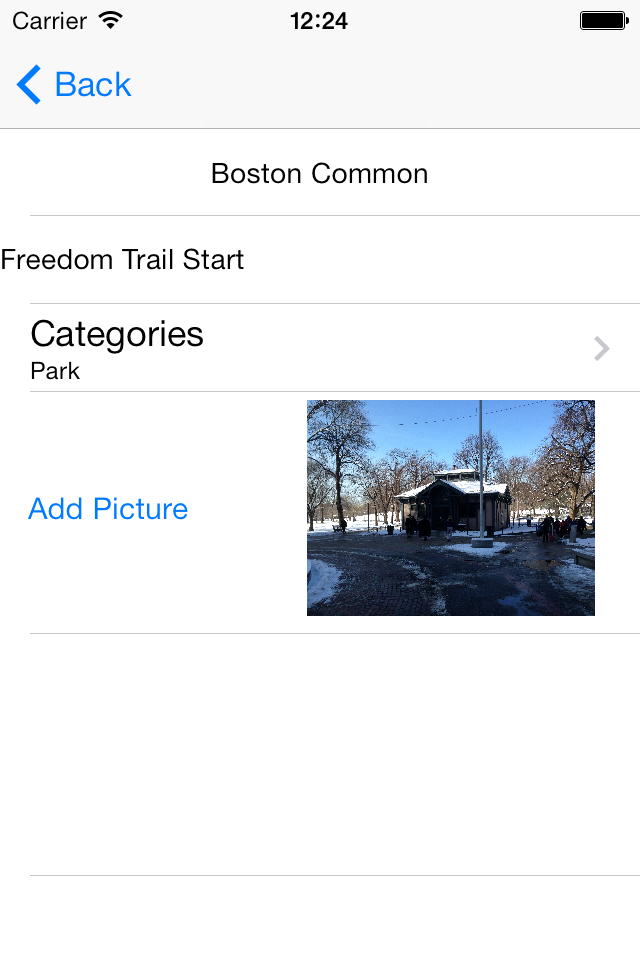
Build and run your app and add a new location by tapping the button in the upper right.
As part of creating your new location, add an image. Note that you can add images to the simulator by long-pressing on pictures in Safari.
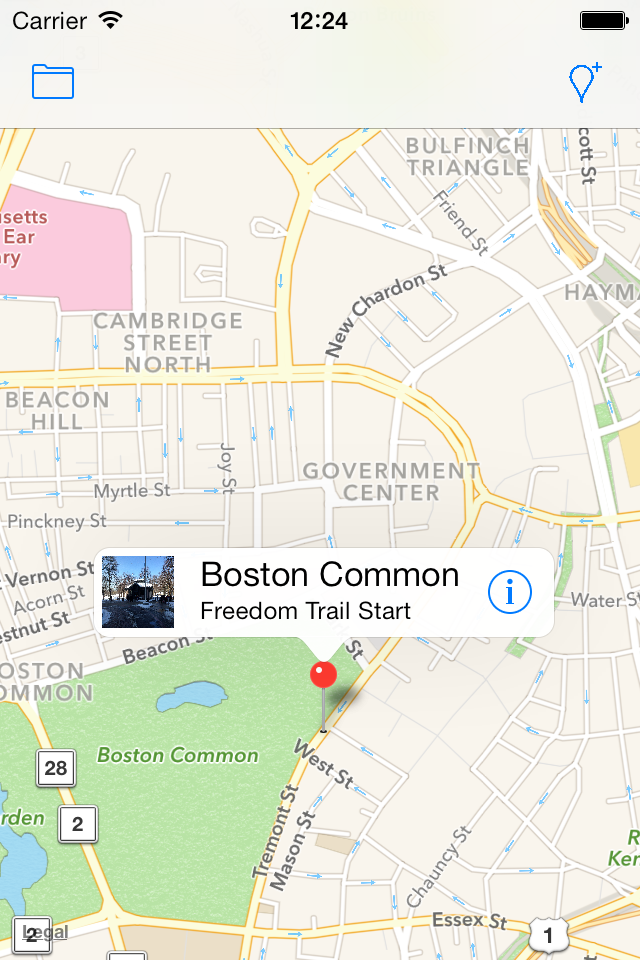
Once you've saved your new location, restart the app — and lo and behold, the app reloads your data without a hitch, as shown in the screenshot below:
Adding an image to a Location in Tour My Town.
Location annotation with an image.
Querying for Locations
Your ultra-popular Tour My Town app will collect a ton of data incredibly quickly after it's released. To prevent long wait times while downloading all of the data for the app, you can limit the amount of data retrieved by using location-based filtering. This way you only retrieve the data that's going to be shown on the screen.
MongoDB has a powerful feature for finding entities that match a given criteria. These criteria can be basic comparisons, type checking, expression evaluation (including regular expression and arbitrary javascript), and geospatial querying.
The geospatial querying of MongoDBis a natural fit with a map-based application. You can use the extents of the map view to obtain only the subset of data that will be shown on the screen.
Your next task is to modify collectionDriver.js to supply filter criteria with a GET request.
Add the following method above the final exports line in collectionDriver.js:
//Perform a collection query
CollectionDriver.prototype.query = function(collectionName, query, callback) { //1
    this.getCollection(collectionName, function(error, the_collection) { //2
      if( error ) callback(error)
      else {
        the_collection.find(query).toArray(function(error, results) { //3
          if( error ) callback(error)
          else callback(null, results)
        });
      }
    });
};
Here's how the above code functions:
-
queryis similar to the existingfindAll, except that it has aqueryparameter for specifying the filter criteria. - You fetch the collection access object just like all the other methods.
-
CollectionDriver'sfindAllmethod usedfind()with no arguments, but here thequeryobject is passed in as an argument. This will be passed along to MongoDB for evaluation so that only the matching documents will be returned in the result.
Note: This passes in the query object directly to MongoDB. In an open API case, this can be dangerous since MongoDB permits arbitrary JavaScript using the $where query operator. This runs the risk of crashes, unexpected results, or security concerns; but in this tutorial project which uses a limited set of operations, it is a minor concern.
Go back to index.js and replace the current app.get('/:collection'... block with the following:
app.get('/:collection', function(req, res, next) {
   var params = req.params;
   var query = req.query.query; //1
   if (query) {
        query = JSON.parse(query); //2
        collectionDriver.query(req.params.collection, query, returnCollectionResults(req,res)); //3
   } else {
        collectionDriver.findAll(req.params.collection, returnCollectionResults(req,res)); //4
   }
});

function returnCollectionResults(req, res) {
    return function(error, objs) { //5
        if (error) { res.send(400, error); }
	        else {
                    if (req.accepts('html')) { //6
                        res.render('data',{objects: objs, collection: req.params.collection});
                    } else {
                        res.set('Content-Type','application/json');
                        res.send(200, objs);
                }
        }
    };
};
- HTTP queries can be added to the end of a URL in the form
http://domain/endpoint?key1=value1&key2=value2....req.querygets the whole "query" part of the incoming URL. For this application the key is "query" (hencereq.query.query) - The query value should be a string representing a MongoDB condition object.
JSON.parse()turns the JSON-string into a javascript object that can be passed directly to MongoDB. - If a query was supplied to the endpoint, call
collectionDriver.query()returnCollectionResults is a common helper function that formats the output of the request. - If no query was specified, then
collectionDriver.findAllreturns all the items in the collection. - Since
returnCollectionResults()is evaluated at the time it is called, this function returns a callback function for the collection driver. - If the request specified HTML for the response, then render the data table in HTML; otherwise return it as a JSON document in the body.
Save your work, kill your Node.js instance and restart it with the following command:
node index.js
Now that the server is set up for queries, you can add the geo-querying functions to the app.
Replace the stubbed-out implementation of queryRegion of Locations.m with the following code:
- (void) queryRegion:(MKCoordinateRegion)region
{
    //note assumes the NE hemisphere. This logic should really check first.
    //also note that searches across hemisphere lines are not interpreted properly by Mongo
    CLLocationDegrees x0 = region.center.longitude - region.span.longitudeDelta; //1
    CLLocationDegrees x1 = region.center.longitude + region.span.longitudeDelta;
    CLLocationDegrees y0 = region.center.latitude - region.span.latitudeDelta;
    CLLocationDegrees y1 = region.center.latitude + region.span.latitudeDelta;

    NSString* boxQuery = [NSString stringWithFormat:@"{\"$geoWithin\":{\"$box\":[[%f,%f],[%f,%f]]}}",x0,y0,x1,y1]; //2
    NSString* locationInBox = [NSString stringWithFormat:@"{\"location\":%@}", boxQuery]; //3
    NSString* escBox = (NSString *)CFBridgingRelease(CFURLCreateStringByAddingPercentEscapes(NULL,
                                                                                  (CFStringRef) locationInBox,
                                                                                  NULL,
                                                                                  (CFStringRef) @"!*();':@&=+$,/?%#[]{}",
                                                                                  kCFStringEncodingUTF8)); //4
    NSString* query = [NSString stringWithFormat:@"?query=%@", escBox]; //5
    [self runQuery:query]; //7
}
This is a fairly straightforward block of code; queryRegion: turns a Map Kit region generated from a MKMapView into a bounded-box query. Here's how it does it:
- These four lines calculate the map-coordinates of the two diagonal corners of the bounding box.
- This defines a JSON structure for the query using MongoDB's specific query language.
A query with a$geoWithinkey specifies the search criteria as everything located within the structure defined by the provided value.$boxspecifies the rectangle defined by the provided coordinates and supplied as an array of two longitude-latitude pairs at opposite corners. -
boxQueryjust defines the criteria value; you also have to provide the search key field alongboxQueryas a JSON object to MongoDB. - You then escape the entire query object as it will be posted as part of a URL; you need to ensure that that internal quotes, brackets, commas, and other non-alphanumeric bits won't be interpreted as part of the HTTP query parameter.
CFURLCreateStringByAddingPercentEscapesis a CoreFoundation method for creating URL-encoded strings. - The final piece of the string building sets the entire escaped MongoDB query as the query value in the URL.
- You then request matching values from the server with your new query.
Replace the stubbed-out implementation of runQuery: in Locations.m with the following code:
- (void) runQuery:(NSString *)queryString
{
    NSString* urlStr = [[kBaseURL stringByAppendingPathComponent:kLocations] stringByAppendingString:queryString]; //1
    NSURL* url = [NSURL URLWithString:urlStr];

    NSMutableURLRequest* request = [NSMutableURLRequest requestWithURL:url];
    request.HTTPMethod = @"GET";
    [request addValue:@"application/json" forHTTPHeaderField:@"Accept"];

    NSURLSessionConfiguration* config = [NSURLSessionConfiguration defaultSessionConfiguration];
    NSURLSession* session = [NSURLSession sessionWithConfiguration:config];

    NSURLSessionDataTask* dataTask = [session dataTaskWithRequest:request completionHandler:^(NSData *data, NSURLResponse *response, NSError *error) {
        if (error == nil) {
            [self.objects removeAllObjects]; //2
            NSArray* responseArray = [NSJSONSerialization JSONObjectWithData:data options:0 error:NULL];
            NSLog(@"received %d items", responseArray.count);
            [self parseAndAddLocations:responseArray toArray:self.objects];
        }
    }];
     [dataTask resume];
}
runQuery: is very similar to import but has two important differences:
- You add the query string generated in
queryRegion:to the end of the locations endpoint URL. - You also discard the previous set of locations and replace them with the filtered set returned from the server. This keeps the active results at a manageable level.
Build and run your app; create a few new locations of interest that are spread out on the map. Zoom in a little, then pan and zoom the map and watch NSLog display the changing count of the items both inside and outside the map range, as shown below:
Debugger output while panning and zooming map.
