Today Extensions Tutorial: Getting Started
Learn how to make your app’s data show up in Notification Center in this iOS 8 today extension tutorial! By Chris Wagner.
Build the Interface
Open MainInterface.storyboard and delete the label. Set the view to 150pts tall and 320pts wide in the Size Inspector. Drag a Button, two Labels and a View from the Object Library onto the view controllers view.
- Position one of the labels in the top left corner, and in the Attributes Inspector set its Text to $592.12 and its Color to Red: 66, Green: 145 and Blue: 211. This will display the current market price.
- Position the other label to the right of the one you’ve just set up, but leave a margin to the right for the button. In the Attributes Inspector set its Text to +1.23 and its Color to Red: 133, Green: 191 and Blue: 37. This will display the difference between yesterdays price and the current price.
- Move the button to the upper right of the view, and in the Attributes Inspector set its Image to caret-notification-center and delete its Title.
- Finally, position the empty view below the two labels and the button, stretch it so it’s bottom and side edges are touching the containing view and set its Height to 98. In the Attributes Inspector set its Background to Clear Color, and in the Identity Inspector set its Class to
JBLineChartView.
Note: There is a class named JBLineChartDotView that Xcode may suggest when typing, verify that you chose JBLineChartView.
The view and Document Outline should now look something like this:

Note: The view shown here has a white background for the purpose of visibility in this book. Your view will actually have a dark grey background that simulates how your view appears within Notification Center.
Don’t worry about laying things out exactly as shown, as you’ll soon be adding Auto Layout constraints to properly define the layout.
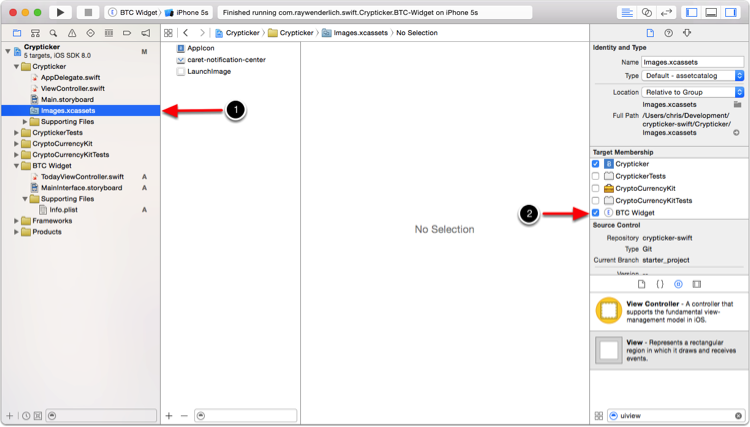
Now, expand the Crypticker group in the Project Navigator and select Images.xcassets. In the File Inspector, add the asset catalog to the extension’s target by checking the box to the left of BTC Widget.
This causes Xcode to include the image asset catalog from the Crypticker target in your BTC Widget target; that is where the caret-notification-center image that you used for your button resides. If you have an overlap of image assets between your container app and widget it is a good idea to use a dedicated catalog that only contains the assets that will actually be shared. This will reduce bloat in your finalized bundles by not including images that are unused.
Switch back to MainInterface.storyboard and open the Assistant Editor. Make sure TodayViewController.swift is the active file. Add this at the top of the file:
import CryptoCurrencyKit
This imports the CryptoCurrencyKit framework.
Next, you need to update the class declaration, like this:
class TodayViewController: CurrencyDataViewController, NCWidgetProviding {
This makes the TodayViewController a subclass of CurrencyDataViewController, and ensures it conforms to the NCWidgetProviding protocol.
CurrencyDataViewController is included in CryptoCurrencyKit and is also used by the primary view within Crypticker. Since the widget and app will be displaying similar information through a UIViewController, it makes sense to put reusable components in a superclass and then sub-class that as requirements vary.
NCWidgetProviding is a protocol specific to widgets; there are two methods from the protocol that you’ll be implementing.
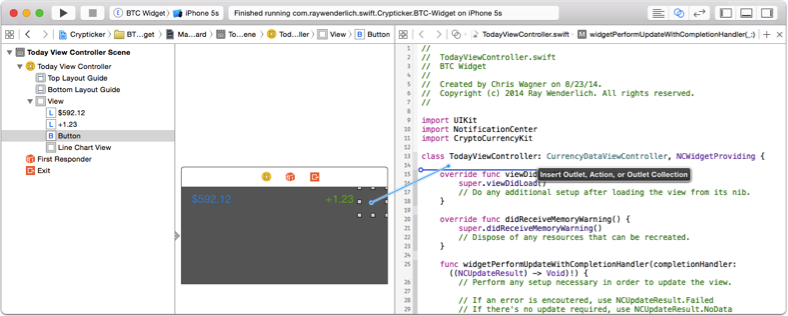
Ctrl+drag from the button to the class, just below the class declaration. In the popup dialog make sure the Connection is set to Outlet, the Type is set to UIButton, and enter toggleLineChartButton for the Name. Click Connect.
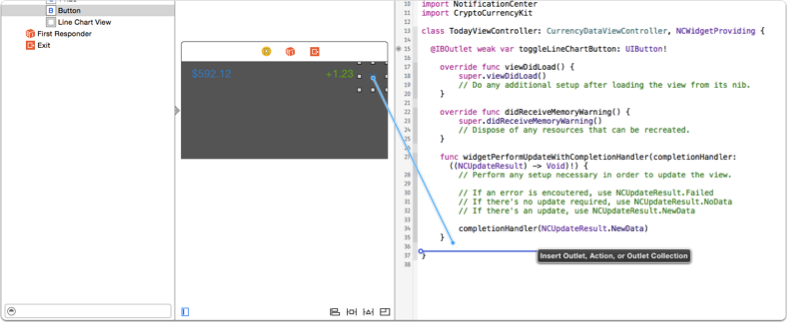
Then ctrl+drag from the button to the bottom of the class this time. In the popup dialog change the Connection to Action, set the Type to UIButton, and enter toggleLineChart for the Name. Click Connect.
TodayViewController subclasses CurrencyDataViewController, which has outlets for the price label, price change label and line chart view. You now need to wire these up. In the Document Outline, ctrl+drag from Today View Controller to the price label (the one with its text set to $592.12). Select priceLabel from the popup to create the connection. Repeat for the other label, selecting priceChangeLabel from the popup. Finally, do the same for the Line Chart View, selecting lineChartView from the popup.

For your widget to be adaptive, you’ll need to set up Auto Layout constraints. New with iOS 8 is the concept of Adaptive Layout. The general idea is that views are designed with a single layout that can work on a variety of screen sizes. The view is considered adaptive when it can adapt to unknown future device metrics.
One of the constraints that you will add is to show and hide the chart, and help define the overall height of the widget. Notification Center will rely on you to display your widget with the appropriate height.
Select the $592.12 label and then select Editor\Size to Fit Content. If the Size to Fit Content option is disabled in the menu, deselect the label, and then reselect it and try again; sometimes Xcode can be a little temperamental. Next, using the Pin button at the bottom of the storyboard canvas, pin the Top and Leading space to 8 and 16 respectively. Make sure that Constrain to margins is turned off.

Select the +1.23 label and again select Editor\Size to Fit Content. Then, using the Pin button, pin the Top and Trailing space both to 8.

Select the Button, and using the Pin button, pin its Top and Trailing space to 0, and its Bottom space to 8. Pin both its Width and Height to 44. Make sure that Constrain to margins is turned off.

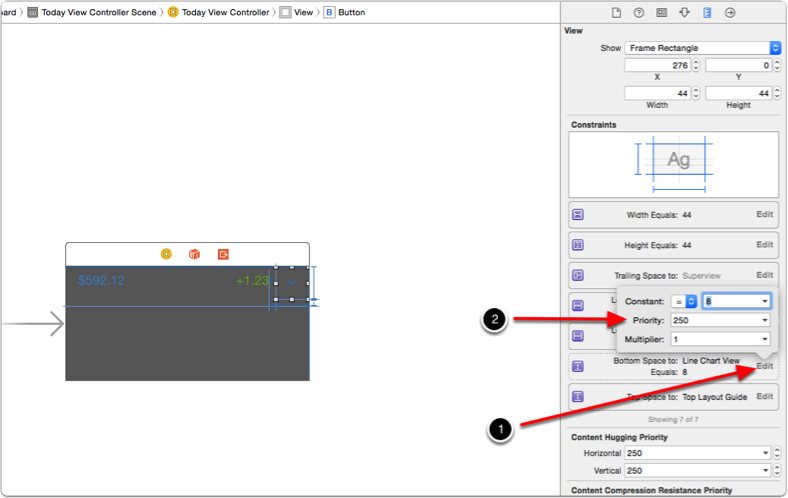
You need to reduce the priority for the bottom spacing constraint of the button. Select the button, and then open the Size Inspector. Locate the Bottom Space to: constraint in the list of constraints, click Edit and change it’s Priority to 250.
By lowering the priority you are allowing the Auto Layout system to break this constraint, as it deems necessary. 250 is an arbitrary value that happens to be less than 1,000, which is what the priority is set to for all constraints by default and means required. This constraint needs to be broken when the widget is in its collapsed state. By having varying levels of priorities per constraint you are hinting to the system which constraints to break first or last when a conflict arises.
Finally, select the Line Chart View. Using the Pin button, pin its Leading, Trailing and Bottom space to 0 and its Height to 98.

From the Document Outline select the view controllers View, the choose Editor\Resolve Auto Layout Issues\All Views\Update Frames. This will fix any Auto Layout warnings in the canvas by updating the frames of the views to match their constraints. If Update Frames is not enabled then you laid everything out perfect and it is unnecessary to run.
With all of your constraints in place, the final step is to create an outlet for the line chart view’s height constraint. Find the Line Chart View in the Document Outline and click the disclosure triangle.
Then click the disclosure triangle for the Constraints to find the necessary height constraint. Select it, and then ctrl+drag into the Assistant Editor, releasing just below the other outlet. In the popup, make sure the Connection is set to Outlet and enter lineChartHeightConstraint for the Name. Click Connect.

Now the interface is in place and everything is wired up, open up TodayViewController.swift in the Standard Editor.
You’ll notice you’re working with bog-standard UIViewController subclass. Comforting, right? Although later you’ll encounter a new method called widgetPerformUpdateWithCompletionHandler from the NCWidgetProviding protocol. You’ll learn more about it towards the end of the tutorial.
This view controller is responsible for displaying the current price, price difference, responding to a button press and showing the price history in a line chart.
Define a property at the top of TodayViewController that you’ll use to track if the line chart is visible or not:
var lineChartIsVisible = false
Now replace the boilerplate viewDidLoad() method with the following implementation:
override func viewDidLoad() {
  super.viewDidLoad()
  lineChartHeightConstraint.constant = 0

  lineChartView.delegate = self;
  lineChartView.dataSource = self;

  priceLabel.text = "--"
  priceChangeLabel.text = "--"
}
This method does the following:
- Sets the line view charts’ height constraints’ constant to 0, so that it’s hidden by default.
- Sets self as the data source and delegate for the line chart view.
- Sets some placeholder text on the two labels.
Still in TodayViewController, add the following method:
override func viewDidAppear(animated: Bool) {
  super.viewDidAppear(animated)

  fetchPrices { error in
    if error == nil {
      self.updatePriceLabel()
      self.updatePriceChangeLabel()
      self.updatePriceHistoryLineChart()
    }
  }
}
The fetchPrices method is defined in CurrencyDataViewController, and is an asynchronous call that takes a completion block. The method makes a request to the web-service mentioned at the beginning of the tutorial to obtain Bitcoin price information.
In the method’s completion block update both labels and the line chart. The update methods are also defined for you in the super-class. They simply take the values retrieved by the fetchPrices method and format them appropriately for display.
Due to the design of the widget, you’ll also need to implement widgetMarginInsetsForProposedMarginInsets to provide custom margin insets. Add the following code to TodayViewController:
func widgetMarginInsetsForProposedMarginInsets
  (defaultMarginInsets: UIEdgeInsets) -> (UIEdgeInsets) {
    return UIEdgeInsetsZero
}
By default, widgets have a large left margin, which is evident in many of Apple’s default widgets. If you want to fill the entire width of Notification Center, you must implement this method and return UIEdgeInsetsZero, which translates to 0 on all sides.
Now it’s time to see what you have so far. Select the BTC Widget scheme. Build and run. Choose Today as the app to run when prompted.
- If Notification Center doesn’t appear, swipe down from the top of the screen to activate it.
- If the widget doesn’t appear in Notification Center, you’ll need to add it via the Edit menu. Towards the bottom of the Today’s view content you will see an Edit button. Tap the button to reveal a menu of all Today Extensions that are installed on the system. Here you can enable, disable and re-order them as desired. Enable BTC Widget if not already.

Cool! Your widget now displays real-time Bitcoin pricing right in Notification Center. But you may have noticed a problem; the button doesn’t work and you can’t see the line chart.

Next, you’ll implement toggleLineChart for the button that you added so that it expands the widget’s view and exposes the line chart. As the method name implies, this button will behave as a toggle; it will also collapse the view to hide the chart.
Replace the empty toggleLineChart method with the following code:
@IBAction func toggleLineChart(sender: UIButton) {
  if lineChartIsVisible {
    lineChartHeightConstraint.constant = 0
    let transform = CGAffineTransformMakeRotation(0)
    toggleLineChartButton.transform = transform
    lineChartIsVisible = false
  } else {
    lineChartHeightConstraint.constant = 98
    let transform = CGAffineTransformMakeRotation(CGFloat(180.0 * M_PI/180.0))
    toggleLineChartButton.transform = transform
    lineChartIsVisible = true
  }
}
This method manipulates the constant of the Line Chart Views’ height constraint to toggle its display. It also applies a rotation transform to the button so it accurately reflects the visibility of the chart.
After updating the constraint, you must reload the chart’s data so that it redraws based on the new layout.
You’ll do this in viewDidLayoutSubviews. Add the following to TodayViewController:
override func viewDidLayoutSubviews() {
  super.viewDidLayoutSubviews()
  updatePriceHistoryLineChart()
}
Make sure the BTC Widget scheme is selected. Build and run. Choose Today as the app to run when prompted.
On the left, you’ll see how the widget appears when the chart is hidden. On the right, you’ll see how it appears when opened. Not too shabby!

A quick update of the line’s color and you’ll have one sharp looking widget. Add the following method to TodayViewController:
override func lineChartView(lineChartView: JBLineChartView!,
  colorForLineAtLineIndex lineIndex: UInt) -> UIColor! {
    return UIColor(red: 0.17, green: 0.49,
      blue: 0.82, alpha: 1.0)
}
Make sure the correct scheme is still selected. Build and run. Choose Today as the app to run when prompted.

Your last order of business is to add support to your widget to update its view when it’s off-screen, by allowing the system to create a snapshot. The system does this periodically to help your widget stay up to date.
Replace the existing implementation of widgetPerformUpdateWithCompletionHandler with the following code:
func widgetPerformUpdateWithCompletionHandler(completionHandler: ((NCUpdateResult) -> Void)!) {
  fetchPrices { error in
    if error == nil {
      self.updatePriceLabel()
      self.updatePriceChangeLabel()
      self.updatePriceHistoryLineChart()
      completionHandler(.NewData)
    } else {
      completionHandler(.NoData)
    }
  }
}
This method does the following:
- It fetches the current price data from the web service by calling fetchPrices.
- If there’s no error the interface is updated.
- Finally – and as required by the NCWidgetProviding protocol – the function calls the system-provided completion block with the .NewData enumeration.
- In the event of an error, the completion block is called with the .Failed enumeration. This informs the system that no new data is available and the existing snapshot should be used.
And that wraps up your Today Extension! You can download the final project here.