12 June 2012

Introduction to RESTKit Tutorial

This post is also available in: Chinese (Simplified)

Need coffee now? You're gonna write an app for that!

This is a post by iOS Tutorial Team Member Scott McAlister, an indie iOS developer and founder of 4 Arrows Media.

There are a lot of web services that you can connect to to get interesting and useful data.

For example, Twitter has an web service you can use to list and send Tweets, and Foursquare has a web service you can connect to that allows you to retrieve a list of restaurants near your current location.

If you want to use these APIs, you can connect to them directly with NSURLRequest or a wrapper library like ASIHTTPRequest or AFNetworking, as mentioned in some of the other tutorials on this site.

However, there’s an easier way for many of these APIs – use RESTKit!

RESTKit is a popular and easy-to-use framework that saves you from having to write much of the boring code you usually have to when working with web service APIs, such as parsing JSON or mapping responses to objects.

In this tutorial, we’ll try it out with by making a simple app that uses the FourSquare API to list the coffee shops nearby – because I love coffee! :]

This tutorial is for any level of iOS developer, from beginner to advanced. So read on and get ready for a buzz!

Getting Started

To start, we’re going to create a Master-View application in Xcode. If you’re already familiar with how to do this and how it works, feel free to glance through this quickly and move to the next section – but I’m going to include some more details for the beginners.

Start up Xcode and create a new project with the iOS\Application\Master-Detail Application template.

Enter CoffeeShop for the product name, set device family to iPhone, and make sure Use Storyboards and Use Automatic Reference Counting are checked (but leave the other checkboxes unchecked):

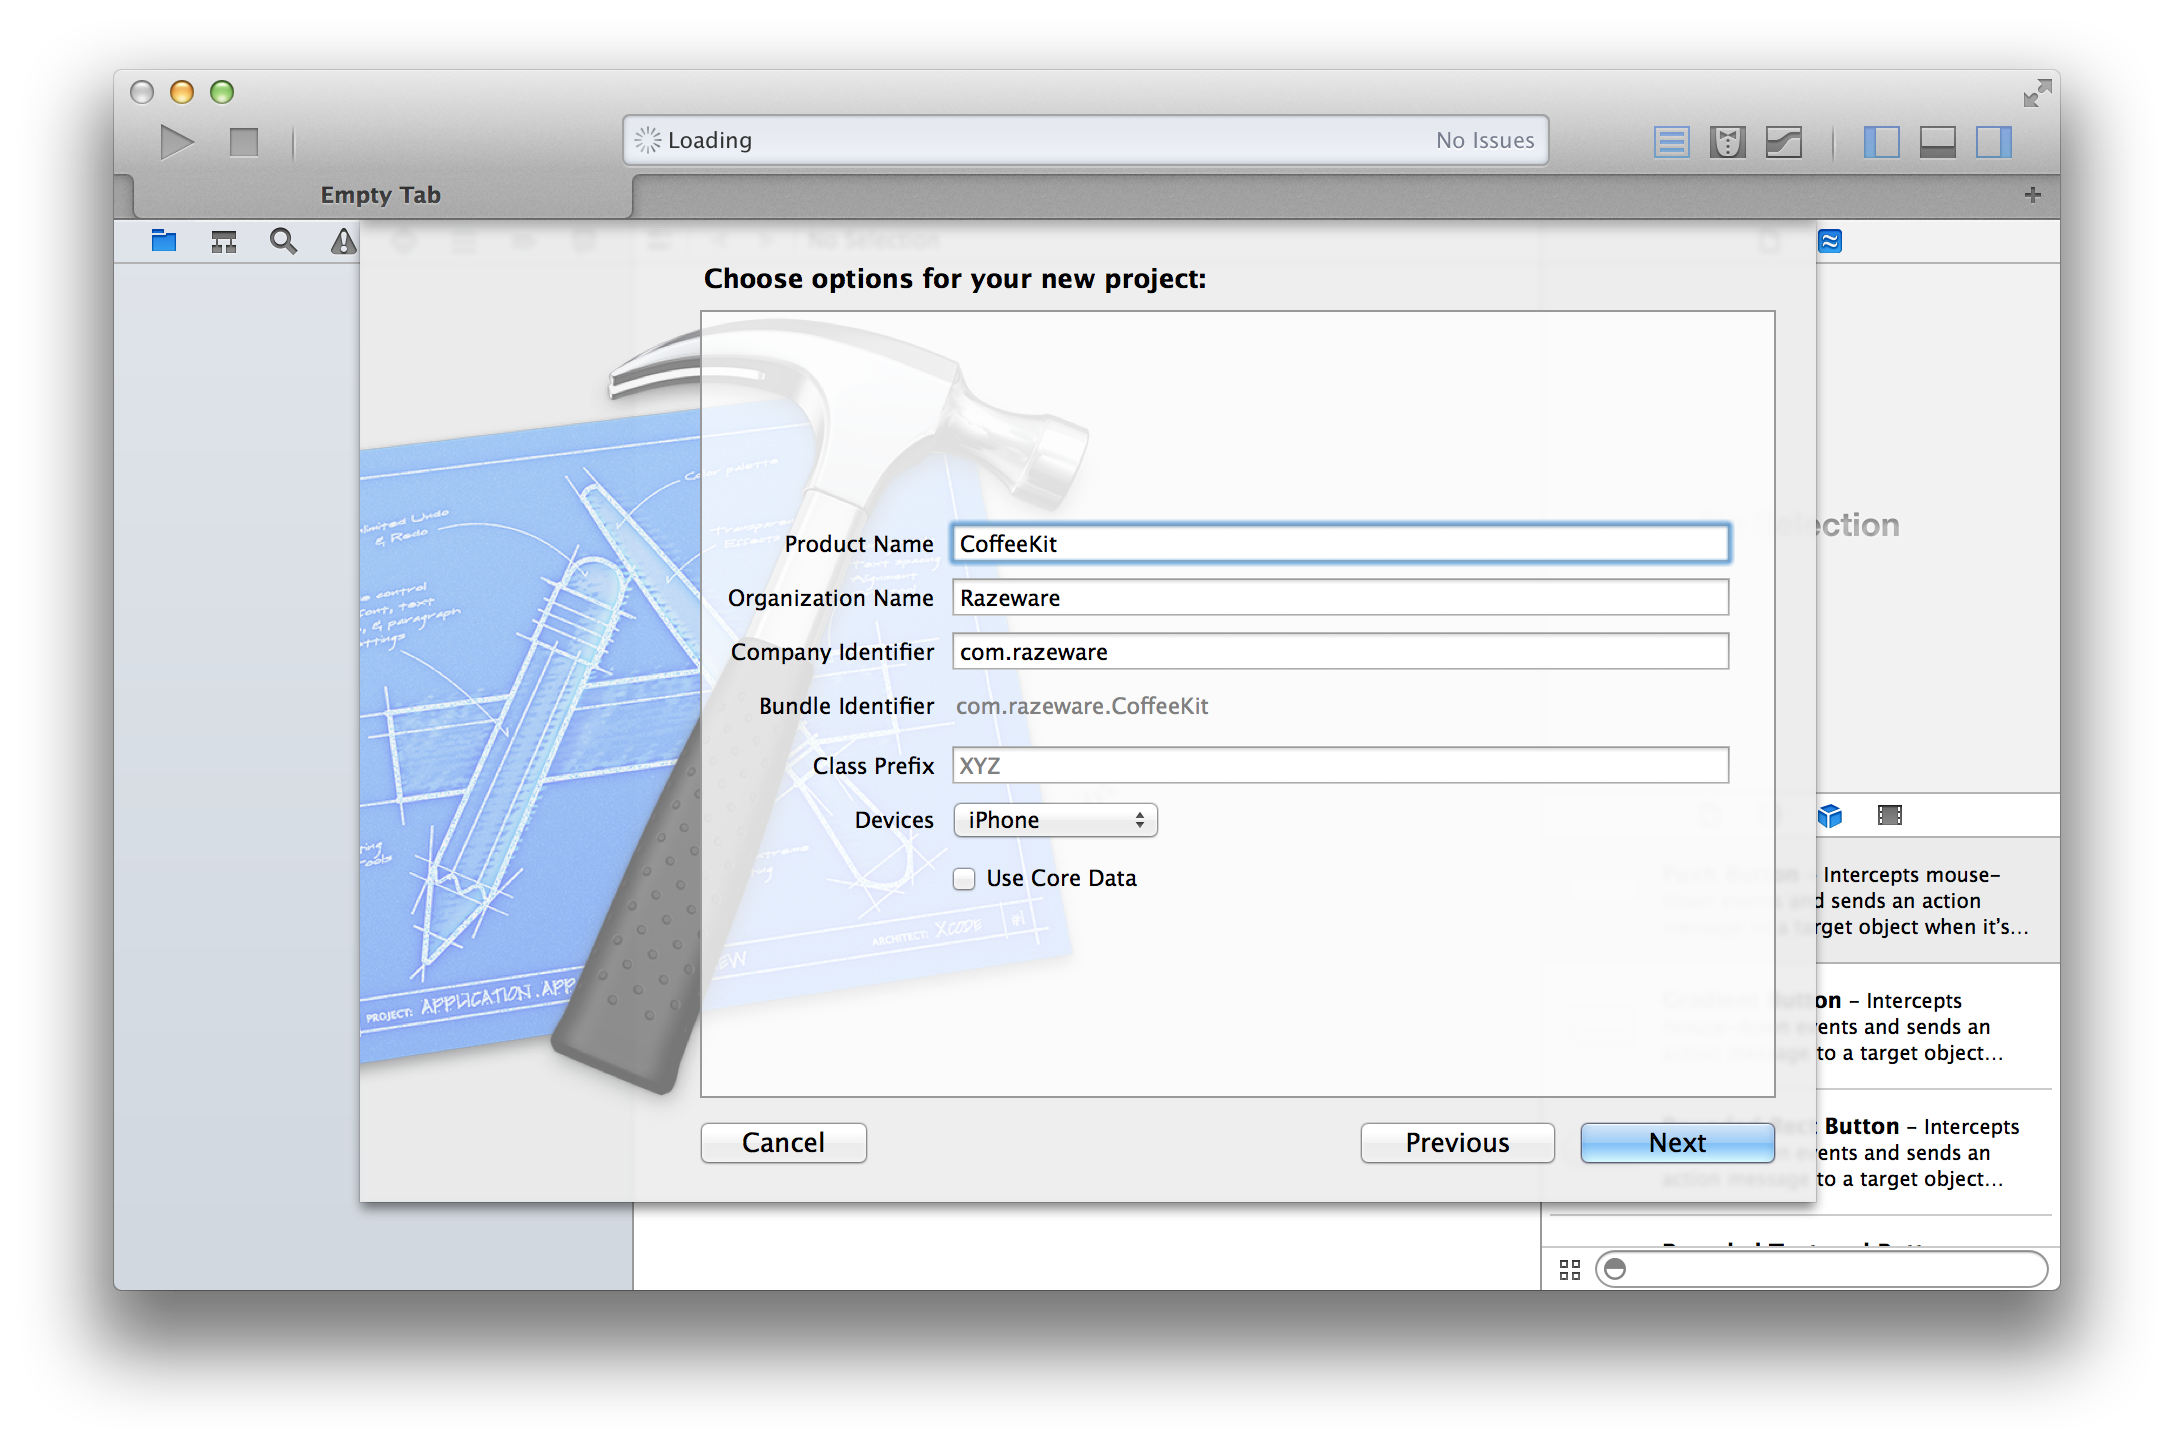
Click Next and choose a location to save your project.

The Master-Disciple, er, wait… Master-Detail template is a fully-functioning app, so click Run to build and run.

You should see a blank screen with Edit and Add (+) buttons. Click the (+) button to add some table entries to the Master screen. Tapping one of these entries will show a Detail screen:

You can see how this format is perfect for lists of data that contain different levels of information. Look at MasterViewController.h:

#import <UIKit/UIKit.h>
 
@interface MasterViewController : UITableViewController
 
@end

MasterViewController is a UITableViewController, which manages a UITableView and conforms to two protocols: UITableViewDelegate and UITableViewDataSource. UITableViewDataSource handles the data model needs for the UITableView, and UITableViewDelegate handles the appearance needs of the UITableView (such as managing selections; configuring section headers and footers; deleting and reordering of cells).

Look at some key methods in MasterViewController.m:

 
- (NSInteger)numberOfSectionsInTableView:(UITableView *)tableView 
{ 
    return 1; 
}
 
- (NSInteger)tableView:(UITableView *)tableView numberOfRowsInSection:(NSInteger)section 
{
    return _objects.count; 
}
 
- (UITableViewCell *)tableView:(UITableView *)tableView cellForRowAtIndexPath:(NSIndexPath*)indexPath 
{ 
    UITableViewCell *cell = [tableView dequeueReusableCellWithIdentifier:@"Cell"];
 
    NSDate *object = [_objects objectAtIndex:indexPath.row]; cell.textLabel.text = [object description];
    return cell; 
}
 
- (void)prepareForSegue:(UIStoryboardSegue *)segue sender:(id)sender 
{ 
    if ([[segue identifier] isEqualToString:@"showDetail"]) { 
        NSIndexPath *indexPath = [self.tableView indexPathForSelectedRow]; 
        NSDate *object = [_objects objectAtIndex:indexPath.row]; 
        [[segue destinationViewController] setDetailItem:object]; 
    } 
}

The first two methods, numberOfSectionsInTableView: and tableView:numberOfRowsInSection: are as their names imply. You use them to tell the table how many sections it has and how many rows are in each section.

You specify the data displayed in each cell using tableView:cellForRowAtIndexPath:.

prepareForSegue:sender: prepares the Master view to display the Detail view. Segues are used to control movement between view controllers, and are a feature of Storyboards. For more on Storyboards, see Beginning Storyboards in iOS 5 for an excellent introduction.

For this tutorial, you’ll only be using the Master View Controller to display a list of nearby coffee shops. To keep things simple, the Detail View Controller will not be used. So remove the following:

  • prepareForSegue:sender: from MasterViewController.m
  • The #import for DetailViewController.h at the top of MasterViewController.m.
  • The files DetailViewController.h and DetailViewController.m
  • Delete “Detail View Controller – Detail” from MainStoryboard. You can find it here:

RESTing Easy

OK now on to the fun stuff – RESTKit!

RestKit.org describes RESTKit as the following:

“RestKit is an Objective-C framework for iOS that aims to make interacting with RESTful web services simple, fast and fun. It combines a clean, simple HTTP request/response API with a powerful object mapping system that reduces the amount of code you need to write to get stuff done.”

RestKit has three main components:

  1. Network – Provides a request/response abstraction on top of NSURLConnection.
  2. Object Mapping – Provides a simple API for turning remote JSON/XML responses into local objects.
  3. Core Data – Provides additional support on top of the object mapper for mapping remote resources to persisted local objects.

In other words, that’s all a lot of code that you don’t have to write! ;]

The hardest thing about working with RestKit is the setup. It’s not difficult, but there are a lot of steps, so bear with me.

The first thing you want to do is install the RestKit submodule. I recommend using a Git submodule to manage your installation of RestKit.

Open up Terminal and enter the following commands:

$ cd /path/to/MyApplication # initialize git if needed 
$ git init 
$ git submodule add git://github.com/RestKit/RestKit.git RestKit

Next, add RestKit to your project. In a Finder window, open the RestKit folder inside your CoffeeShop project folder. Drag RestKit.xcodeproj into the Project Navigator in Xcode.

Now that you’ve told your project RestKit is there, it’s time for the most detailed step: configuring Restkit so you can use it properly. You’ll both configure settings and add some frameworks to your build configuration.

  1. Click on the top item in the Project Navigator pane and select the CoffeeShop target.
  2. Click the Build Settings filter for “Other Linker Flags” in the search box. Click the value column to the right of “Other Linker Flags,” add “-ObjC” and click Done.

  3. After configuring the Linker Flags, clear the search box text and input “Header Search Path.” Click the value column to the right of “Header Search Paths,” add “$(BUILT_PRODUCTS_DIR)/../../Headers” (be sure to include the quotes) and click Done.

  4. Now click on the Build Phases tab, click on the disclosure triangle for Target Dependencies, and tap the Add (+) button. Select RestKit and click Add.
  5. Now click on the Link Binary With Libraries disclosure triangle and tap the Add (+) button. Select libRestKit.a and click Add.
  6. You also need to add some required Apple frameworks. Click the Add (+) button again and select the following: (⌘-click for multi-select)
    • CFNetwork.framework
    • CoreData.framework
    • libxml2.dylib
    • MobileCoreServices.framework
    • QuartzCore.framework
    • Security.framework
    • SystemConfiguration.framework

    Click Add (+) one last time!

For the final step in the setup, verify your RestKit installation and configuration. Open AppDelegate.m, and add the following:

#import <RestKit/RestKit.h>

Click Run. If it builds without error, RestKit is set up correctly. Feel the force!

Connecting with Foursquare

Now that you have RestKit working, you can use it to connect to Foursquare’s web services to get venue data for your app.

You will be using Foursquare’s Search Venues API to search for coffee shops near your current location.

Don’t worry about reading that whole document right now, just know we’ll be using this basic query (feel free to click it to try it out!):

This will return JSON-formatted data of coffee-related venues located near Apple Headquarters (latitude: 37.33 and longitude: -122.03). Foursquare’s identifier for venues categorized as “Coffee Shop” is
“categoryId=4bf58dd8d48988d1e0931735.”

A typical JSON response to the basic query will look something like this:

 
{
    "meta": {
        "code": 200
    }, 
    "notifications": [
        {
            "item": {
                "unreadCount": 0
            }, 
            "type": "notificationTray"
        }
    ], 
    "response": {
        "venues": [
            {
                "beenHere": {
                    "count": 0
                }, 
                "categories": [
                    {
                        "icon": {
                            "name": ".png", 
                            "prefix": "https://Foursquare.com/img/categories/food/coffeeshop_", 
                            "sizes": [
                                32, 
                                44, 
                                64, 
                                88, 
                                256
                            ]
                        }, 
                        "id": "4bf58dd8d48988d1e0931735", 
                        "name": "Coffee Shop", 
                        "pluralName": "Coffee Shops", 
                        "primary": true, 
                        "shortName": "Coffee Shop"
                    }
                ], 
                "contact": {
                    "formattedPhone": "(650) 967-4473", 
                    "phone": "6509674473", 
                    "twitter": "redrockcoffee"
                }, 
                "hereNow": {
                    "count": 1, 
                    "groups": [
                        {
                            "count": 1, 
                            "items": [], 
                            "name": "Other people here", 
                            "type": "others"
                        }
                    ]
                }, 
                "id": "450af4f4f964a5204c391fe3", 
                "location": {
                    "address": "201 Castro St.", 
                    "city": "Mountain View", 
                    "country": "United States", 
                    "crossStreet": "at Villa St.", 
                    "distance": 8315, 
                    "lat": 37.393803003654625, 
                    "lng": -122.07888155105633, 
                    "postalCode": "94041", 
                    "state": "CA"
                }, 
                "menu": {
                    "mobileUrl": "https://Foursquare.com/v/450af4f4f964a5204c391fe3/device_menu", 
                    "type": "foodAndBeverage", 
                    "url": "https://Foursquare.com/v/red-rock-coffee/450af4f4f964a5204c391fe3/menu"
                }, 
                "name": "Red Rock Coffee", 
                "specials": {
                    "count": 0, 
                    "items": []
                }, 
                "stats": {
                    "checkinsCount": 10817, 
                    "tipCount": 91, 
                    "usersCount": 3281
                }, 
                "url": "http://redrockcoffee.org/", 
                "verified": true
            } 
        ]
    }
}

Foursquare provides free access to their web services, as long as you register your app using the OAuth Consumer Registration page, so make sure you do that before going any further.

The Application Web Site and Callback URL can be dummy pages on your website, since your app will be a mobile connection and isn’t dependent on server code. Check out Foursquare’s User Authentication page for more information.

When you create your Foursquare app registration, you’ll be given a Client ID and a Client Secret that you can use for Foursquare API calls.

You need to add these to your source code so that RestKit can authenticate itself when making any Foursquare API calls. Add the following to the top of MasterViewController.m, right below the #import lines:

#define kCLIENTID "Your Foursquare Client ID"
#define kCLIENTSECRET "Your Foursquare Client Secret"

Remember that you must replace the dummy values above with the actual Client ID and Secret you receive from Foursquare.

Time to Code, It Is Surely

You have all the pieces in place to build your app. All you need to do now is add the code!

You will use two of the main components of RestKit: Network and Object Mapping. For Network, you define the base URL for Foursquare’s API, “https://api.Foursquare.com/v2″ and send/receive your messages. For Object Mapping, you create a data model that you will map to the returned JSON values.

The JSON output above lists two venues. So, start by creating a data model class for Venue based on the JSON output.

  1. Select File->New->File (or right-click in the Project Navigator->New File, or ⌘-N).

  2. Select iOS\Cocoa Touch\Objective-C class and click Next.

  3. Enter “Venue” for class name, select Subclass of NSObject and click Next.

  4. Choose a location and click Create.

The only JSON venue data you are adding for now is the venue name. So, in Venue.h, add a property for name:

@interface Venue : NSObject
 
@property (strong, nonatomic) NSString *name;
 
@end

In Venue.m, synthesize the property:

@implementation Venue
 
@synthesize name;
 
@end

You will add more in a bit, when needed.

Next, modify MasterViewController.m for RestKit usage. Add the following imports:

#import <RestKit/RestKit.h>
#import "Venue.h"

And modify ViewDidLoad to:

- (void)viewDidLoad
{
    [super viewDidLoad];
 
    RKURL *baseURL = [RKURL URLWithBaseURLString:@"https://api.Foursquare.com/v2"];
    RKObjectManager *objectManager = [RKObjectManager objectManagerWithBaseURL:baseURL];
    objectManager.client.baseURL = baseURL;
 
    RKObjectMapping *venueMapping = [RKObjectMapping mappingForClass:[Venue class]];
    [venueMapping mapKeyPathsToAttributes:@"name", @"name", nil];
    [objectManager.mappingProvider setMapping:venueMapping forKeyPath:@"response.venues"];
 
    [self sendRequest];
}

Here you define the base URL for Foursquare’s API. All send requests will be appended to this baseURL. This is nice if you need to switch between different servers and environments (development/staging/production). Using this base URL, you create a RKObjectManager object. RKObjectManager is the primary interface for interacting with RESTful services via HTTP.

The RKObjectMapping class is used to define the mapping between the JSON data and your data model class. mapKeyPathsToAttributes will map the JSON fields to your data model’s attributes. For instance, it will map the value “id” in the JSON data to the “venueID” property in the Venue class.

Next, create a request message to retrieve the data for your tableView. Still in MasterViewController.m, add a new method, sendRequest:

- (void)sendRequest
{
    NSString *latLon = @"37.33,-122.03";
    NSString *clientID = [NSString stringWithUTF8String:kCLIENTID];
    NSString *clientSecret = [NSString stringWithUTF8String:kCLIENTSECRET];
 
    NSDictionary *queryParams;
    queryParams = [NSDictionary dictionaryWithObjectsAndKeys:latLon, @"ll", clientID, @"client_id", clientSecret, @"client_secret", @"coffee", @"query", @"20120602", @"v", nil];
    RKObjectManager *objectManager = [RKObjectManager sharedManager];
 
    RKURL *URL = [RKURL URLWithBaseURL:[objectManager baseURL] resourcePath:@"/venues/search" queryParameters:queryParams];
    [objectManager loadObjectsAtResourcePath:[NSString stringWithFormat:@"%@?%@", [URL resourcePath], [URL query]] delegate:self];    
}

RestKit will send back responses using delegate methods. To receive those responses, you must adopt the RKObjectLoaderDelegate protocol. To do this, add this to your interface declaration in MasterViewController.h:

@interface MasterViewController : UITableViewController <RKObjectLoaderDelegate>

Then in MasterViewController.m, add the following RKObjectLoaderDelegate methods:

- (void)objectLoader:(RKObjectLoader *)objectLoader didFailWithError:(NSError *)error
{
    NSLog(@"Error: %@", [error localizedDescription]);
}
 
- (void)request:(RKRequest*)request didLoadResponse:(RKResponse*)response {
    NSLog(@"response code: %d", [response statusCode]);
}
 
- (void)objectLoader:(RKObjectLoader *)objectLoader didLoadObjects:(NSArray *)objects
{
    NSLog(@"objects[%d]", [objects count]);
    data = objects;
 
    [self.tableView reloadData];
}

The only required method is objectLoader:didFailWithError, but you also need objectLoader:didLoadObjects to retrieve your request data. It returns an array of Venue objects based on the object mapping you registered in viewDidLoad.

If you try to build now, you will get an error because data in objectLoader:didLoadObjects is undefined.

To fix this, in MasterViewController.m, change:

@interface MasterViewController () {
    NSMutableArray *_objects;
}
@end
 
@implementation MasterViewController

to:

@interface MasterViewController ()
 
@property (strong, nonatomic) NSArray *data;
 
@end
 
@implementation MasterViewController
@synthesize data;

And change:

- (UITableViewCell *)tableView:(UITableView *)tableView cellForRowAtIndexPath:(NSIndexPath *)indexPath
{
    UITableViewCell *cell = [tableView dequeueReusableCellWithIdentifier:@"Cell"];
 
    NSDate *object = [_objects objectAtIndex:indexPath.row];
    cell.textLabel.text = [object description];
    return cell;
}

to:

- (UITableViewCell *)tableView:(UITableView *)tableView cellForRowAtIndexPath:(NSIndexPath *)indexPath
{
    UITableViewCell *cell = [tableView dequeueReusableCellWithIdentifier:@"Cell"];
 
    Venue *venue = [data objectAtIndex:indexPath.row];    
    cell.textLabel.text = [venue name];
    return cell;
}

Also, still in MasterViewController.m, change the return statement in tableView:numberOfRowsInSection: to:

	return data.count;

Finally, be sure to remove the tableView:commitEditingStyle: and insertNewObject: methods from MasterViewController.m, since the data is no longer editable. (Plus, Xcode throws a few compilation errors if you don’t remove/fix those methods :])

Click Run. You should see something similar to this:

You’ll notice some of the places on this list aren’t actually coffee houses, such as Kaiser Permanente and Nokia. I blame Foursquare for that! :P

TableViews hold a collection of TableViewCells. But for performance reasons, it only creates enough TableViewCell instances for the visible cells. And instead of deleting and creating more cells, it reuses the ones that scroll off the screen.

In tableView:cellForRowAtIndexPath above, [tableView dequeueReusableCellWithIdentifier:@"Cell"] will reuse any unused tableViewCells that match the identifier “Cell.” The identifier is set in MainStoryboard.storyboard, in the Table View Cell window, as illustrated below:

Stylin’ the TableViewCells

Another option in the storyboard image above is TableViewCell Style. The default is Basic. It provides a left-aligned text label in the cell. The other provided options are:

  • Right Detail
  • Left Detail   
  • Subtitle       

These other options make it possible to show a detail of your choice in the Master view. For example, if you were to use this app to find nearby coffee shops, it would be nice to see how far away each shop is from your present location. Nobody wants to go too far for a coffee fix!

For now, use the Right Detail style to show the name and distance. Change the Style from “Basic” to “Right Detail” in the drop-down menu.

In the JSON data above, the “location” field provides the distance:

	"location": {
		"address": "201 Castro St.", 
		"city": "Mountain View", 
		"country": "United States", 
		"crossStreet": "at Villa St.", 
		"distance": 8315, 
		"lat": 37.393803003654625, 
		"lng": -122.07888155105633, 
		"postalCode": "94041", 
		"state": "CA"
	}, 

So that RestKit can retrieve this, create a Location data model and provide the mapping. Here are the steps:

  1. Create a New File called “Location,” a subclass of NSObject.
  2. In Location.h, add:
    @property (nonatomic, strong) NSString *address;
    @property (nonatomic, strong) NSString *city;
    @property (nonatomic, strong) NSString *country;
    @property (nonatomic, strong) NSString *crossStreet;
    @property (nonatomic, strong) NSString *postalCode;
    @property (nonatomic, strong) NSString *state;
    @property (nonatomic, strong) NSNumber *distance;
    @property (nonatomic, strong) NSNumber *lat;
    @property (nonatomic, strong) NSNumber *lng;

    Make sure to synthesize these properties in Location.m!

  3. Now in Venue.h, add:
    #import "Location.h"
     
    @property (strong, nonatomic) Location *location;

    And synthesize location in Venue.m.

  4. In MasterViewController.m, add the Location mappings in viewDidLoad (before the call to sendRequest):
        RKObjectMapping *locationMapping = [RKObjectMapping mappingForClass:[Location class]];
        [locationMapping mapKeyPathsToAttributes:@"address", @"address", @"city", @"city", @"country", @"country", @"crossStreet", @"crossStreet", @"postalCode", @"postalCode", @"state", @"state", @"distance", @"distance", @"lat", @"lat", @"lng", @"lng", nil];
     
        [venueMapping mapRelationship:@"location" withMapping:locationMapping];
        [objectManager.mappingProvider setMapping:locationMapping forKeyPath:@"location"];
  5. This is similar to the Venue mapping you did earlier, except for mapRelationship:withMapping:. It informs your venueMapping instance to use locationMapping for its location property. setMapping:forKeyPath: tells the objectManager to use locationMapping for the location key in the JSON data.

  6. Change tableView:cellForRowAtIndexPath: to:
        UITableViewCell *cell = [tableView dequeueReusableCellWithIdentifier:@"Cell"];
        Venue *venue = [data objectAtIndex:indexPath.row];
        cell.textLabel.text = [venue.name length] > 24 ? [venue.name substringToIndex:24] : venue.name;
        cell.detailTextLabel.text = [NSString stringWithFormat:@"%.0fm", [venue.location.distance floatValue]];
        return cell;

Build and run. Now you should see something like this:

The m stands for meters, not miles. Also remember that we’re still using the latitude/longitude for Apple – if you want you might want to replace it with your own coordinates. For more info on how to do that, check out this tutorial.

Customizing TableViewCells

Let’s wrap things up by displaying the FourSquare checkins in our table view cell as well. To do this, we’ll need to make a custom table view cell.

In MainStoryboard, change the TableViewCell style to Custom. The default labels will disappear. In the Size Inspector, change the Row Height to Custom and from 44 to 64. Make sure that you set the Row Height to 64 for the TableView too.

Now add three labels, similar to this:

Notice that you can use the Custom style to incorporate even more detail onto the Master screen. Not too much, but just enough.

Since the tableViewCell is now set to Custom, you can’t use UITableViewCell’s textLabel and detailTextLabel properties to add text to the labels. This means that in order to refer to the individual labels, you need to create a subclass of UITableViewCell with outlets for venue name, distance, and check-ins.

Add a new file to the project, with the Objective-C class template. Name it “VenueCell” and make it a subclass of UITableViewCell.

Change VenueCell.h to:

#import <UIKit/UIKit.h>
 
@interface VenueCell : UITableViewCell
 
@property (strong, nonatomic) IBOutlet UILabel *nameLabel;
@property (strong, nonatomic) IBOutlet UILabel *distanceLabel;
@property (strong, nonatomic) IBOutlet UILabel *checkinsLabel;
 
@end

Change VenueCell.m to:

#import "VenueCell.h"
 
@implementation VenueCell
@synthesize nameLabel, distanceLabel, checkinsLabel;
 
@end

As you can see, this class doesn’t do much: it just adds properties for nameLabel, distanceLabel and checkinsLabel.

Back in MainStoryboard.storyboard, select the prototype cell and set its Class to “VenueCell” in the Identity Inspector. Also, in the Attributes Inspector, change Identifier to “VenueCell.”

These items don’t need to match, but it is good to match them for consistency and clarity.

Now connect the outlets to the labels in VenueCell. In the Connections Inspector, connect the Outlets: nameLabel, distanceLabel and checkinsLabel to their respective UILabels.

Add an import for VenueCell to the top of MasterViewController.m:

#import "VenueCell.h"

Still in MasterViewController.m, change tableView:cellForRowAtIndex: from:

    UITableViewCell *cell = [tableView dequeueReusableCellWithIdentifier:@"Cell"];
    Venue *venue = [data objectAtIndex:indexPath.row];
    cell.textLabel.text = [venue.name length] > 25 ? [venue.name substringToIndex:25] : venue.name;
    cell.detailTextLabel.text = [NSString stringWithFormat:@"%.0fm", [venue.location.distance floatValue]];
    return cell;

to:

    VenueCell *cell = [tableView dequeueReusableCellWithIdentifier:@"VenueCell"];
    Venue *venue = [data objectAtIndex:indexPath.row];
    cell.nameLabel.text = [venue.name length] > 25 ? [venue.name substringToIndex:25] : venue.name;
    cell.distanceLabel.text = [NSString stringWithFormat:@"%.0fm", [venue.location.distance floatValue]];
    cell.checkinsLabel.text = [NSString stringWithFormat:@"%d checkins", [venue.stats.checkins intValue]];
    return cell;

This won’t work if you try to build and run, because Venue does not have a stats property… yet. Just as with location data, Foursquare provides venue stats in the JSON data:

	"stats": {
		"checkinsCount": 3552, 
		"tipCount": 42, 
		"usersCount": 1089
	},

And just as for the Location data, you need to create a Stats data model and provide the mapping for RestKit.

  1. Create a New File called “Stats,” and make it a subclass of NSObject.
  2. In Stats.h, add:
    @property (nonatomic, strong) NSNumber *checkins;
    @property (nonatomic, strong) NSNumber *tips;
    @property (nonatomic, strong) NSNumber *users;

    And synthesize them in Stats.m.

  3. In Venue.h, add:
    #import "Stats.h"
     
    @property (strong, nonatomic) Stats *stats;

    And synthesize stats in Venue.m.

  4. In MasterViewController.m, add the Location mappings in viewDidLoad (before the call to sendRequest):
        RKObjectMapping *statsMapping = [RKObjectMapping mappingForClass:[Stats class]];
        [statsMapping mapKeyPathsToAttributes:@"checkinsCount", @"checkins", @"tipCount", @"tips", @"usersCount", @"users", nil];
     
        [venueMapping mapRelationship:@"stats" withMapping:statsMapping];
        [objectManager.mappingProvider setMapping:statsMapping forKeyPath:@"stats"];

Build and run, and you should see something like this:

Who woulda thought, Kaiser Permanente is more popular than Starbucks! ;]

Note: If you have any crashes at this point, double-check to make sure that you set the Identifier for the cell to “VenueCell” in MainStoryboard.storyboard. That’s the most likely culprit.

Where to Go From Here?

Here is a example project with all of the code from the above tutorial.

Here is list of what you have done:

  • An introduction to UITableView using the Master-Detail Application template.
  • RestKit installation and configuration for your app.
  • Foursquare configuration for your app and an introduction to their Venues API.
  • Created data models for your app.
  • Setup RestKit mappings so that it can request, receive and parse the data into your data model.
  • Created a custom table view cell to display the Foursquare data.

Here is what you did not do:

  • Setup and use NSURLConnections or NSURLConnectionDelegates.
  • Parse JSON or XML data.
  • Map the JSON or XML responses to your own objects.

Because RestKit handled all of this for you! Not bad, eh?

From here, feel free set up Foursquare user authentication to gain full access to Foursquare’s API and extend this example with even more features, or find other web services that you can use RestKit to provide data for your app.

I hope you enjoyed this tutorial, and if you have any questions on it or RESTKit in general, please join the forum discussion below!


This is a post by iOS Tutorial Team Member Scott McAlister, an indie iOS developer and founder of 4 Arrows Media.


iPhoneCategory:

Tags: , , , , ,

I'd love to hear your thoughts!