Card Game Mechanics in Sprite Kit with Swift
Learn how to implement basic card game mechanics and animation with Sprite Kit and Swift. By Brian Broom.
Flipping The Card
Finally, add some card-like actions to make the game more realistic. Since the basic premise is that two players will share an iPad, the cards need to be able to turn face down so the other player cannot see them.
An easy way to do this is to make the card flip over when you double tap it. However, you need a property to keep track of the card state to make this possible.
Open Card.swift and add the following property below the other properties:
var faceUp = true
Next, add a function to swap the textures that will make a card appears flipped:
func flip() {
  if faceUp {
    self.texture = backTexture
    damageLabel.isHidden = true
  } else {
    self.texture = frontTexture
    damageLabel.isHidden = false
  }
  faceUp = !faceUp
}
Finally, in GameScene.swift, add the following to the beginning of touchesBegan(_:with:), just inside the if let card section.
if touch.tapCount > 1 {
  card.flip()
}
Now you understand why you saved the front and back card images as textures earlier — it makes flipping the cards delightfully easy. You also hide damageLabel so the number is not shown when the card is face down.
Build and run the project and flip those cards by double-tapping.
Simple card flip by swapping out the texture. The little bounce is the pick-up animation triggered by the first touch.
The effect is ok, but you can do better. One trick is to use the scaleX(to:duration:) animation to make it look as though it actually flips.
In Card.swift, replace flip() with:
func flip() {
  let firstHalfFlip = SKAction.scaleX(to: 0.0, duration: 0.4)
  let secondHalfFlip = SKAction.scaleX(to: 1.0, duration: 0.4)

  setScale(1.0)

  if faceUp {
    run(firstHalfFlip) {
      self.texture = self.backTexture
      self.damageLabel.isHidden = true

      self.run(secondHalfFlip)
    }
  } else {
    run(firstHalfFlip) {
      self.texture = self.frontTexture
      self.damageLabel.isHidden = false

      self.run(secondHalfFlip)
    }
  }
  faceUp = !faceUp
}
The scaleX(to:duration) action shrinks only the horizontal direction and gives it a pretty cool 2D flip animation. The animation splits into two halves so that you can swap the texture halfway. The setScale(_:) function makes sure the other scale animations don’t get in the way.
Build and run the project to see the new “flip” effect in action.
Now you have a nice looking flip animation.

Things are looking great, but you can’t fully appreciate the bear’s goofy grin when the cards are so small. If only you could enlarge a selected card to see its details…
Enlarging The Card
The last effect you’ll work with in this tutorial is modifying the double tap action so that it enlarges the card. Add these two properties to the beginning of Card.swift with the other properties:
var enlarged = false
var savedPosition = CGPoint.zero
Add the following method to perform the enlarge action:
func enlarge() {
  if enlarged {
    enlarged = false
    zPosition = CardLevel.board.rawValue
    position = savedPosition
    removeAllActions()
    setScale(1.0)
    zRotation = 0
  } else {
    enlarged = true
    savedPosition = position
    zPosition = CardLevel.enlarged.rawValue

    if let parent = parent {
      position = CGPoint(x: parent.frame.midX, y: parent.frame.midY)
    }

    removeAllActions()
    setScale(5.0)
    zRotation = 0
  }
}
Remember to update touchesBegan(_:with:), in GameScene.swift, to call the new function, instead of flip()
if touch.tapCount > 1 {
  card.enlarge()
  return
}

if card.enlarged { return }
Finally, make a small update to touchesMoved(_:with:) and touchesEnded(_:with:) by adding the following line to each, just inside the if let card section:
if card.enlarged { return }
You need to add the extra property savedPosition so the card can be moved back to its original position. This is the point when touch-handling logic becomes a bit tricky, as mentioned earlier.
The tapCount check at the beginning of the function prevents glitches when the card is enlarged and then tapped again. Without the early return, the large image would shrink and start the wiggle animation.
It also doesn’t make sense to move the enlarged image, and there is nothing to do when the touch ends, so both functions return early when the card is enlarged.
Build and run the app to see the card grow and grow to fill the screen.
Basic card enlarging. Would look much better with some animation, and the enlarged image is fuzzy.

But why is it all pixelated? Vicki’s artwork is much too nice to place under such duress. You’re enlarging this way because you’re not using the large versions of the card images.
Using Large Images
Because loading the large images for all the cards at the beginning can waste memory, it’s best to make it so they don’t load until the user needs them.
Add this property to Card.swift at the end of the property section
let largeTextureFilename :String
var largeTexture :SKTexture?
Next, add the initializer for largeTextureFileName by making your switch statement in init(texture:color:size) look like
switch cardType {
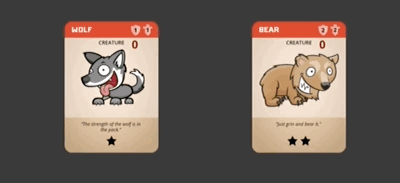
case .wolf:
frontTexture = SKTexture(imageNamed: "card_creature_wolf")
largeTextureFilename = "card_creature_wolf_large"
case .bear:
frontTexture = SKTexture(imageNamed: "card_creature_bear")
largeTextureFilename = "card_creature_bear_large"
case .dragon:
frontTexture = SKTexture(imageNamed: "card_creature_dragon")
largeTextureFilename = "card_creature_dragon_large"
}
The final version of the enlarge() function is as follows:
func enlarge() {
  if enlarged {
    let slide = SKAction.moveTo(savedPosition, duration:0.3)
    let scaleDown = SKAction.scaleTo(1.0, duration:0.3)
    runAction(SKAction.group([slide, scaleDown])) {
      self.enlarged = false
      self.zPosition = CardLevel.board.rawValue
    }
  } else {
    enlarged = true
    savedPosition = position

    if largeTexture != nil {
      texture = largeTexture
    } else {
      largeTexture = SKTexture(imageNamed: largeTextureFilename)
      texture = largeTexture
    }

    zPosition = CardLevel.enlarged.rawValue

    if let parent = parent {
      removeAllActions()
      zRotation = 0
      let newPosition = CGPoint(x: parent.frame.midX, y: parent.frame.midY)
      let slide = SKAction.moveTo(newPosition, duration:0.3)
      let scaleUp = SKAction.scaleTo(5.0, duration:0.3)
      runAction(SKAction.group([slide, scaleUp]))
    }
  }
}
The animations are fairly straightforward at this point.
The card’s position saves before running an animation, so it returns to its original position. To prevent the pickup and drop animations from interfering with the animation as it scales up, you add the removeAllActions() function.
When the scale down animations run, the enlarged and zPosition properties don’t set until the animation completes. If these values change earlier, an enlarged card sitting behind another card will appear to slide underneath as it returns to its previous position.
Since largeTexture is defined as an optional, it can have a value of nil, or “no value”. The if statement tests to see if it has a value, and loads the texture if it doesn’t.
Note: Optionals are a core part of learning Swift, especially since it works differently than nil values in Objective-C.
Build and run the app once again. You should now see a nice, smooth animation from the card’s initial position to the final enlarged position. You’ll also see the cards in full, clean, unpixelated splendor.
Animating the card enlargement, and swapping to the large image make this look much nicer.

Final Challenge: Sound effects are an important part of any game, and there are some sound files included in the starter project. See if you can use SKAction.playSoundFileNamed(_:waitForCompletion:) to add a sound effect to the card flip, and the enlarge action.