Splash Screen Tutorial for Android
Learn how to implement splash screen in new and existing Android apps, using the SplashScreen API introduced in Android 12. By Jemma Slater.
Adding an Animated Icon
Now that you have defined a place for your Android 12 splash screen theme to be set up, let’s customize! The attribute windowSplashScreenAnimatedIcon will show an animated icon on the splash screen, if you supply an animated vector drawable.
In values-v31/styles.xml, remove the previously declared icon and add:
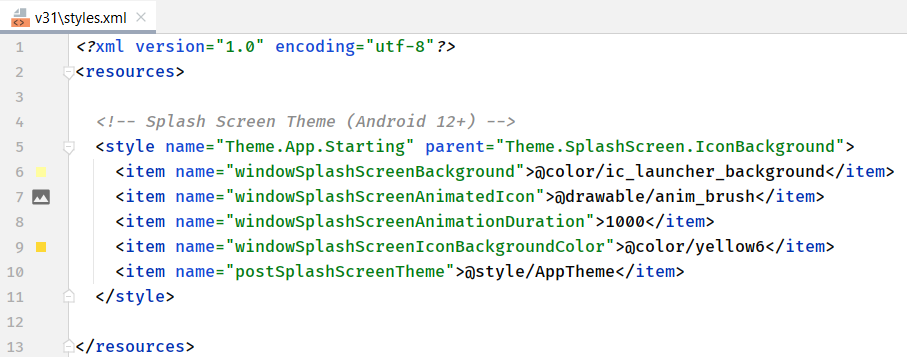
<item name="windowSplashScreenAnimatedIcon">@drawable/anim_brush</item>
<item name="windowSplashScreenAnimationDuration">1000</item>
This sets the icon to the anim_brush.xml animated vector drawable, an animated color-changing app icon.
When using an animated icon, you need to define its duration. It’s recommended the animation duration shouldn’t be longer than 1,000 milliseconds and should loop if the app startup time exceeds that. You can access the duration for customizations of the exit animation, but that value doesn’t affect how long the splash screen is shown. Your animation might be cut short when the app has loaded. You can prevent that by forcing the splash screen to persist for a set time. Though discouraged, this is possible if required – see how in a minute.
Your values-v31/styles.xml should look like this:
Build and run the app on API 31, force close and relaunch from the launcher. The icon is now animating through colors on the splash screen.
![]()
Adding a Branding Image
The official Android documentation recommends against using a branding image. However, the SplashScreen API provides the ability to add a small branding image at the bottom of the screen. This should be a vector drawable centered in a layer-list. If done otherwise, the dimensions appear incorrectly on the screen.
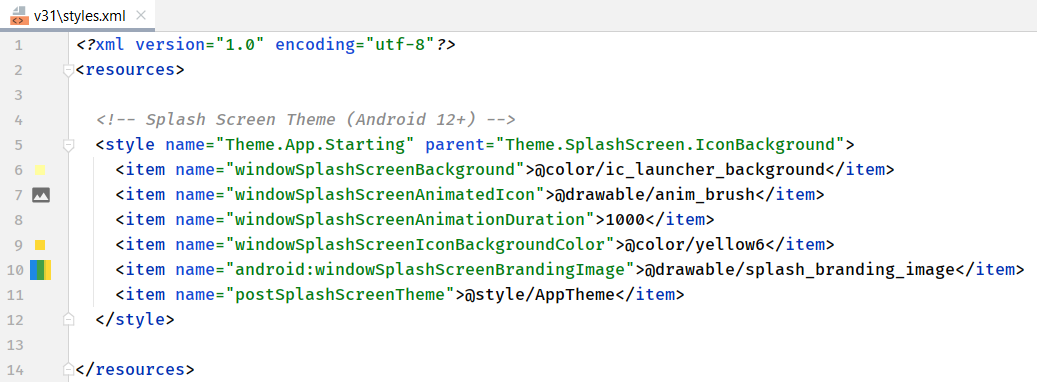
In values-v31/styles.xml, add the following to the splash theme:
<item name="android:windowSplashScreenBrandingImage">@drawable/splash_branding_image</item>
This sets the branding image drawable, which in this case is a color swatch but could be your company logo or similar branding. Your values-v31/styles.xml should look like this:
Build and run the app on API 31, force close, and relaunch from the launcher to see the branding image on the splash screen.

Extending the Duration
Though discouraged, you’ll occasionally want to hold the user on the splash screen before letting them into the app. For example, if you are loading settings or a small amount of data from an initial setup network call, you might need that in place before the user enters the app. To do that, you can delay the app from drawing its first frame, thus delaying the splash screen dismissal.
Open MainActivity.kt. At the top of the file, add the imports:
import androidx.core.splashscreen.SplashScreen
import android.view.View
import android.view.ViewTreeObserver
Uncomment setupSplashScreen() and replace the first TODO with:
val content: View = findViewById(android.R.id.content)
content.viewTreeObserver.addOnPreDrawListener(
   object : ViewTreeObserver.OnPreDrawListener {
     override fun onPreDraw(): Boolean {
       return if (contentHasLoaded) {
         content.viewTreeObserver.removeOnPreDrawListener(this)
         true
       } else false
     }
   }
)
This adds an OnPreDrawListener to the root view. When triggered, if contentHasLoaded is true, it removes itself as a listener and returns true, allowing the app to start drawing its views. If contentHasLoaded is false, the content is not ready so it delays the app from drawing. Here, contentHasLoaded is a local variable set in startLoadingContent() after a three-second delay, representing a network call response.
At the bottom of onCreate(), replace the TODO with:
setupSplashScreen(splashScreen)
This calls setupSplashScreen(), which adds the OnPreDrawListener and supplies splashScreen for the exit animation to use later. Your MainActivity.kt should look like this:

On API 31, build, run, and relaunch the app. Now the app waits for three seconds before dismissing the splash screen after the content has loaded.

Changing the Exit Animation
You can’t change the launch animation, but you can get into the exit animation through the SplashScreen API and customize it.
In MainActivity.kt, add these imports to the top of the file:
import android.animation.ObjectAnimator
import android.view.animation.DecelerateInterpolator
import androidx.core.animation.doOnEnd
doOnEnd is a core animation extension function and is just one of many useful extension functions from Android Jetpack KTX.
Replace the TODO in setupSplashScreen() with:
splashScreen.setOnExitAnimationListener { splashScreenView ->
 val slideBack = ObjectAnimator.ofFloat(
     splashScreenView.view,
     View.TRANSLATION_X,
     0f,
     -splashScreenView.view.width.toFloat()
 ).apply {
   interpolator = DecelerateInterpolator()
   duration = 800L
   doOnEnd { splashScreenView.remove() }
 }

 slideBack.start()
}
That action sets an OnExitAnimationListener on the splash screen instance. Here, the screen will slide off to the left. The DecelerateInterpolator means the animation will start quickly before slowimg down. The duration is 800 milliseconds. The KTX extension function doOnEnd() handles the removal of the splash screen after the animation finishes. Finally, start() starts the animation.
On API 31, build, run and relaunch the app. The splash screen now slides back off the screen.

If you use an animated icon and need it to finish animating before dismissing the splash screen, ensure the exit animation isn’t triggered too early. Within the OnExitAnimationListener you can access the splashScreenView.iconAnimationDuration and splashScreenView.iconAnimationStart values and use them to determine whether enough time has passed since the icon animation has started to allow it to finish. If you don’t check, the splash screen will dismiss when your app is ready, and that might occur before your animation has finished.
Migrating Your Project
Before library support, developers had two main ways to implement splash screens.
The first was to override android:windowBackground in a custom theme. The second was to provide a dedicated activity.

Legacy Method: Overriding android:windowBackground
The most straightforward way to create a simple splash screen was to create a dedicated theme overriding android:windowBackground with a drawable containing branding colors or a bitmap of a logo. The theme was set as an attribute of the launcher activity in AndroidManifest.xml. Then, in the first line of the launcher activity’s onCreate(), the theme would be set back to the main app theme.
It was effective and works as expected on devices running older versions of Android. However, with changes introduced in Android 12, users will be shown the default splash screen on Android 12 and above. Any customization you added previously is ignored and users won’t see it.
To test it, update the starter project. Navigate to styles.xml. You will see the LegacySplashTheme style which overrides android:windowBackground.
Open AndroidManifest.xml and replace the MainActivity theme with:
android:theme="@style/LegacySplashTheme"
This sets the theme of the MainActivity as LegacySplashTheme, which will apply when the app launches. Open MainActivity.kt. In onCreate() comment out:
// val splashScreen = installSplashScreen()
...
// setupSplashScreen(splashScreen)
This comments out the SplashScreen API functions, so you can see the legacy behavior. Uncomment the line at the top of onCreate():
setTheme(R.style.AppTheme)
This sets the theme of the activity to the main AppTheme. This step was needed to set the main theme attributes after the splash screen dismissed.
Now your code has the legacy setup. Build, run and relaunch the app on both emulators to compare them. You’ll see Android 10 displays the old custom splash screen as expected, but Android 12 uses the default icon. The app doesn’t provide a consistent experience across versions, and the more modern devices might be losing additional brand information.
