How To Secure iOS User Data: The Keychain and Biometrics — Face ID or Touch ID
Learn how to use the keychain and biometrics to secure your app and use Face ID or Touch ID. By Tim Mitra.
Touching You, Touching Me
In this section, you’ll add biometric ID to your project in addition to using the Keychain. While Keychain isn’t necessary for Face ID/Touch ID to work, it’s always a good idea to implement a backup authentication method for instances where biometric ID fails, or for users that don’t have at least a Touch ID compatible device.
Open Assets.xcassets.
Next, open the Resources folder from the starter project you downloaded earlier in Finder. Locate FaceIcon and Touch-icon-lg.png images (all three sizes), select all six and drag them into Images.xcassets so that Xcode knows they’re the same image, only with different resolutions:
![]()
Open Main.storyboard and drag a Button from the Object Library onto the Login View Controller Scene, just below the Create Info Label, inside the Stack View. You can open the Document Outline, swing open the disclosure triangles and make sure that the Button is inside the Stack View. It should look like this:

If you need to review stack views, take a look at UIStackView Tutorial: Introducing Stack Views.
In the Attributes inspector, adjust the button’s attributes as follows:
- Set Type to Custom.
- Leave the Title empty.
- Set Image to Touch-icon-lg.
When you’re done, the button’s attributes should look like this:

Ensure your new button is selected, then click the Add New Constraints button in the layout bar at the foot of the storyboard canvas and set the constraints as below:
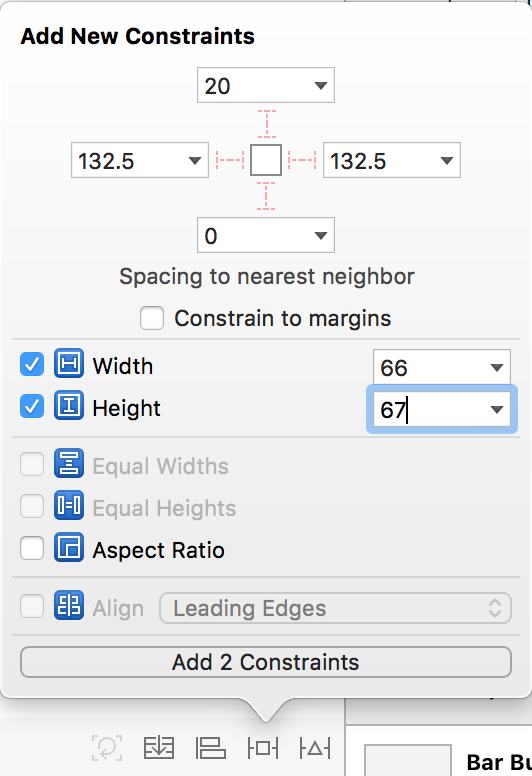
- Width should be 66
- Height should be 67
Click Add 2 Constrains. Your view should now look like the following:

Still in Main.storyboard, open the Assistant Editor and make sure LoginViewController.swift is showing.
Next, Control-drag from the button you just added to LoginViewController.swift, just below the other IBOutlets, like so:

In the popup enter touchIDButton as the Name and click Connect:

This creates an IBOutlet you’ll use to hide the button on devices that don’t have biometric ID available.
Next, you need to add an action for the button.
Control-drag from the same button to LoginViewController.swift to just above checkLogin(username:password:):
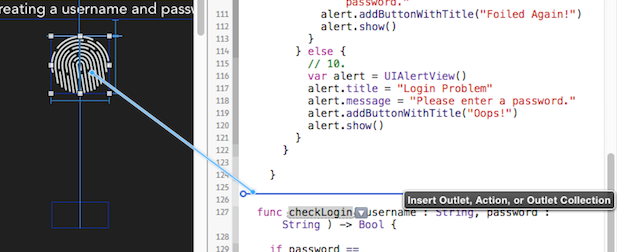
In the popup, change Connection to Action, set Name to touchIDLoginAction, set Arguments to none for now. Then click Connect.

Build and run to check for any errors. You can still build for the Simulator at this point since you haven’t yet added support for biometric ID. You’ll take care of that now.
Adding Local Authentication
Implementing biometric ID is as simple as importing the Local Authentication framework and calling a couple of simple yet powerful methods.
Here’s what the Local Authentication documentation has to say:
“The Local Authentication framework provides facilities for requesting authentication from users with specified security policies.”
The specified security policy in this case will be your user’s biometrics — A.K.A their face or fingerprint! :]
New in iOS 11 is support for Face ID. LocalAuthentication adds a couple of new things: a required FaceIDUsageDescription and a LABiometryType to determine whether the device supports Face ID or Touch ID.
In Xcode’s Project navigator select the project and click the Info tab. Hover over the right edge of one of the Keys and click the +. Start typing “Privacy” and from the pop up list that appears select “Privacy – Face ID Usage Description” as the key.
The type should be a String. In the value field enter We use Face ID to unlock the notes.

In the Project navigator right-click the TouchMeIn group folder and select New File…. Choose iOS\Swift File. Click Next. Save the file as TouchIDAuthentication.swift with the TouchMeIn target checked. Click Create.
Open TouchIDAuthentication.swift and add the following import just below import Foundation:
import LocalAuthentication
Next, add the following to create a new class:
class BiometricIDAuth {

}
Now you’ll need a reference to the LAContext class.
Inside the class add the following code between the curly braces:
let context = LAContext()
The context references an authentication context, which is the main player in Local Authentication. You’ll need a function to see if biometric ID is available to the user’s device or in the Simulator.
Add the following method to return a Bool if biometric ID is supported inside BiometricIDAuth:
func canEvaluatePolicy() -> Bool {
  return context.canEvaluatePolicy(.deviceOwnerAuthenticationWithBiometrics, error: nil)
}
Open LoginViewController.swift and add the following property to create a reference to BiometricIDAuth.
let touchMe = BiometricIDAuth()
At the bottom of viewDidLoad() add the following:
touchIDButton.isHidden = !touchMe.canEvaluatePolicy()
Here you use canEvaluatePolicy(_:) to check whether the device can implement biometric authentication. If so, show the Touch ID button; if not, leave it hidden.
Build and run on the Simulator; you’ll see the Touch ID logo is hidden. Now build and run on your physical Face ID/Touch ID-capable device; you’ll see the Touch ID button is displayed. In the Simulator you can choose Touch ID > Enrolled from the Hardware menu and test the button.
Face ID or Touch ID
If you’re running on an iPhone X or later Face ID equipped device you may notice a problem. You’ve taken care of the Face ID Usage Description, and now the Touch ID icon seems out of place. You’ll use the biometryType enum to fix this.
Open, TouchIDAuthentication.swift and add a BiometricType enum above the class.
enum BiometricType {
  case none
  case touchID
  case faceID
}
Next, add the following function to return which biometric type is supported using the canEvaluatePolicy.
func biometricType() -> BiometricType {
  let _ = context.canEvaluatePolicy(.deviceOwnerAuthenticationWithBiometrics, error: nil)
  switch context.biometryType {
  case .none:
    return .none
  case .touchID:
    return .touchID
  case .faceID:
    return .faceID
  }
}
Open, LoginViewController and add the following to the bottom of viewDidLoad() to fix the button’s icon.
switch touchMe.biometricType() {
case .faceID:
  touchIDButton.setImage(UIImage(named: "FaceIcon"),  for: .normal)
default:
  touchIDButton.setImage(UIImage(named: "Touch-icon-lg"),  for: .normal)
}
Build and run on the Simulator with Touch ID Enrolled to see the Touch ID icon; you’ll see the correct icon is shown on the iPhone X – the Face ID icon.