PaintCode Sketch Plugin Tutorial
Learn how to use the new PaintCode Sketch plugin to export your Sketch artwork into Swift code, allowing easy resizing and dynamic customization. By Robert Chen.
Using different image sizes
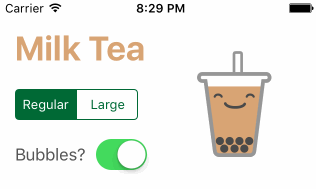
The app has an order tab where you can customize your beverage. Although there’s a cute cup of bubble tea smiling back at you, it doesn’t do anything when you toggle the options on the form yet.
Draw the image based on beverage size
The form has a segmented control which lets you choose between Regular or Large. Your job is to make the preview icon change size based on the selection.
Open BubbleTeaCup.swift, and replace its contents with the following code:
import UIKit

// 1
enum BeverageSize {
  case Regular, Large
}

@IBDesignable
class BubbleTeaCup: UIView {
  // 2
  var beverageSize: BeverageSize = .Regular {
    didSet {
      setNeedsDisplay()
    }
  }
  override func drawRect(rect: CGRect) {
    // 3
    let imageSize: CGRect
    switch beverageSize {
    case .Regular:
      imageSize = bounds.insetBy(dx: bounds.width * 0.1, dy: bounds.height * 0.1) // 4
    case .Large:
      imageSize = bounds // 5
    }
    // 6
    StyleKit.drawBubbleTeaCup(frame: imageSize)
  }
}
Let’s review this section by section:
- Creates an
enumwith beverage size options. This goes outside the class body so the rest of the app has access to it. - Stores the state of the beverage size, which you’ll user later when calculating the image size. It also triggers a re-draw whenever this value changes.
- Calculates the image size based on the beverage size.
- Regular has a slightly smaller width and height.
- Large takes up the full view.
- Draws the image based on the
imageSizedimensions.
When you set the beverageSize property, the view refreshes its display to reflect the new beverage size.
Wire up the segmented control
For this to actually work, you need to wire up the order form’s segmented control.
Open OrderViewController.swift and replace the sizeChange @IBAction method with the following:
@IBAction func sizeChange(sender: UISegmentedControl) {
  switch sender.selectedSegmentIndex {
  case 0:
    bubbleTeaCup.beverageSize = .Regular
  case 1:
    bubbleTeaCup.beverageSize = .Large
  default:
    break
  }
}
This sets the beverageSize property of the custom view based on the selectedSegmentIndex.
Build and run. Now when you toggle between Regular and Large, the order preview updates accordingly.
Changing the tea color at runtime
PaintCode really shines when you have to change individual image layers at runtime. This would be a nightmare using PNGs.
In this section, you’re going to change the color of the tea based on flavor selection.
Pass in a parameter to change the color
By default, the PaintCode drawing methods expose parameters for size and stretch. In order to support color changes, you’ll need to add your own parameter.
Open StyleKit.swift and replace the following line of code:
class func drawBubbleTeaCup(frame frame: CGRect = CGRect(x: 0, y: 0, width: 161, height: 221), resizing: ResizingBehavior = .AspectFit) {
With the following:
class func drawBubbleTeaCup(frame frame: CGRect = CGRect(x: 0, y: 0, width: 161, height: 221), teaColor: UIColor = milkTea, resizing: ResizingBehavior = .AspectFit) {
You’re squeezing in an additional parameter teaColor into the method signature. You also have it default to milkTea so it doesn’t break existing code.
Next, scroll to around line 64 where the liquid layer color fill happens:
...
UIColor(hue: 0.078, saturation: 0.447, brightness: 0.843, alpha: 1).setFill() // change this
liquid.fill()
...
Replace the code so it looks like this:
...
teaColor.setFill() // now uses the parameter
liquid.fill()
...
Instead of filling the liquid with a hard-coded UIColor, you use the teaColor parameter instead.
StyleKit file from Sketch, remember that your custom changes will be wiped out. If controlling layer behavior with custom parameters is something you’ll be doing often, consider using the full featured PaintCode 2 Mac app which has a neat Variables feature.
Wire up the custom view
The next step is to wire up the BubbleTeaCup class to use this new parameter.
Open BubbleTeaCup.swift, and add the following property above drawRect(_:):
var teaColor = StyleKit.milkTea {
  didSet {
    setNeedsDisplay()
  }
}
The teaColor property keeps track of the liquid color, and re-draws the view when it changes.
Within the same file, update the following line of code:
StyleKit.drawBubbleTeaCup(frame: imageSize)
To this:
StyleKit.drawBubbleTeaCup(frame: imageSize, teaColor: teaColor)
The canvas drawing method supports a new parameter, and you pass it the current teaColor.
Wire up the collection view
All of the bubble tea flavors are in a collection view at the bottom of the order tab. When a user taps a cell, you want the order preview image to change color too.
Open OrderViewController.swift and append the following line to the end of collectionView(_:didSelectItemAtIndexPath:indexPath:):
bubbleTeaCup.teaColor = selectedFlavor.color
selectedFlavor represents the Flavor object that the user tapped (i.e. Mango). Here you set the teaColor to the flavor’s color.
Build and run. Now when you choose different flavors, the order preview image updates as well.

Hold the bubbles
Bubble tea sure has a lot of carbs! The drinks are sugary, and the bubbles are made of starchy tapioca balls. It’d be nice if there was a no-bubble option.
Pass in a parameter to change the color
In this section, you’re going to parameterize the image again. But this time, you’ll pass a flag to indicate whether or not to draw the bubbles.
Open StyleKit.swift and replace the following line of code:
class func drawBubbleTeaCup(frame frame: CGRect = CGRect(x: 0, y: 0, width: 161, height: 221), teaColor: UIColor = milkTea, resizing: ResizingBehavior = .AspectFit) {
With the following:
class func drawBubbleTeaCup(frame frame: CGRect = CGRect(x: 0, y: 0, width: 161, height: 221), teaColor: UIColor = milkTea, addBubbles: Bool = true, resizing: ResizingBehavior = .AspectFit) {
You’re inserting yet another parameter addBubbles with a default value of true.
Next, scroll to around line 157 toward the end of the bubble-related code. Replace the following line:
bubbles.fill()
With this:
if addBubbles {
  bubbles.fill()
}
You only draw the bubbles if the addBubbles parameter is true.
Wire up the custom view
Like before, the next step is to wire up the BubbleTeaCup class to use this new parameter.
Open BubbleTeaCup.swift, and add the following property below teaColor:
var bubbles = true {
  didSet {
    setNeedsDisplay()
  }
}
This is yet another property that triggers a re-draw when its value changes.
Within the same file, update the following line of code:
StyleKit.drawBubbleTeaCup(frame: imageSize, teaColor: teaColor)
To this:
StyleKit.drawBubbleTeaCup(frame: imageSize, teaColor: teaColor, addBubbles: bubbles)
Here, you pass the bubbles flag to the canvas drawing method.