Easier Auto Layout: Coding Constraints in iOS 9
iOS 9 made coding Auto Layout constraints far easier! Learn everything you need to know about layout guides and layout anchors in this Auto Layout tutorial. By Caroline Begbie.
Intrinsic Content Size
Now it’s time to work on the chapter label.
At the end of setupConstraints() add the following:
chapterLabel.translatesAutoresizingMaskIntoConstraints = false
chapterLabel.centerXAnchor.constraint(
      equalTo: view.centerXAnchor).isActive = true
chapterLabel.bottomAnchor.constraint(
      equalTo: bookTextView.topAnchor).isActive = true
Here you set chapterLabel to use Auto Layout and constrained it to the center of the view. You also constrained chapterLabel‘s bottom to bookTextView‘s top.
Build and run the app; chapterLabel will be colored yellow:
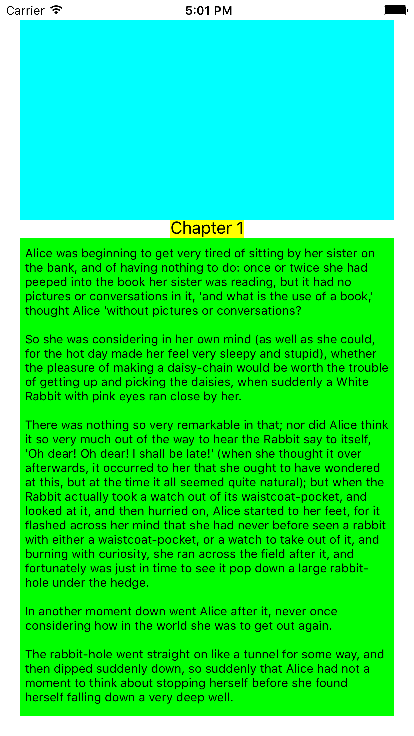
“But wait,” you protest. “I only set two constraints. You told me I had to set four.”
Yes, that is true. However, all views have an intrinsic content size. If that intrinsic content size is set, you don’t have to explicitly create layout constraints for Width and Height.
chapterLabel‘s intrinsic content size is set by the font and text used.
However, a standard UIView‘s intrinsic content width and height are set by default to UIViewNoIntrinsicMetric, which means that there is no size.
To demonstrate this, you’ll now change the constraints for avatarView. This is a subclass of UIView, so it has no default intrinsic content size. Just for fun, you’ll set avatarView to have an intrinsic content height of 100 instead of the current constant height of 200.
Remove the following constant constraint from setupConstraints():
avatarView.heightAnchor.constraint(equalToConstant: 200).isActive = true
avatarView now has X Position, Y Position and Width constraints, but no Height constraint. If you were to run the app now, avatarView would not show on the screen at all, as it would have a zero height.
In AvatarView.swift, override the intrinsicContentSize property:
override var intrinsicContentSize: CGSize {
  return CGSize(width: UIViewNoIntrinsicMetric, height: 100)
}
This sets avatarView to have no intrinsic width, but to have an intrinsic height of 100.
The constraints now look like this:

Build and run your app; you’ll see that the cyan-colored avatarView takes the height of 100 from its intrinsic content size:
![]()
Note: If you ever need to change the intrinsic content size while the app is running, you can update it using invalidateIntrinsicContentSize().
In this case you really want chapterLabel to stay at its intrinsic height and avatarView to stretch so that it fills out the rest of the view, with a constant margin between them as in this diagram:

First set the constant white space gap by adding the following to the end of setupConstraints() in ViewController.swift:
avatarView.bottomAnchor.constraint(
      equalTo: chapterLabel.topAnchor,
      constant: -10).isActive = true
This will constrain avatarView‘s bottom anchor to be 10 pixels higher than the top of chapterLabel‘s top anchor.
Build and run the app:

Uh oh. chapterLabel has stretched instead of avatarView!
You’ve set up constraints so that chapterLabel‘s top is anchored to avatarView‘s bottom and chapterLabel‘s bottom is anchored to the text view’s top. But when you don’t set an explicit constraint for Width and Height, the Auto Layout engine has to take intrinsic content size as a guide rather than a rule. In this situation it has given priority to avatarView‘s intrinsic size over chapterLabel‘s.
chapterLabel has consequently stretched vertically in a rather uncomfortable manner:
There are two methods associated with intrinsic content size that give priorities to which views should stretch and compress.
setContentHuggingPriority(_:for:) takes a priority and an axis to determine how much a view wants to stretch. A high priority means that a view wants to stay the same size. A low priority allows the view to stretch.
setContentCompressionResistancePriority(_:for:) also takes a priority and an axis. This method determines how much a view wants to shrink. A high priority means that a view tries not to shrink and a low priority means that the view can squish.
Note: Priorities are values between 1 and 1000, where 1000 is the highest. The standard priorities are UILayoutPriorityRequired = 1000, UILayoutPriorityDefaultHigh = 750 and UILayoutPriorityDefaultLow = 250.
In this case you want chapterLabel to always have the correct height for the label and not stretch at all, so add the following to the bottom of setupConstraints():
chapterLabel.setContentHuggingPriority(
               UILayoutPriorityRequired,
               for: .vertical)
chapterLabel.setContentCompressionResistancePriority(
               UILayoutPriorityRequired,
               for: .vertical)
This sets chapterLabel‘s hugging priority and compression resistance as required for the vertical axis. The layout engine will therefore keep chapterLabel‘s intrinsic content height when it can.
Build and run the app again; you’ll see that avatarView stretches to fill the gap, which is exactly what you want:
![]()
bookTextView didn’t shrink or stretch, because it has no intrinsic content size and all four constraints were explicitly set.
A Reusable Hierarchy in Code
Now you’ll work on avatarView. Just like a generic profile view, this view will have an image, title and social media icons. The views will adjust depending on whether the width is Compact or Regular.
This is how avatarView will look when completed:
![]()
In AvatarView.swift all the subviews are set up and ready to go, so just add this code to the end of setup():
addSubview(imageView)
addSubview(titleLabel)
addSubview(socialMediaView)
Still in AvatarView, add a new method named setupConstraints():
func setupConstraints() {
  imageView.translatesAutoresizingMaskIntoConstraints = false
  titleLabel.translatesAutoresizingMaskIntoConstraints = false
  socialMediaView.translatesAutoresizingMaskIntoConstraints = false
}
Remember, you need to set translatesAutoresizingMaskIntoConstraints for every view you want to use with Auto Layout.
Call your new method at the end of willMove(toSuperview:) like so:
setupConstraints()
Build and run the app; the three subviews are there, sized to their intrinsic sizes, but not constrained to the correct positions:
![]()
Note: The social media icons are courtesy of Vicki Wenderlich – you can purchase her art from Game Art Guppy.
Activate Arrays of Constraints
Setting each individual constraint’s active property as you have been doing so far is not as efficient as setting up all the constraints first and activating them all at once. So now you’ll set up the constraints for titleLabel, imageView and socialMediaView in this more efficient way.
You’ll add these constraints in code:

Add the following code to the bottom of setupConstraints() in AvatarView.swift:
// 1
let labelBottom =
      titleLabel.bottomAnchor.constraint(equalTo: bottomAnchor)
let labelCenterX = titleLabel.centerXAnchor.constraint(
      equalTo: centerXAnchor)

// 2
let imageViewTop =
      imageView.topAnchor.constraint(equalTo: topAnchor)
let imageViewBottom =
      imageView.bottomAnchor.constraint(
        equalTo: titleLabel.topAnchor)
let imageViewCenterX =
      imageView.centerXAnchor.constraint(
        equalTo: centerXAnchor)

// 3
let socialMediaTrailing =
      socialMediaView.trailingAnchor.constraint(equalTo: trailingAnchor)
let socialMediaTop = socialMediaView.topAnchor.constraint(equalTo: topAnchor)
Taking the above code step-by-step:
- You create two variables to hold
titleLabel‘s constraints. The first will constraintitleLabel‘s bottom edge toavatarView‘s bottom and the second will centertitleLabelinavatarView. - Similarly, the next three variables hold
imageView‘s constraints, with the top ofimageViewconstrained toavatarViewand the bottom ofimageViewto the top oftitleLabel.imageViewwill be centered inavatarView. - The last two variables hold constraints for
socialMediaViewto be right aligned and constrained to the top ofavatarView.
For each of the views, you’ve created constraint variables but the constraints are not yet active.
To activate the constraints all at once, add the following to the end of setupConstraints():
NSLayoutConstraint.activate([
            imageViewTop, imageViewBottom, imageViewCenterX,
            labelBottom, labelCenterX,
            socialMediaTrailing, socialMediaTop])
The constraints are now activated in the array order.
As both imageView and titleLabel have intrinsic sizes, you’ll need to set imageView‘s compression resistance to ensure that imageView resizes in preference to titleLabel.
Add the code below to the end of setupConstraints():
imageView.setContentCompressionResistancePriority(
            UILayoutPriorityDefaultLow,
            for: .vertical)
imageView.setContentCompressionResistancePriority(
            UILayoutPriorityDefaultLow,
            for: .horizontal)
Here you set imageView‘s compression resistance priority to low for the vertical and horizontal axes.
Finally, change socialMediaView‘s axis to vertical like so:
socialMediaView.axis = .vertical
Build and run on the iPhone 7 Plus and check out the app in portrait:

This layout is looking pretty good. imageView and titleLabel are centered, and socialMediaView is right aligned and vertical.