Card Game Mechanics in Sprite Kit with Swift
Learn how to implement basic card game mechanics and animation with Sprite Kit and Swift. By Brian Broom.
Update 10/8/2016: This tutorial has been updated for Xcode 8.0 and Swift 3.
For more than 20 years, people have played Collectible Card Games (CCGs). The Wikipedia entry gives a fairly thorough recount of how these games evolved, which seems were inspired by role playing games like Dungeons and Dragons; Magic the Gathering is one example of a modern CCG.
At their core, CCGs are a set of custom cards representing characters, locations, abilities, events, etc. To play the game, players must first build their own decks, then use their individual decks to play. Most players create decks that accentuate certain factions, creatures or abilities.
In this tutorial, you’ll use Sprite Kit to manipulate images that serve as cards in a CCG app. You’ll move cards on the screen, animate them to show which cards are active, flip them over and enlarge them so you can read the text — or just admire the artwork.
If you’re new to SpriteKit, you may want to read through a beginner tutorial or indulge yourself with the 2D iOS & tvOS Games by Tutorials book. If you’re new to Swift, make sure you check out the Swift Quick Start series.
Getting Started
Since this is a card game, the best place to start is with the actual cards. Download the starter project which provides a SpriteKit project preset for an iPad in landscape mode, as well as all the images, fonts and sound files you’ll need to create a functional sample game.
Take a minute to look around the project to acquaint yourself with its file structure and content. You should see the following project folders:
- System: Contains the basic files to set up a SpriteKit project. This includes AppDelegate.swift, GameViewController.swift, and the storyboard files.
- Game: Contains an empty main scene GameScene.swift, and an empty class Card.swift which will manage the game content.
- Assets: Contains all of the images, fonts, and sound files you’ll use in the tutorial.
This game just wouldn’t be as cool without the art, so I’d like to give special thanks to Vicki from gameartguppy.com for the beautiful card artwork.
The Card Class
Since you can’t play a card game without cards, start by making a class to represent them. Card.swift is currently a blank Swift file, so find it and add:
import SpriteKit

enum CardType :Int {
  case wolf,
  bear,
  dragon
}

class Card : SKSpriteNode {
  let cardType :CardType
  let frontTexture :SKTexture
  let backTexture :SKTexture

  required init?(coder aDecoder: NSCoder) {
    fatalError("NSCoding not supported")
  }

  init(cardType: CardType) {
    self.cardType = cardType
    backTexture = SKTexture(imageNamed: "card_back")

    switch cardType {
    case .wolf:
      frontTexture = SKTexture(imageNamed: "card_creature_wolf")
    case .bear:
      frontTexture = SKTexture(imageNamed: "card_creature_bear")
    case .dragon:
      frontTexture = SKTexture(imageNamed: "card_creature_dragon")
    }

    super.init(texture: frontTexture, color: .clearColor(), size: frontTexture.size())
  }
}
You’re declaring Card as a subclass of SKSpriteNode. Since a card can be one of several different cards with their own statistics and image, it makes sense to define an enum. This way you can define a card as a wolf or a bear, and the appropriate values can be set. For now, the only thing different is the image for the card face.
To create a simple sprite with an image, you would use SKSpriteNode(imageNamed:). In order to keep this behavior, you use the inherited initializer which must call the designated initializer of the super class, init(texture:color:size:). The color value used does not matter since you use an image, but since it’s not defined as optional, you have to specify a value. You do not support NSCoding in this game, which is used by the visual designer for sks files.
Properties are defined to store the image for the card front and back. Since these are not optional, they must be initialized by the end of the init(texture:color:size:) method. The switch statement lets you set the image based on the CardType value.
To put some sprites on the screen, open GameScene.swift, and add the following code to the end of didMoveToView(_:):
let wolf = Card(cardType: .wolf)
wolf.position = CGPoint(x: 100, y: 200)
addChild(wolf)

let bear = Card(cardType: .bear)
bear.position = CGPoint(x: 300, y: 200)
addChild(bear)
Build and run the project, and take a moment to admire the wolf and bear.
A good start…
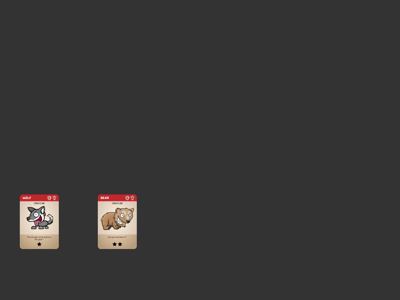
Rule #1 for creating card games: start with creative, imaginative art. Looks like your app is shaping up nicely!
Note: Depending on screen size, you may want to zoom the simulator window, using Window\Scale\50% to fit on the screen. You can also use the iPad 2 simulator, since its non-retina screen is smaller.
Looking at a couple of cards is fun and all, but the UI will be much cooler if you can actually move the cards. You’ll do that next.
Moving The Cards Around The Board
No matter the quality of the art, cards sitting on a screen won’t earn your app any rave reviews, because you need be able to drag them around like you can do with real paper cards. The simplest way to do this is to handle touches in the scene itself.
Still in GameScene.swift, add this new function to the class:
override func touchesMoved(_ touches: Set<UITouch>, with event: UIEvent?) {
  for touch in touches {
    let location = touch.location(in: self)           // 1
    if let card = atPoint(location) as? Card {        // 2
      card.position = location
    }
  }
}
There are two parts here.
- The
location(in:)method converts the touch location into the scene coordinates. - Use
atPoint(_:)to determine which node was touched. This method will always return a value, even if you didn’t touch any of the cards. In that case, you get some otherSKNodeclass. Theas? Cardkeyword then either returns aCardobject, ornilif that node isn’t aCard. Theif letthen guarantees thatcardcontains an actualCard, and not anything else. Without this step, you might accidentally move the background node, which is amusing, but not what you want.
Build and run the project, and drag those two cards around the display.
The cards now move, but sometimes slide behind other cards. Read on to fix the problem.

As you play around with this, you’ll notice several issues:
- First, since the sprites are at the same
zPosition, they are arranged in the same order they are added to the scene. This means the bear card is “above” the wolf card. If you’re dragging the wolf, it appears to slide beneath the bear. - Second,
atPoint(_:)returns the topmost sprite at that point. So when you drag the wolf under the bear,atPoint(_:)returns the bear sprite and start changes its position, so you might find yourself moving the bear even though you originally moved the wolf.
While this effect is almost magical, it’s not the kind of magic you want in the final app.
To fix this, you’ll modify the card’s zPosition while dragging. Instead of hardcoding values, add the following to GameScene.swift, before the class definition.
enum CardLevel :CGFloat {
  case board = 10
  case moving = 100
  case enlarged = 200
}
Make sure you pick a zPosition value that is greater than other cards will be, as well as less than any interface elements that should be displayed on top of the card layer.
Your first inclination might be to change the zPosition of the sprite in touchesMoved(_:with:), but this isn’t a good approach if you want to change it back later.
Using touchesBegan(_:with:) and touchesEnded(_:with:) is a better strategy. Still in GameScene.swift, add the following two methods:
override func touchesBegan(_ touches: Set<UITouch>, with event: UIEvent?) {
  for touch in touches {
    let location = touch.location(in: self)
    if let card = atPoint(location) as? Card {
      card.zPosition = CardLevel.moving.rawValue
    }
  }
}

override func touchesEnded(_ touches: Set<UITouch>, with event: UIEvent?) {
  for touch in touches {
    let location = touch.location(in: self)
    if let card = atPoint(location) as? Card {
      card.zPosition = CardLevel.board.rawValue
      card.removeFromParent()
      addChild(card)
    }
  }
}
The line to remove and add the card to the scene may look strange, but it prevents the wolf from jumping underneath the card for the bear if they overlap when the touch ends. The SKNodes are displayed in reverse order that they were added to the scene, with the later nodes on top. You can’t rearrange the order of nodes in SKNode‘s internal storage, but removing and adding the node again has the desired effect.
Build and run the project again, and you’ll see the cards sliding over each other as you would expect.
Cards now correctly move over each other, but looks a little plain. You’ll fix that next.
