How To Make a 2.5D Game With Unity Tutorial: Part 2
This is a blog post by iOS Tutorial Team member Marin Todorov, a software developer with 12+ years of experience, an independant iOS developer and the creator of Touch Code Magazine. This is the second part of a two part tutorial series on how to make a simple 2.5D game for the iPhone with the […] By Marin Todorov.
Sign up/Sign in
With a free Kodeco account you can download source code, track your progress, bookmark, personalise your learner profile and more!
Create accountAlready a member of Kodeco? Sign in
Sign up/Sign in
With a free Kodeco account you can download source code, track your progress, bookmark, personalise your learner profile and more!
Create accountAlready a member of Kodeco? Sign in
Contents
How To Make a 2.5D Game With Unity Tutorial: Part 2
25 mins
This is a blog post by iOS Tutorial Team member Marin Todorov, a software developer with 12+ years of experience, an independant iOS developer and the creator of Touch Code Magazine.
Learn how to create a simple 2.5D game with Unity!
This is the second part of a two part tutorial series on how to make a simple 2.5D game for the iPhone with the Unity game development tool.
In the first part of the tutorial series, we covered the basics of using Unity and writing scripts with C#. We created a simple game where a plane could fly back and forth bombing sharks while protecting the clown fish!
In this second and final part of the tutorial series, we’re going to extend the game to add some finishing touches. We’ll add some sound effects and music, wrap up the game logic, and add multiple scenes to the game!
If you don’t have it already, grab the project where we left it off in the last tutorial, and open it up in Unity. Make sure to click the Scenes\LevelScene item to make it visible if it doesn’t load on startup.
Allright, so let’s learn some more about Unity and wrap up this game!
Adding iCandy to the game
You’ve probably noticed that when a bomb hits a shark, it just quietly disappears, and thought to yourself, “meh, that’s not very cool!”
Well, be prepared to be blown away – we’re going to add a cool underwater explosion instead!
From the menu select “GameObject/Create other/Particle System”, and you’ll see a particle system appear on the scene. Rename the “Particle System” to “Explosion” in “Hierarchy” panel, and set the Explosion’s position to [1, 1, 8].
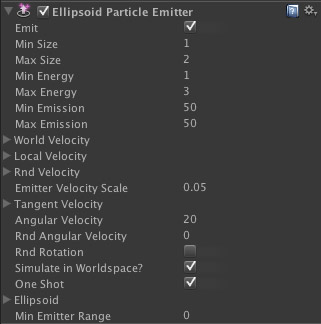
Now if you are a Particle System specialist – head to the “Inspector” and pimp it up yourself, and if you are not – just follow my lead it’s pretty easy. Copy over these values in the “Inspector”:
Here the most important property is “One shot” – when you check it the system will emit particles only once – as an explosion does. Now let’s setup also the animation values – just try to more or less match the colors below (not important if you don’t):
Here the one important property is “Autodestruct” – when checked the Particle System will remove itself from the scene when there are no more living particles. This is exactly what we want – it’s like automatic garbage collection.
Now you have a nice small explosion and you need to do exactly the same you did before with the bomb – make a prefab, instantiate it when needed, leave it to autodestroy itself when it’s done on the scene.
Right-click “Project” panel “Prefabs” folder, choose “Create/Prefab”, rename it to “ExplosionPrefab”. Drag the “Explosion” object from “Hierarchy” onto the new “ExplosionPrefab”. Right-click “Explosion” in “Hierarchy” and choose “Delete”.
Right-click “Project” panel and choose “Sync MonoDevelop Project” to open MonoDevelop. Load in the editor BombClass.cs and add this code:
//right under definition of "ySpeed"
public GameObject explosionPrefab;

//inside OnTriggerEnter, right after Destroy(this.gameObject)
Instantiate(explosionPrefab, transform.position, Quaternion.identity);
Now switch back to Unity and select “BombPrefab” in “Project” panel – in the “Inspector” you see the new property “ExplosionPrefab”. Just drag “ExplosionPrefab” from “Project” onto this new property field and you’re set to go.
That’s it – press play and see the explosions when you hit sharks. Sweet!
Adding earCandy to the Game
Don’t tell Steve, but iCandy wasn’t enough for us – we need some earCandy too!
How could we have a game be without background music?! We’re going to visit another great guy – Kevin Macleod, who is a great composer releasing film&game music under CC license. So if you use his stuff don’t forget to attribute.
Open this url: http://incompetech.com/m/c/royalty-free/index.html?keywords=the%20cannery
Once you’re there, download “The Cannery” track somewhere to your disc, and drag “The Cannery.mp3” onto the folder “Audio” in the “Project” panel.
We would like to have the music loop all the time… but which object should we attach it to?
Well, let’s attach it to the camera! The camera is a game object too, and can have other components attached.
Drag “The Cannery” from “Project” panel onto “Main Camera” in the “Hierarchy” panel. Select “Main Camera” in “Hierarchy” and in the “Inspector” find the Audio Source strip – check the “Loop” checkbox and set Volume to “0.20”.
It’s as easy as that – run the scene and enjoy the new background music!
Creating a GUI with Unity
Let’s dive into yet another new area – GUI. Unity provides you with some standard labels and buttons, but all in all it’s not the biggest strength of Unity. However we’re going to use a label to show the current score; so first we’ll need to implement the score logic.
Switch to MonoDevelop. Open up PlayerClass.cs and add a new property:
public static int score = 0;
Aha! There’s again something new – “static”. This property will be created when the class is loaded and will persist no matter whether there are instances of the class. Additionally this property is accessible from all other classes – this is why we’re keeping the score count in a static property.
Next add this method which will take care of updating the score (not much sense in it now, but just go with it) – see how the score property is accessed via the class name:
public void updateScoreBy(int deltaScore) {
	PlayerClass.score += deltaScore;
}
Add one more method to PlayerClass – this one will draw the score count on the screen:
void OnGUI() {
	GUIStyle style = new GUIStyle();
	style.fontSize = 20;
	GUI.Label(new Rect(10,10,100,20), "Score:"+PlayerClass.score, style );
}
This event handler “OnGUI” is getting called on every frame on the GUI layer. So, you draw everything you need on the GUI in here.
GUIStyle is a class, which mimics a CSS class – so you can use fontSize, marginLeft and such if you are familiar with CSS, otherwise just keep with the font size for now. GUI.Label() is a method taking 3 arguments: a rect for the bounds of the label, the string to draw and the text style. That’s all to it.
The only task left is: update the score when we have hits or misses! Open up BombClass.cs and make the following modifications:
//add a new property
public PlayerClass player;

//replace the existing OnTriggerMethod with
void OnTriggerEnter(Collider obj) {
	if (obj.gameObject.name == "Shark") {
		//reset shark
		obj.gameObject.transform.rotation = Quaternion.identity;
		obj.gameObject.transform.position = new Vector3(20f, -3f, 8f);
		player.updateScoreBy(+1);
		Destroy(gameObject);
		Instantiate(explosionPrefab, transform.position, Quaternion.identity);
	}
	if (obj.gameObject.name == "ClownFish") {
		//reset fish
		obj.gameObject.transform.rotation = Quaternion.identity;
		obj.gameObject.transform.position = new Vector3(-20f, -1f, 8f);
		player.updateScoreBy(-1);
		Destroy(gameObject);
		Instantiate(explosionPrefab, transform.position, Quaternion.identity);
	}
}
It’s pretty similar to what we had before, but we’re having a new property called “player” and when we need to update the score we call player.updateScoreBy().
Also to make the game more interesting if you hit a shark you’ll get a point, if you hit a clownfish (remember? clownfish – gooood, shark – baaahhd) then you will loose a point. Now that’s shaping as a difficult game!
There’s one last thing – to set the player property on the bomb. Now we can’t do it like before because bombs are dynamically created, but fortunately the bombs are created by the player himself, so he can set the player property at creation time.
Let’s do that – open up PlayerClass.cs and just under the line “bombObject.transform.position = this.gameObject.transform.position;” add this code:
BombClass bomb = (BombClass)bombObject.GetComponent("BombClass");
bomb.player = this;
There’s something new again! Let’s discuss: bombObject is a GameObject instance (returned by Instantiate), so we call “GetComponent” on it and this way we can access all attached components to the game object – the result we cast to a BombClass – so in the end we got the reference to the C# class attached to the game object. Next we just set the “player” property to this (the PlayerClass instance).
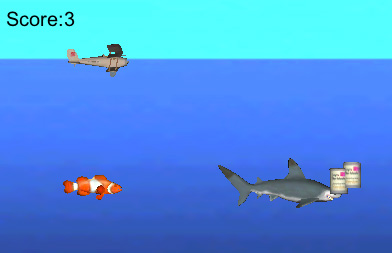
Run the scene and you’ll see the score counter!


