Drawing Custom Shapes in Android
Learn how to draw custom shapes and paths in Android by creating a neat curved profile card with gradient colors. By Ahmed Tarek.
Adding Negative Space Around the Avatar
Next, you’ll add some negative space to the blue shape to set it apart from the avatar. Add a new function called drawBackground() to ProfileCardPainter:
private fun drawBackground(canvas: Canvas, bounds: RectF, avatarBounds: RectF) {
  //1
  val paint = Paint()
  paint.color = color

  //2
  val backgroundPath = Path().apply {
    // 3
    moveTo(bounds.left, bounds.top)
    // 4
    lineTo(bounds.bottomLeft.x, bounds.bottomLeft.y)
    // 5
    lineTo(avatarBounds.centerLeft.x, avatarBounds.centerLeft.y)
    // 6
    arcTo(avatarBounds, -180f, 180f, false)
    // 7
    lineTo(bounds.bottomRight.x, bounds.bottomRight.y)
    // 8
    lineTo(bounds.topRight.x, bounds.topRight.y)
    // 9
    close()
  }

  //10
  canvas.drawPath(backgroundPath, paint);
}
Add any missing import by pressing Option+Enter on Mac or Alt+Enter on PC. To import all the extension functions you need for RectF in a row, add the following import:
import com.raywenderlich.android.starsofscience.utils.*
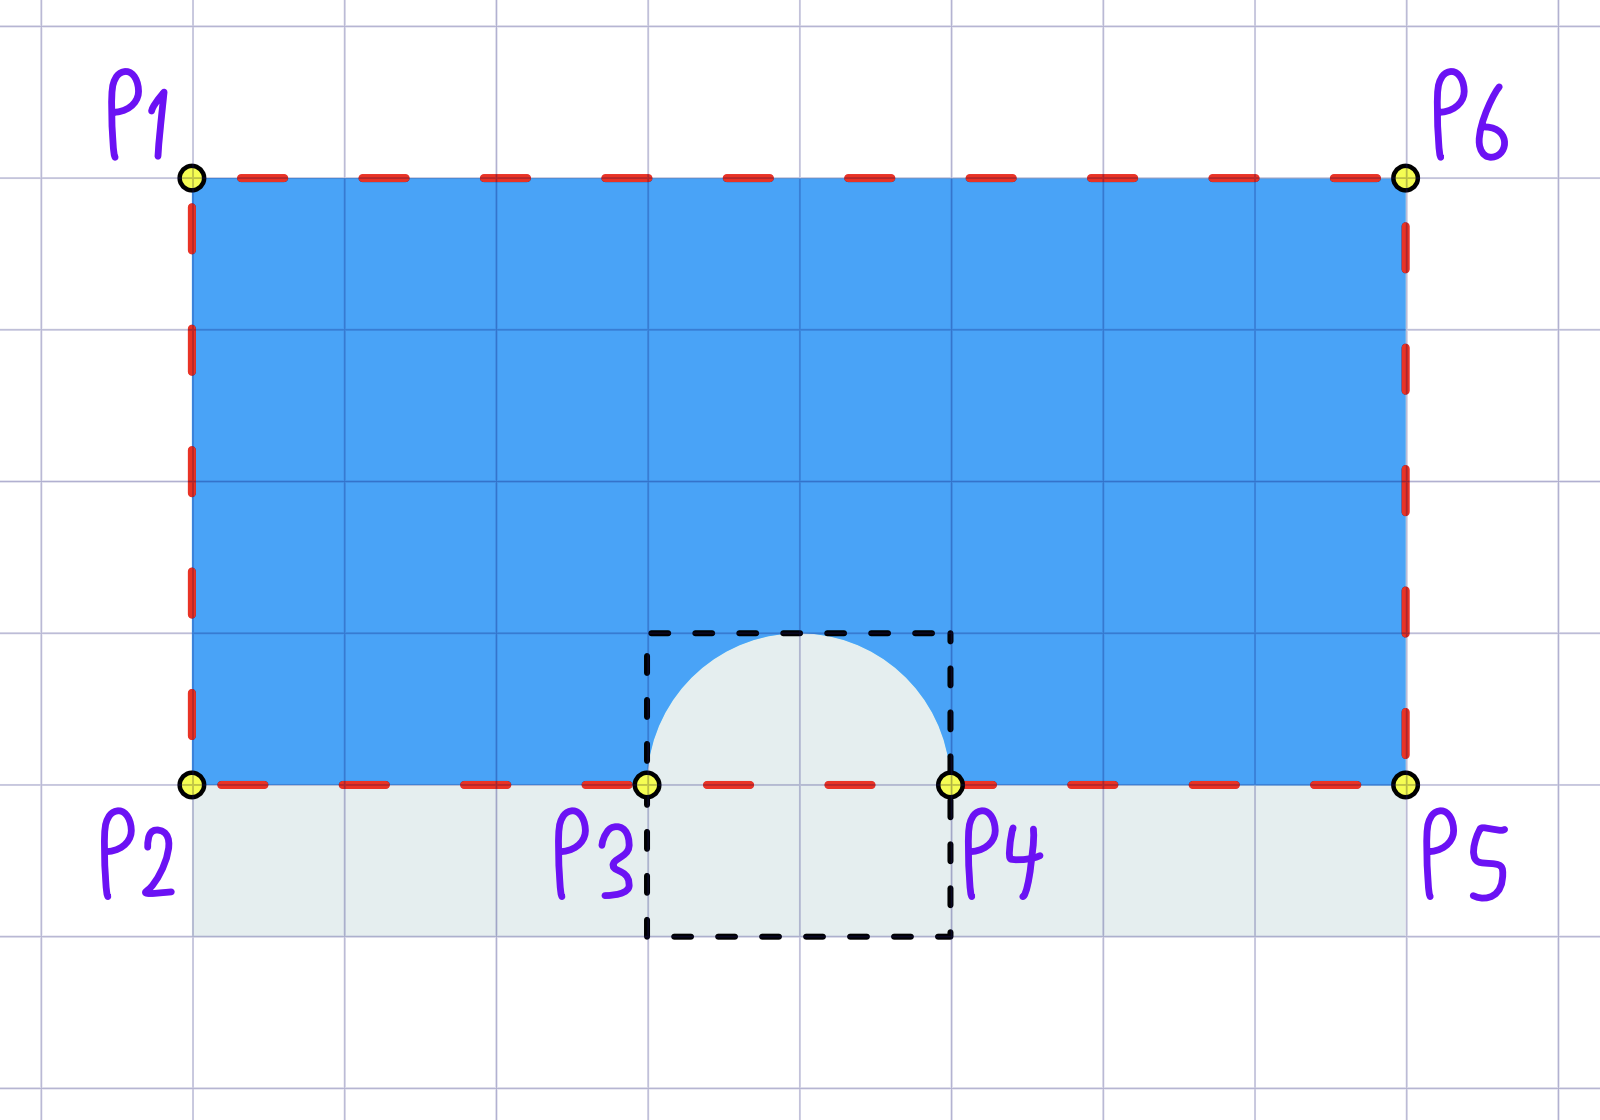
This diagram illustrates the proper coordinates for each point you need to build the path.
In the previous code:
- You create a
Paintobject and set its color. - Then, you create a
Pathobject. - You move to the top-left corner, P1, without drawing a line. This is like moving a pencil to a starting point without touching the paper.
- Next, you add a straight line that starts at P1 and ends at P2.
- Then, you add a straight line that starts at P2 and ends at P3: The point at the edge of where you will start drawing the arc.
- Then, starting from P3, add an arc in the upper half region of the avatar bounds: The arc starts from the angle
-180degrees and sweeps by180degrees ending at P4.
You passfalseas the last parameter to prevent starting a new sub-path for the arc. This tells Android that you want the arc on the same path. - Next, you add a straight line that starts from the current point and ends at P5 at the bottom-right corner.
- You finish by adding a straight line that starts from the current point P5 and ends at the given point P6 at the top-right corner.
- Then you close the path by adding a straight line that starts at the current point P6 and ends at the beginning point on the path, P1.
- Finally, you draw the
backgroundPathon the canvas by passing it todrawPath()withpaint.
In the previous code, you can collapse lines five and six in a single line. Do you know how? You can find the solution in the spoiler below.
[spoiler title=”Solution”]
You can collapse lines five and six by leaving only line six.
arcTo(avatarBounds, -180f, 180f, false)
The official documentation of
arcTo(RectF oval, float startAngle, float sweepAngle, boolean forceMoveTo)
states: “If the start of the path is different from the path’s current last point, then an automatic lineTo() is added to connect the current contour to the start of the arc.”
[/spoiler]
Phew! That was a lot of code, but it was worth the effort!
Creating the Rectangle Around the Avatar
In ProfileCardPainter, go to paint() and replace the last three lines:
    val paint = Paint()
    paint.color = color
    canvas.drawRect(shapeBounds, paint)
with the following code to create a new RectF around the avatar:
//1
val centerAvatar = PointF(shapeBounds.centerX(), shapeBounds.bottom)
//2
val avatarBounds = RectFFactory.fromCircle(center = centerAvatar, radius = avatarRadius)
//3
drawBackground(canvas, shapeBounds, avatarBounds)
Here’s what this code does:
- You create a
PointFobject for the center point of the avatar, wherexis theshapeBounds.centerX()andyis thebottomof theshapeBounds. - Then, you create a
RectFobject from the avatar circle usingfromCircle(). The center iscenterAvatar, which you just created, and the radius is theavatarRadius. - Finally, you call
drawBackground()and pass the canvas with rest of the parameters to draw your first path.
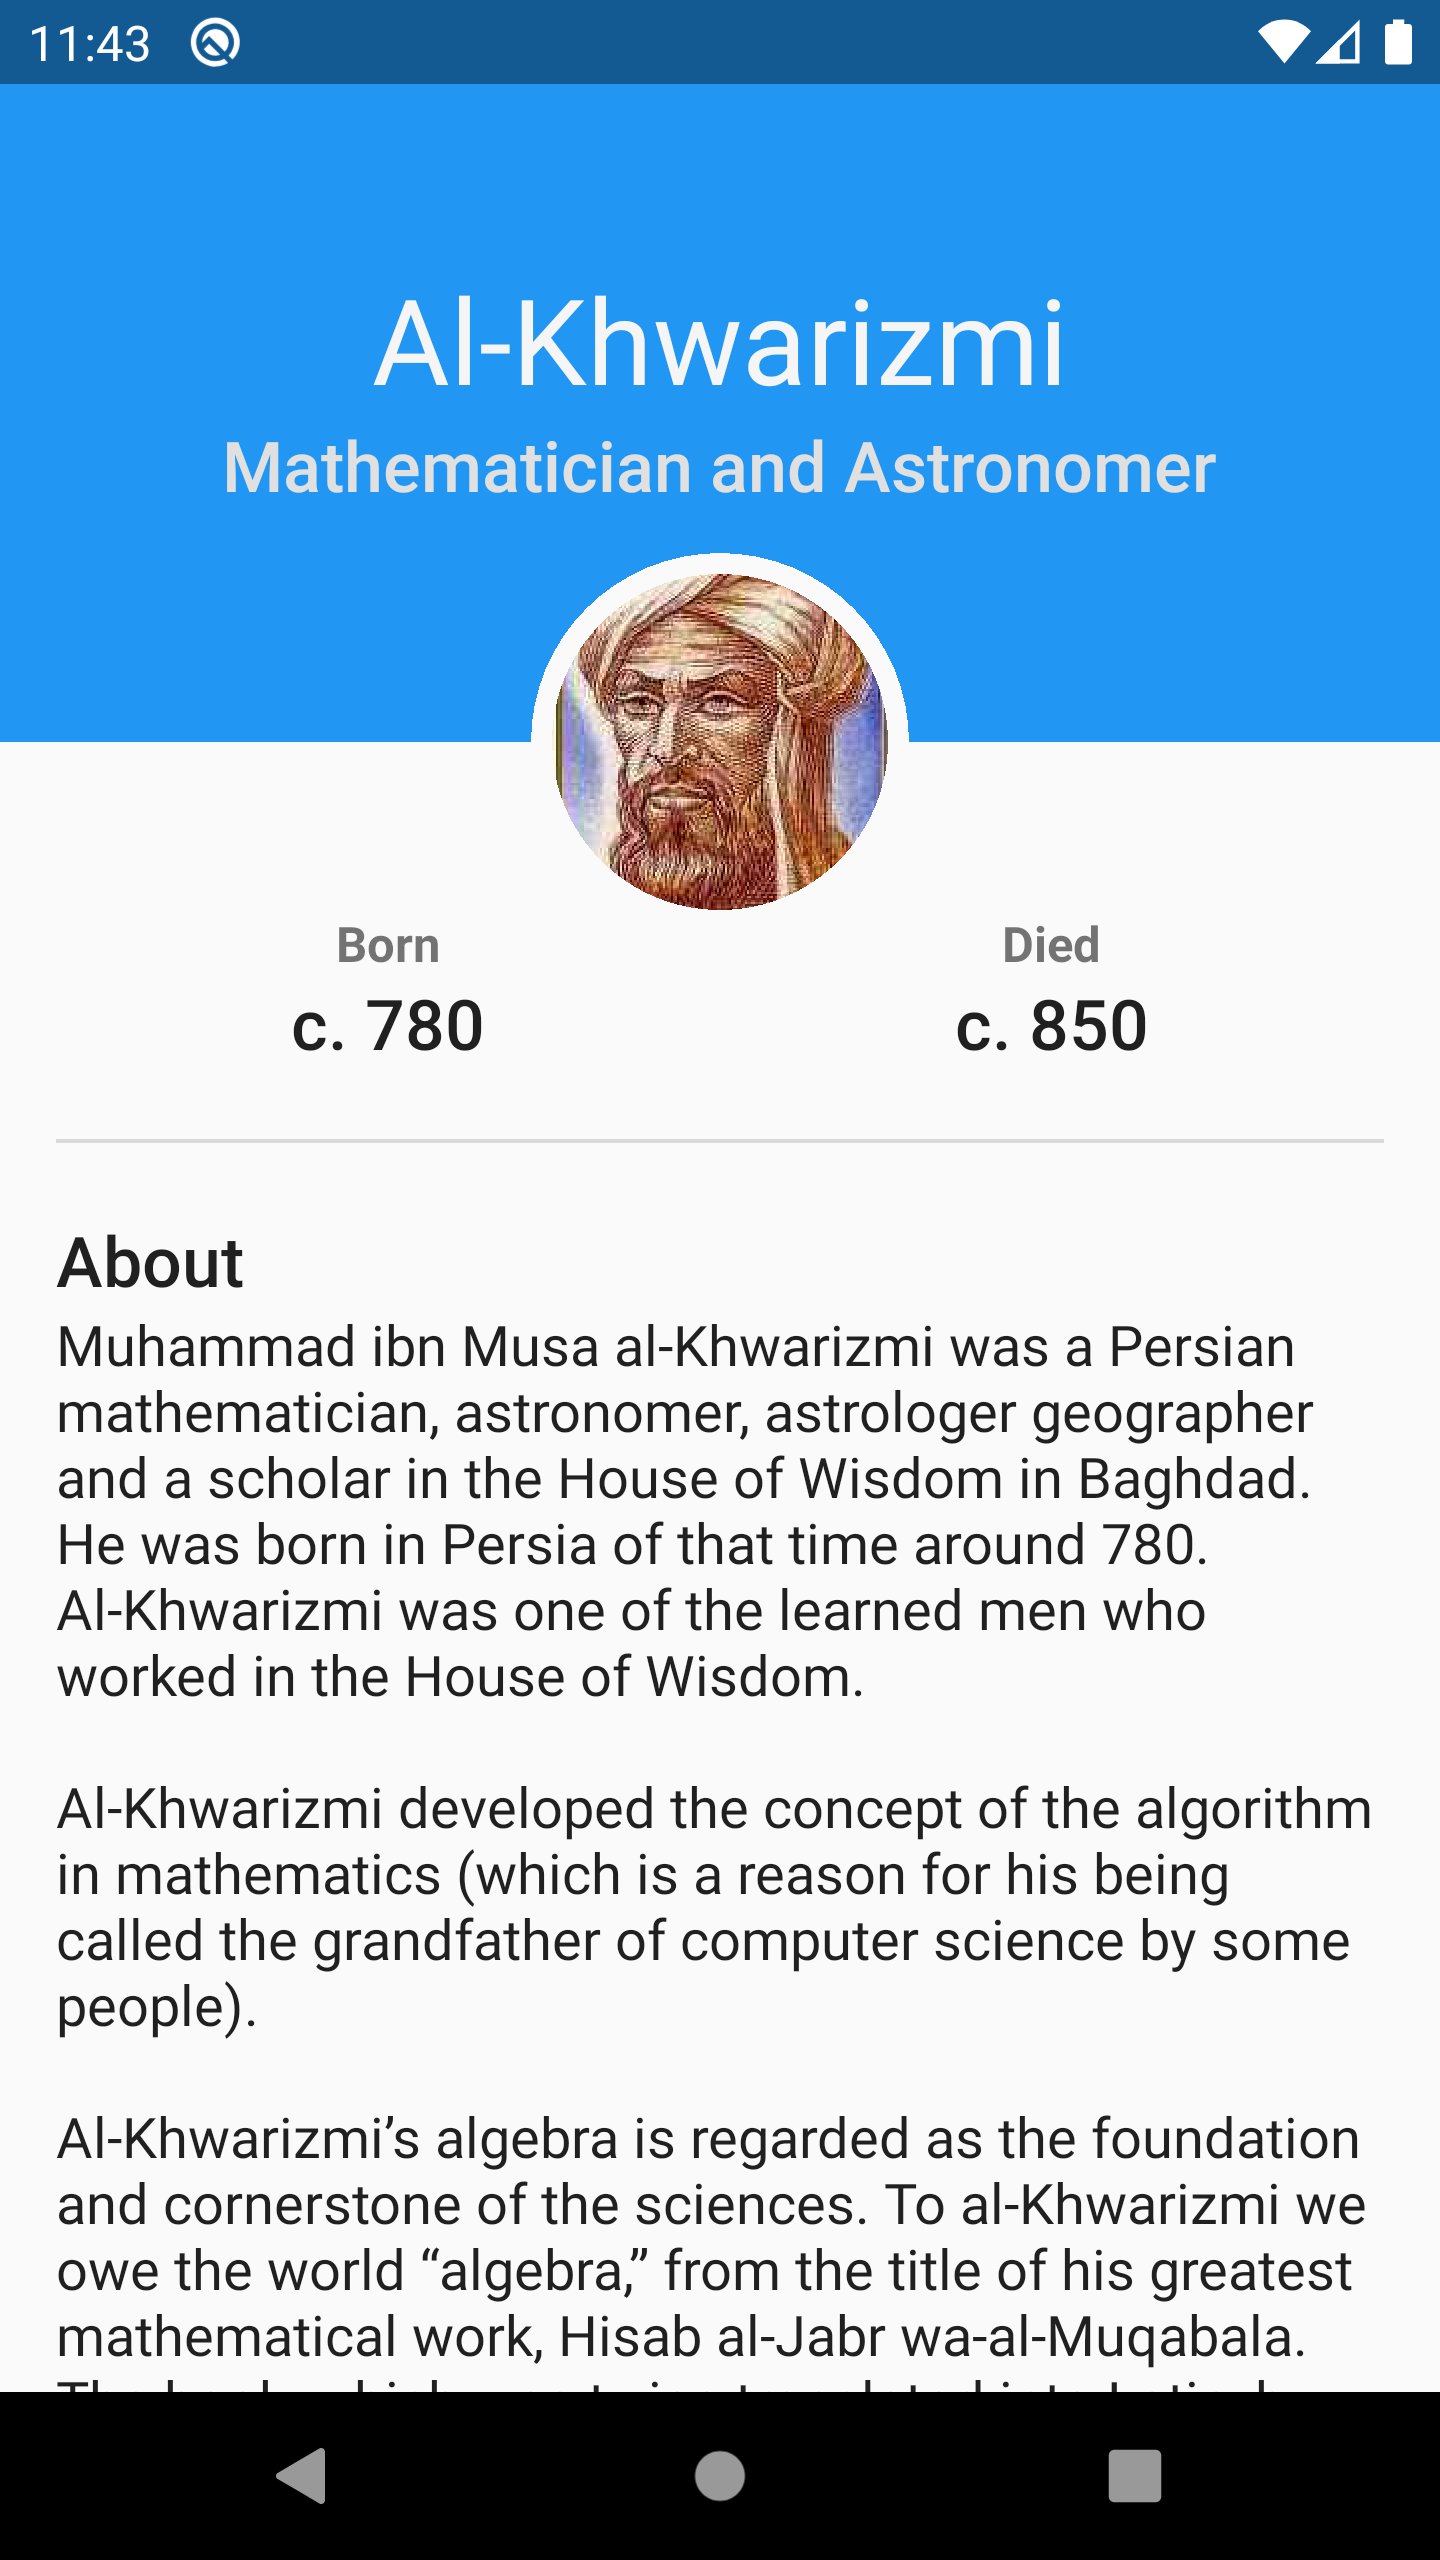
Build and run the app. You’ll see this:

You probably don’t notice the difference yet. Don’t worry, you’ll fix that next.
Adding a Margin Around the Avatar
There is a difference, but you can’t see it because the negative space is exactly equal to the circular avatar’s size. Next, you’ll make that negative space a bit bigger to leave a margin between it and the avatar.
First, get the margin of the avatar. Start by adding one more class property called avatarMargin to your ProfileCardPainter primary constructor, don’t forget the comma at the end of the line above the new code.
class ProfileCardPainter(
    ...
    private val avatarMargin: Float
)
Then, go to MainActivity.kt and, in onCreate(), pass the avatarMargin to the ProfileCardPainter constructor:
val painter = ProfileCardPainter(
  ...
  avatarMargin = avatarMargin
)
Finally, return to ProfileCardPainter.kt and\where you create the avatarBounds in paint, add .inflate(avatarMargin) to the end:
val avatarBounds = RectFFactory.fromCircle(center = centerAvatar, radius = avatarRadius).inflate(avatarMargin)
Calling inflate() on a RectF creates a new RectF object whose left, top, right and bottom edges are moved outwards by the given value. The result is a nice space around the avatar.
To see the margin in action, build and run the app.
Pretty... but ordinary. Next, you'll spice up the background by adding an attractive curved shape.
Adding More Neat Shapes
To enhance your custom shape, you can add some simple decorations like stars or circles in a partially-faded color. For this app, you'll add a more interesting decoration: A curvy shape in gradient colors.
Adding a Curved Shape
Before you start drawing, take a moment to learn about the different types of curves. The Quadratic Bézier Curve and the Cubic Bézier Curve are two commonly used curves.

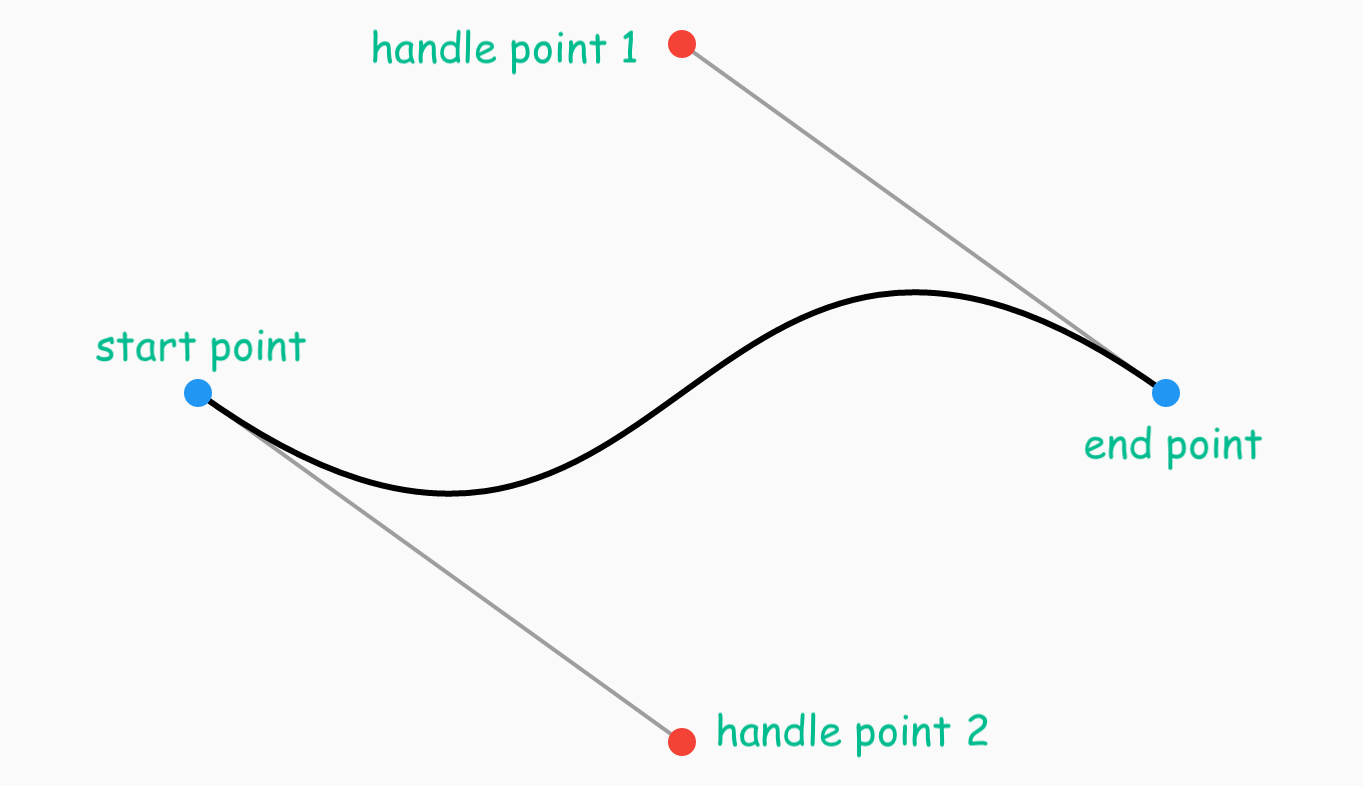
- A quadratic Bézier curve requires three points to draw: A start point, an endpoint and a handle point that pulls the curve towards it.
- A cubic Bézier curve needs four points to draw: A start point, an end point and two handle points that pull the curve towards them.
Next, you'll use a quadratic Bézier curve to create an interesting background shape.
Drawing a Quadratic Bézier Curve
Start by creating a new function called drawCurvedShape() inside ProfileCardPainter with the following:
private fun drawCurvedShape(canvas: Canvas, bounds: RectF, avatarBounds: RectF) {
  //1
  val paint = Paint()
  paint.color = color.darkerShade()

  //2
  val handlePoint = PointF(bounds.left + (bounds.width() * 0.25f), bounds.top)

  //3
  val curvePath = Path().apply {
    //4
    moveTo(bounds.bottomLeft.x, bounds.bottomLeft.y)
    //5
    lineTo(avatarBounds.centerLeft.x, avatarBounds.centerLeft.y)
    //6
    arcTo(avatarBounds, -180f, 180f, false)
    //7
    lineTo(bounds.bottomRight.x, bounds.bottomRight.y)
    //8
    lineTo(bounds.topRight.x, bounds.topRight.y)
    //9
    quadTo(handlePoint.x, handlePoint.y, bounds.bottomLeft.x, bounds.bottomLeft.y)
    //10
    close()
  }

  //11
  canvas.drawPath(curvePath, paint)
}
This diagram will help you understand the code you added. Use it as a guide to the proper coordinates for each point you'll build to create the path:

In the previous code:
- You create a
Paintobject and set its color to a darker shade of the profile color. - Then, you create a handle point at the top left corner of the
RectF, shifted to the right by 25% of the width of theRectF. This is P6 in the guide image. - You create a
Pathobject. - Then, you move to the bottom-left corner, P1 in the guide image.
- You add a straight line that starts from P1 and ends at P2: The middle point at the edge of the black dashed avatar bounds
RectF. - Then, starting from the current point, P2, add an arc in the upper- half region of the avatar bounds: The arc starts from the angle
-180degrees and sweeps by180degrees ending in P3.
You passfalseas the last parameter so you don't start a new sub-path for the arc. This tells Android that you want the arc on the same path. - You add a straight line that starts from the current point and ends at the given point, the bottom-right corner. This adds a line from P3 to P4.
- Then, you add a straight line that starts from the current point and ends at the given point, the top-right corner, adding a line from P4 to P5.
- You add a quadratic Bézier curve that starts from the current point, P5, and ends at the bottom-left corner, P1, using the handle point you created in step two.
- Finally, you close the path, even though it's not required this time since you are back at the beginning point on the path.
- You draw
curvePathon the canvas by passing it todrawPath()along with thepaintobject.