Improving Storyboard Segues With IBSegueAction
In this iOS tutorial, you’ll learn how to use IBSegueAction for storyboard segues. You’ll understand the advantages and disadvantages of this new technique. By Chuck Krutsinger .

In UIKit, a segue is an object that defines a transition between two view controllers in a storyboard file. It has nothing to do with a two-wheeled scooter. The only thing a segue and a Segway have in common is that they are homophones. No more, no less!

This tutorial covers a new way of implementing a UIKit segue called IBSegueAction. Introduced in iOS 13, an IBSegueAction lets you create view controllers before UIKit displays them.
In this tutorial, you’ll create two segues using the pre-iOS 13 approach based on prepare(for:sender:). Then, you’ll refactor those same segues using @IBSegueAction to create the endpoint view controllers. You’ll learn about the advantages that IBSegueActions offers over the previous approach as well as the disadvantages. Well, the one disadvantage.
Getting Started
Begin by downloading the project materials using the Download Materials button at the top or bottom of this tutorial. Then open RazeNotes.xcodeproj in the starter folder.
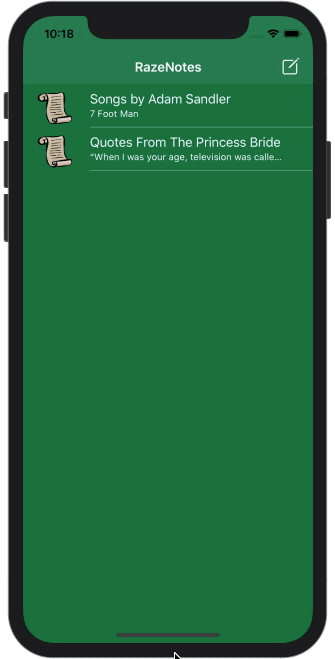
The app, RazeNotes, is a simple note-taking app. It comes preloaded with some fun notes, but feel free to add your own.
Build and run. Tap the new note button in the top-right corner and each of the notes in the list. You’ll notice nothing happens; that’s because the app doesn’t have any segues. Yet.
To make it work, you’ll be adding segues to the new note button and to the items on the list.

Exploring Segues
Before adding functionality to RazeNotes, it would be good to understand more about segues. In UIKit, a segue is an object that defines a transition between two view controllers in a storyboard file. An action — such as tapping a button, performing a gesture or tapping on a table cell row — triggers the segue. The endpoint of the segue is the view controller you want to display.
The diagram below illustrates two segues connecting the same two view controllers. The segue arrow points toward the endpoint.
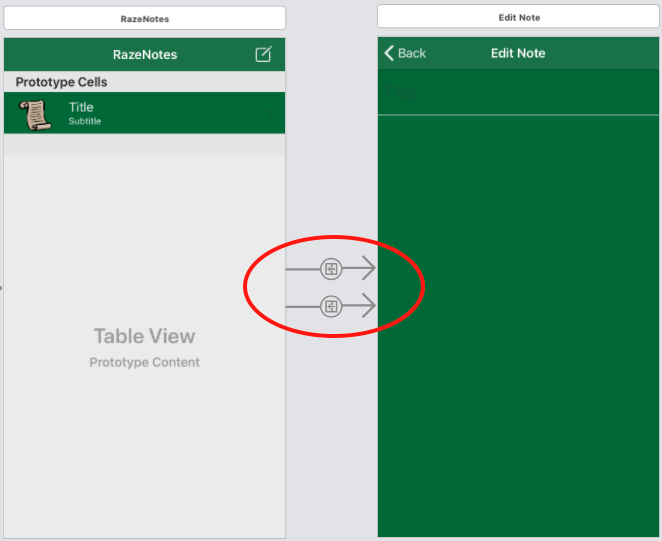
The most common is the Show segue, which puts a view controller modally on top of the current view controller. That’s what you’ll implement in this tutorial.
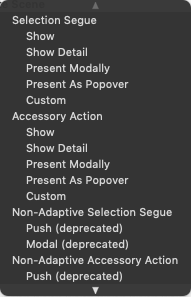
But there are several other types of segues for different kinds of transitions. The menu below shows all the different types of segues, including some that are deprecated. You shouldn’t add the deprecated segue types to new projects. They’re there for backward compatibility.
In most cases, you’ll need to configure the segue’s endpoint view controller before it displays. Before iOS 13, UIKit created the endpoint view controller, and then you configured it in the starting view controller’s prepare(for:sender:). As a result, you had to configure it after it was already initialized.
That has some downsides that you’ll be able to experience once you’ve implemented the segues in both fashions.
Making RazeNotes Segues Work Before iOS 13

Time to do some development! In this section, you’ll handle the new note and edit note segues using prepare(for:sender:), the traditional method of handling segues. By the end of this section, you’ll have a working RazeNotes app!
Start by opening Main.storyboard. Then, click the RazeNotes Scene in the storyboard. This step will be easiest if you open NotesListViewController.swift in the assistant editor by choosing Editor ▸ Assistant from the Xcode menu. The editor on the right should open to NotesListViewController.swift.
If the assistant editor opens to some other file, then select Automatic at the top-right corner of the editor window and choose Top-Level Objects ▸ NotesListViewController.swift.
To reveal the New Note button, expand the hierarchy of controls in the RazeNotes Scene of the Document Outline; it’s on the left side of the storyboard screen. To create a segue for a new note, Control-drag from the New Note button in the Document Outline to the Edit Note view controller. From the menu that pops up, choose the Show segue type.

Select the new segue. Then open the Attributes inspector so that you can fill in the Identifier attribute with newNoteSegue. You’ll use the identifier later to determine which segue is triggered.

It’s the same process to create a segue for editing a note. Control-drag from the notesCell to the Edit Note view controller in the storyboard Document Outline on the left side. From the menu that pops up, choose the Show segue type again.

Click the new segue and open the Attributes inspector so that you can fill in the Identifier attribute with editNoteSegue.

Time to make those segues work. In the assistant editor, NotesListViewController.swift is already open. Add prepare(for:sender:) to the file right after viewWillAppear(_:). Just type prepareforsend, and let Xcode autocomplete the definition.
Paste over the empty prepare(for:sender:) with the following code:
override func prepare(for segue: UIStoryboardSegue, sender: Any?) {
  //1
  guard let destinationViewController = segue.destination
      as? EditNoteViewController else {
    return
  }

  //2
  switch segue.identifier {
  //3
  case "editNoteSegue":
    guard let selectedRow = notesTableView.indexPathForSelectedRow?.row else {
      return
    }
    destinationViewController.note = notesRepository[selectedRow]

  //4
  case "newNoteSegue":
    let newNote = Note()
    notesRepository.add(note: newNote)
    destinationViewController.note = newNote
    destinationViewController.title = "New Note"

  default:
    break
  }
}
To make the two segues work, prepare(for:sender:) is:
- Determining the selected row.
- Fetching the note from that row from in
notesRepository. - Passing the note to the
destinationViewControllerfor editing.
- Creating a new instance of a
Note. - Adding the note to the
notesRepository. - Passing the new note to the
destinationViewControllerfor editing. - Overriding the title of the
destinationViewControllerto show that this is a new note.
- Casting the
segue.destinationas anEditNoteViewControllersince both segues require that type. - Switching on the segue’s
identifierto determine how to configure thedestinationViewController. Note that switching on aStringlike this is one of the downsides of this approach. The identifier must exactly match the identifier attribute set in the storyboard. This can be a source of errors. - For the editNoteSegue:
- For the newNoteSegue:
Build and run. Tap the New Note button to create a new note. When you tap Back, you’ll see the new note in the list. You can also tap any note to read or edit its contents. Tap Back and then reopen the note to see if your edits took.