SceneKit Tutorial With Swift Part 1: Getting Started
In the first installment of our SceneKit With Swift tutorial, you’ll start making your first 3D iOS game: a game like Fruit Ninja called Geometry Fighter by creating a blank project. By Chris Language.
This tutorial series will show you how to create your first game with Scene Kit, Apple’s built-in 3D game framework: a game like Fruit Ninja called Geometry Fighter
You’d be forgiven for thinking that making 3D games is far more complicated than creating a classic 2D game. 3D games have a reputation for being notoriously difficult to program, usually involving a lot of complicated math.
However, that is no longer the case, thanks to the advent of Apple’s Scene Kit! The simplicity of Scene Kit lets beginners create simple and stylish games in a short amount of time.
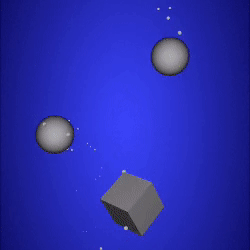
In this 5-part Scene Kit tutorial series, you’ll create your first Scene Kit game: Geometry Fighter. This is a Fruit Ninja style game, with colorful geometric shapes thrown up into the air for your pure destructive indulgence.
In this first part of the series, you’ll simply create a blank project to have a good starting point, which is good for people who like to understand every step. If you’d prefer to dive right into coding, skip to Part 2 of this series, where we’ll have a starter project ready for you.
Getting Started
Download the starter package for this tutorial; it has some resources you’ll need later on.
Open Xcode and select File > New > Project from the main menu. If you want to become an Xcode ninja, use the shortcut command: ⇧⌘N.
Select the iOS/Application/Game template and click Next to continue:

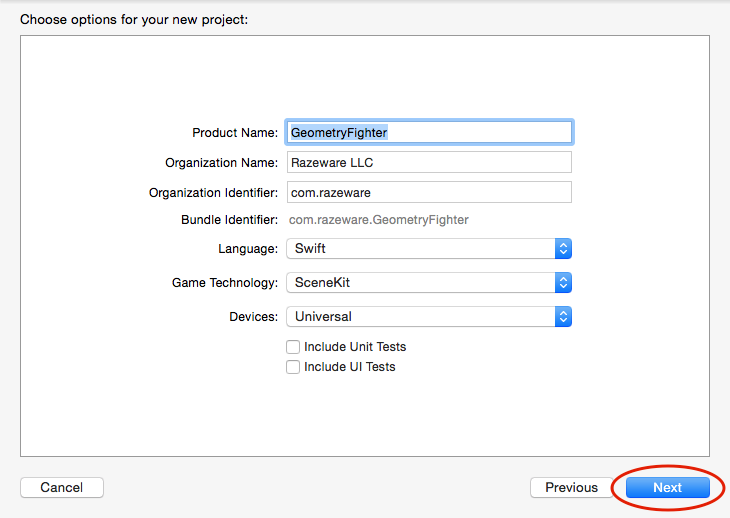
Now you need to provide some basic details about your project. Enter GeometryFighter for the Product Name, select Swift for Language, SceneKit for Game Technology, Universal for Devices, uncheck the unit tests and click Next:
The final step is to choose a location to save your project. Pick a directory and select Create; Xcode will work its magic and generate your project.
Building the SceneKit Game Project
Now that you’ve generated your SceneKit game project from the template, it’s time to see it in action! :]
First, choose the iPhone 6 simulator from the toolbar, then press the Play button at the top to build and run your project. Xcode ninjas can simply press ⌘R:

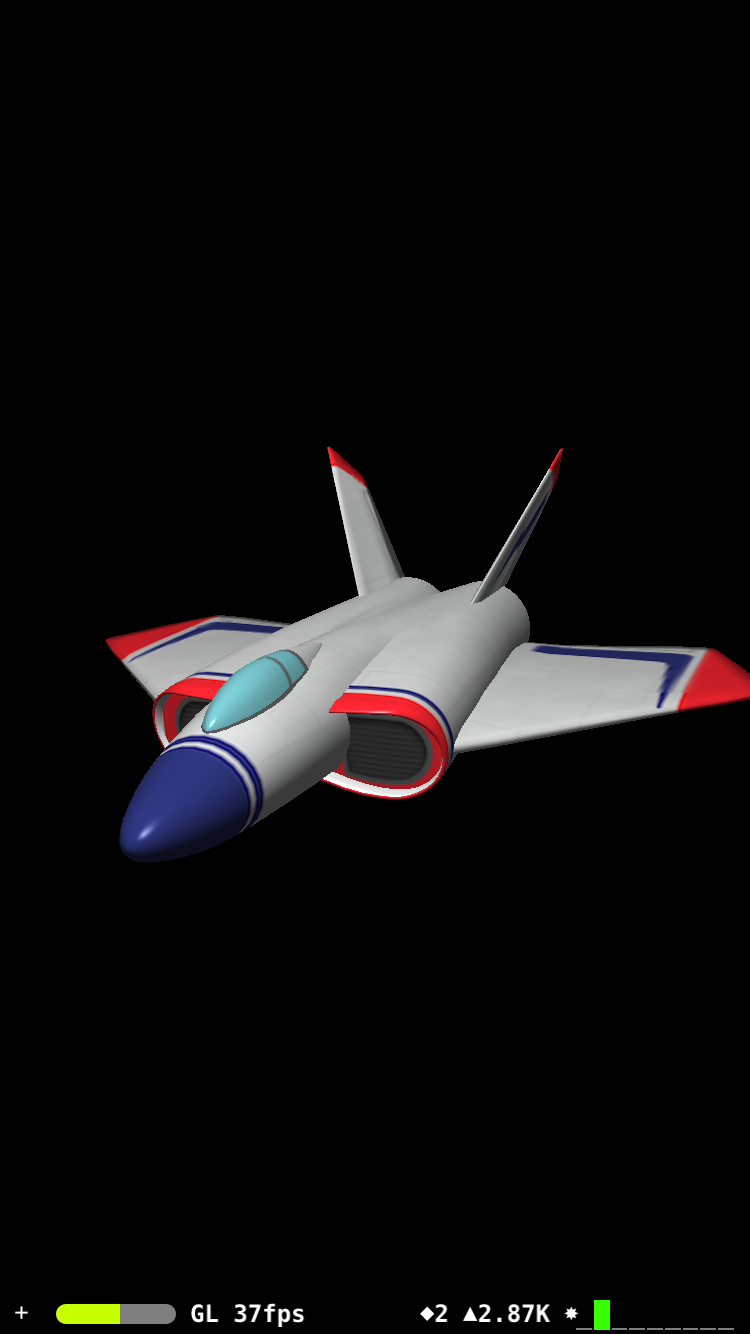
You’ll see the simulator launch, and your first 3D SceneKit game will appear. You can rotate the view of your 3D spaceship in the game by simply draging around the screen in different directions to change the camera angle:
Cool, right? It’s okay if you want to take a moment and do a little happy dance in your seat. When you’re done, continue on with the rest of the tutorial.
Challenge
It’s time for your first mini-challenge! Before you move on, browse through the game template project. Pay close attention to the following key files and folders in the project navigator:
- art.scnassets
- ship.scn
- GameViewController.swift
- Assets.xcassets
- LaunchScreen.storyboard
You may not understand how everything works yet, but try to figure out what you think each file might do. Because you’ll be cleaning up the project in the next section, take a look at the files and folders while they’re still around. :]
Cleaning up the Game Project
There are a few components you need to remove in order to start with a clean SceneKit game project. Don’t worry; you’ll re-create all of the content from scratch so you can get a better idea of how it works and from where it came.
Removing Unwanted Folders
The first thing to remove is the art.scnassets folder. Right-click the folder, select Delete and then click Move to Trash:

Cleaning up Main Project Files
The GameViewController.swift file is a key component of your game; it’s where all of your game logic and code will live. Before you start coding, it’s a good idea to purge all of the code the Xcode SceneKit game template created for you.
Replace the contents of GameViewController.swift with the following:
import UIKit
import SceneKit

class GameViewController: UIViewController {

  override func viewDidLoad() {
    super.viewDidLoad()
  }

  override var shouldAutorotate: Bool {
    return true
  }

  override var prefersStatusBarHidden: Bool {
    return true
  }
}
The boilerplate code generated the spaceship; you’ve replaced that code with an empty slate. shouldAutorotate() handles device rotation and prefersStatusBarHidden() hides the status bar.
Setting up SceneKit
Earlier, you learned how SceneKit uses the scene graph to display content on the screen. The SCNScene class represents a scene; you display the scene onscreen inside an instance of SCNView. Your next task is to set up a scene and its corresponding view in your project.
Setting up the Project View
Add the following property to GameViewController.swift, just above viewDidLoad():
var scnView: SCNView!
Here, you declare a property for the SCNView that renders the content of the SCNScene on the display.
Next, add the following function just below prefersStatusBarHidden():
func setupView() {
  scnView = self.view as! SCNView
}
Here, you cast self.view to a SCNView and store it in the scnView property so you don’t have to re-cast it every time you need to reference the view. Note the view is already configured as an SCNView in Main.storyboard.
SCNView is a subclass of NSView in macOS, and a subclass of UIView in iOS. So whether you’re working with macOS or iOS, the same SCNView provides a view specifically for SceneKit content.
Setting up the Project Scene
It’s time to set up your scene. Add the following property to GameViewController.swift, just below the scnView property:
var scnScene: SCNScene!
Here, you declare a property for the SCNScene in your game. You’ll add components like lights, camera, geometry and particle emitters as children of this scene.
Now, add the following method below setupView():
func setupScene() {
  scnScene = SCNScene()
  scnView.scene = scnScene
}
This code creates a new blank instance of SCNScene and stores it in scnScene; it then sets this blank scene as the one for scnView to use.
Adding Finishing Touches
Now that you’ve created methods to set up instances of SCNView and SCNScene, you’ll need to call them from somewhere during the initialization step. A good place for that is just after the view finishes loading.
Add the following lines to viewDidLoad(), just after the call to super:
setupView()
setupScene()
Now it’s time to add an app icon to your game. Take a look in the Resources folder; you’ll find app icons of various sizes which you can use for this project.
To set an image as the icon for your game, open the Assets.xcassets folder, select the AppIcon entry and drag each file from the Resources folder to the appropriate spot. Your AppIcon panel should look like the following when you’re done:

Build and run your project. Behold — the blank screen of opportunity! :]
