Firebase Tutorial for Flutter: Getting Started
In this tutorial, you’ll learn how to use Firebase Firestore databases in Flutter by creating a fun app that will help you take care of your pets. By Kevin D Moore.
When writing mobile apps, saving the data users input is critical. You can save the data locally, but then you can’t save it permanently or share it with others.
If you want to share your data, you need to save it in the cloud. One of the easiest solutions is Google’s Firebase Firestore database.
Firestore is a NoSQL style database. Unlike traditional table-based databases that require much work to insert data, you save JSON blobs to collections. Additionally, this method doesn’t impose a structure for your data and lets you change it at any time.
Of course, the downside is that you have to take that into account when reading the data. So, you need to plan how you want to store your data. Firestore offers fast, responsive data syncing without much code.
Today, you’ll build PetMedical, an app to store your pets’ medical records. The app is a simple list of pets on the first screen with a floating action button at the bottom to add a new record.
In this tutorial you will learn how to:
- Create a new Firebase project.
- Configure a Firestore database.
- Use and create collections.
- Add Firebase dependencies to your Flutter project.
- Use streams.
- Create models and repositories.
- And much more!
Getting Started
Download the begin project by using the Download Materials button at the top or bottom of the page.
This tutorial uses the latest stable version of Android Studio and the Flutter plugin. Open pubspec.yaml and click on Packages get to download the latest libraries.
Open either an iPhone simulator or an Android emulator and make sure the app runs. The app should like like this:

The UI is in place, but you’ll need to setup Firestore and add the code to add and update records.
Creating a Firebase Account
In order to have a Firestore database, you need a Firebase account. Go to https://firebase.google.com/ and sign up for an account.
On the Welcome to Firebase page, click the Create Project button.

Now, enter the project name: PetMedical. Select the terms checkbox and press the Continue button.

On the next page, click on the switch to disable Analytics as you won’t use it. Then, click Create Project.

You’ll see a few progress dialogs:

Once your new project is ready, press Continue to get to the Getting Started page:

Here you can add Firebase to both your iOS and Android apps. Start with the iOS app.
Registering an iOS App
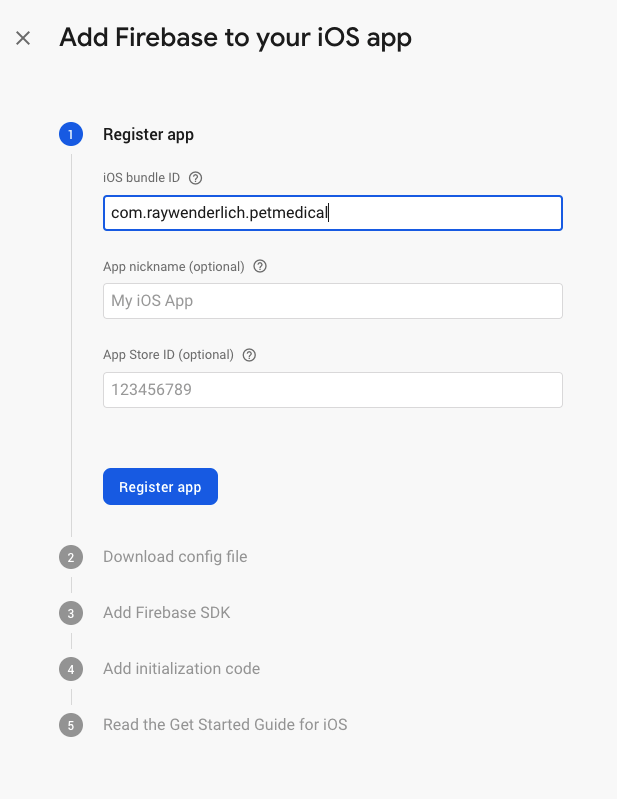
To register the iOS app, click on the iOS circle:

You’ll see a dialog to register your app. Enter com.raywenderlich.petmedical for the iOS bundle id and click on the Register App button.
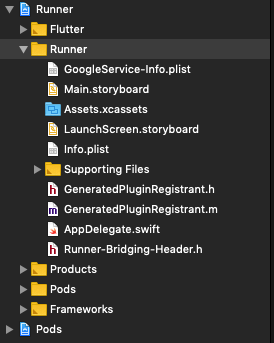
Next, click the Download GoogleService-Info.plist button.

Now, move this file into the iOS ‣ Runner folder. Then, from Android Studio in the Tools ‣ Flutter menu, choose Open iOS module in Xcode. In Xcode, right-click the Runner folder and choose Add files to Runnner….
Next, add GoogleService-Info.plist:
Nice job! Now it’s time to register the Android app. :]
Registering an Android App
First, go back to the Firebase page. On the main page click the Android circle to start the process of adding Firebase to Android:

You’ll see a dialog to register your app. Enter com.raywenderlich.pet_medical in the Android package name. Next, click Register App:

Then, click the Download google-services.json button. In the Finder, move this file into the android ‣ app folder.

Now, in Android Studio, open the Android folder and then open build.gradle. Then add classpath 'com.google.gms:google-services:4.3.3' after the last classpath entry.
Now open the app build.gradle and add apply plugin: 'com.google.gms.google-services' to the bottom.

Not too bad, right? :] Congrats! Now it’s time to create the Firebase database.
Creating Firestore Database
On the Firebase console choose the Database option under the Develop menu:

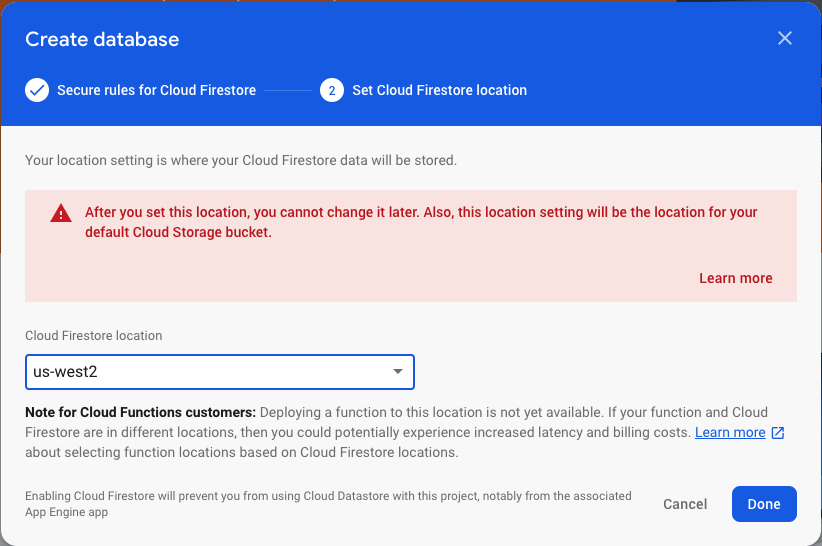
Now click the Create Database button and choose Start in test mode. This turns off any security so you can easily test your database:


When you’re ready for production, change the setting back to production mode and add security rules. Now, click Next. Then choose a Firestore location and click Done:
Nice! You created your first database.
Your screen won’t have any collections to start with:

In Android Studio open pubspec.yaml and add cloud_firestore: ^0.13.0+1 after flutter_form_builder: ^3.7.2. Then click Packages get to add the firestore library.
Before creating the model class, it’s time to talk about collections. :]
Understanding Collections
Firestore stores data in collections, which are similar to tables in a traditional database. They have a name and a list of Documents.
These Documents usually have a unique generated key in the database and they store data in key/value pairs.
These fields can have several different types:
- String.
- Number.
- Boolean.
- Map.
- Array.
- Null.
- Timestamp.
- Geopoint.
- Reference to another document.
You can use Firestore’s console to manually enter data and see the data appear almost immediately in your app. If you enter data in your app, you’ll see it appear on the web and other apps almost immediately.
Next, you’ll create the models for your app.
Creating the Model Classes
To retrieve your data from Firestore, you need to create two model classes where you’ll put the data: Vaccinations and pets.
In Android Studio, right-click the lib directory and select New ‣ Directory. Name the directory models. You’ll create the vaccinations model first.
Creating the Vaccination Model
First, right-click on the models folder and choose New ‣ Dart File. Then name the file vaccination and add the following:
class Vaccination {
  // 1
  String vaccination;
  DateTime date;
  bool done;
  // 2
  DocumentReference reference;
  // 3
  Vaccination(this.vaccination, {this.date, this.done, this.reference});
  // 4
  factory Vaccination.fromJson(Map<dynamic, dynamic> json) => _VaccinationFromJson(json);
  // 5
  Map<String, dynamic> toJson() => _VaccinationToJson(this);
  @override
  String toString() => "Vaccination<$vaccination>";
}
Here are descriptions of the comments above:
- Define your fields. Name of the vaccination, date it was given and whether this vaccination is finished.
- A reference to a Firestore document representing this vaccination.
- Constructor where the vaccination is required and the others are optional.
- A factory constructor to create a Vaccination from JSON.
- Turn this vaccination into a map of key/value pairs.
Now add the helper functions outside the class:
//1
Vaccination _VaccinationFromJson(Map<dynamic, dynamic> json) {
  return Vaccination(
    json['vaccination'] as String,
    date: json['date'] == null ? null : (json['date'] as Timestamp).toDate(),
    done: json['done'] as bool,
  );
}
//2
Map<String, dynamic> _VaccinationToJson(Vaccination instance) =>
    <String, dynamic> {
      'vaccination': instance.vaccination,
      'date': instance.date,
      'done': instance.done,
    };
Here’s what you see:
- _VaccinationFromJson turns a map of values from Firestore into a Vaccination class.
- _VaccinationToJson converts the Vaccination class into a map of key/value pairs.
Next, you’ll create the pets model.