Beginning Android Development with Kotlin, Part Two: Using Android Studio
In this Android Studio tutorial, you’ll learn the fundamental concepts of developing with Android Studio using Kotlin by creating an app to read your fortune. By Kevin D Moore.
Defining Values for Your Layout
Before you start building the view, you’ll need to define some values. Open strings.xml under res/values and add the following:
<string name="fortune_description">Suggest the question, which you can answer “yes” or “no”, then click on the magic ball.</string>
Strings.xml contains all the user-facing strings that appear in your app. Splitting the strings into their own file makes internationalization a breeze, as you just provide a strings file for each language you wish to support. Even if you don’t want to translate your app right away, it’s considered a best practice to use a strings file.
Next, open dimens.xml under res/values and add the following:
<dimen name="description_text_size">15sp</dimen>
<dimen name="fortune_text_size">20sp</dimen>
Dimens.xml contains all the dimension’s values, such as margin spacing for your layouts, your text sizes and so on. Again, it’s a good practice to keep the dimensions in this file so that you can re-use them in constructing layouts.
Creating Your Layout
Now, head back to content_main.xml and replace the entire contents of the file with the code below:
<?xml version="1.0" encoding="utf-8"?>
<android.support.constraint.ConstraintLayout
    xmlns:android="http://schemas.android.com/apk/res/android"
    xmlns:tools="http://schemas.android.com/tools"
    xmlns:app="http://schemas.android.com/apk/res-auto"
    android:layout_width="match_parent"
    android:layout_height="match_parent"
    app:layout_behavior="@string/appbar_scrolling_view_behavior"
    tools:showIn="@layout/activity_main"
    tools:context=".MainActivity">

  <TextView
      android:id="@+id/descriptionText"
      android:layout_width="0dp"
      android:layout_height="wrap_content"
      android:gravity="center"
      android:layout_marginTop="8dp"
      app:layout_constraintTop_toTopOf="parent"
      app:layout_constraintStart_toStartOf="parent"
      app:layout_constraintEnd_toEndOf="parent"
      android:text="@string/fortune_description"
      android:textSize="@dimen/description_text_size"/>

  <ImageView
      android:id="@+id/fortunateImage"
      android:layout_width="wrap_content"
      android:layout_height="wrap_content"
      app:layout_constraintTop_toBottomOf="@+id/descriptionText"
      app:layout_constraintStart_toStartOf="parent"
      app:layout_constraintEnd_toEndOf="parent"
      android:layout_marginTop="10dp"
      android:src="@drawable/img_crystal"/>

  <TextView
      android:id="@+id/fortuneText"
      android:layout_width="match_parent"
      android:layout_height="wrap_content"
      android:layout_marginTop="20dp"
      android:gravity="center"
      app:layout_constraintTop_toBottomOf="@+id/fortunateImage"
      android:textColor="@android:color/holo_red_dark"
      android:textSize="@dimen/fortune_text_size"
      android:textStyle="bold"/>

  <Button
      android:id="@+id/fortuneButton"
      android:layout_width="match_parent"
      android:layout_height="50dp"
      android:layout_below="@id/fortuneText"
      android:layout_centerHorizontal="true"
      app:layout_constraintTop_toBottomOf="@+id/fortuneText"
      android:layout_marginTop="10dp"
      android:text="What's my fortune?"/>
</android.support.constraint.ConstraintLayout>
This large chunk of XML creates Fortune Ball’s layout. At the top level, you’ve added a ConstraintLayout, which will lay out the objects inside of it. It stretches to match the size of its parent — i.e., the full activity.
Within the layout, you’ve added two pieces of text, an image and a button. These will appear within the container in the order in which you added them. Strings.xml reads the content from the text views and the drawable you added reads the content for the image.
As you’re updating content_main.xml, notice how the Preview window updates the UI:

Note: If you can’t see the preview window, click on the Preview button on the right-hand side panel of the layout editor while you’re still in the Text tab.
Finally, build and run your app.

Congrats! You’ve designed your app’s layout. However, it’s only a pretty picture at this point — clicking on that button doesn’t do anything. Are you ready to play around with activities?
Connecting Views With Activities
Use the Kotlin files located in app ▸ src ▸ main ▸ java to implement your app’s logic.
Open MainActivity.kt
Inside of MainActivity.kt add the following at the top of MainActivity:
private var fortuneList = arrayOf(
  "Don’t count on it",
  "Ask again later",
  "You can rely on it",
  "Without a doubt",
  "Outlook is not so good",
  "It's decidedly so",
  "Signs point to yes",
  "Yes, definitely",
  "Yes",
  "My sources say NO"
)

private lateinit var fortuneText: TextView
private lateinit var generateFortuneButton: Button
private lateinit var fortuneBallImage: ImageView
Make sure you import the different Android widgets.
In this small chunk of code, you’ve declared four member variables for the activity. The first is an array of strings that represents the possible fortunes and the remaining three represent the UI elements you created in the layout.
Next, replace the content of onCreate() with the following:
// 1:
super.onCreate(savedInstanceState)
// 2:
setContentView(R.layout.activity_main)
val toolbar = findViewById<View>(R.id.toolbar) as Toolbar
setSupportActionBar(toolbar)
// 3:
fortuneText = findViewById<View>(R.id.fortuneText) as TextView
fortuneBallImage = findViewById<View>(R.id.fortunateImage) as ImageView
generateFortuneButton = findViewById<View>(R.id.fortuneButton) as Button

// 4:
generateFortuneButton.setOnClickListener {
  // 5:
  val index = Random().nextInt(fortuneList.size)
  fortuneText.setText(fortuneList[index])
  // 6:
  YoYo.with(Techniques.Swing)
      .duration(500)
      .playOn(fortuneBallImage)
}
Taking the numbered sections one by one:
Note: Since you are using Kotlin Android Extensions, you don’t need findViewById calls; see more here.
- Call the superclass implementation to ensure the activity is ready to go.
- Specify that the the layout which you created before will provide the layout for this activity and prepare the toolbar.
- Populate the values of the three member variables you created before for the views in the layout using
findViewById. Theidvalue is the same as the one you provided in the XML layout. - Add
OnClickListenerto the button. This is a simple class that encapsulates the functionality you’d like to perform when a user presses the button. - Find a random fortune from the
fortuneListarray and update the fortune text to display it. - Use the third-party animation library you added as a dependency to the gradle file to add a fun animation to the crystal ball image.
OK, that wasn’t too bad right? Build and run your app, then tap the button to test out your fortune-telling powers.

Tidying Up
You’re almost done. But before you start planning your release party, you have some clean-up to do, like getting rid of that floating button. Head to res ▸ layout and open activity_main.xml.
This layout file contains a reference to content_main.xml, which you previously edited. It wraps the content with the default toolbar and the floating action button. However, Fortune Ball doesn’t need a floating action button, so remove the following code block from this XML file:
<android.support.design.widget.FloatingActionButton
  android:id="@+id/fab"
  android:layout_width="wrap_content"
  android:layout_height="wrap_content"
  android:layout_gravity="bottom|end"
  android:layout_margin="@dimen/fab_margin"
  app:srcCompat="@android:drawable/ic_dialog_email" />
Now, build and run the app. You won’t see that floating button on the bottom right-hand corner anymore:

Ask a question, tap on What’s my fortune? and let your future unfold before your eyes!
Logcat
Android Studio provides a bunch of tools to help you look under the hood of your app. You can access them from the View ▸ Tool Windows menu or by clicking the tabs at the bottom of Android Studio:
![]()
Let’s walk through one of them. Don’t worry, you don’t have to memorize all this and there won’t be a quiz. :]
Click the Logcat tab:
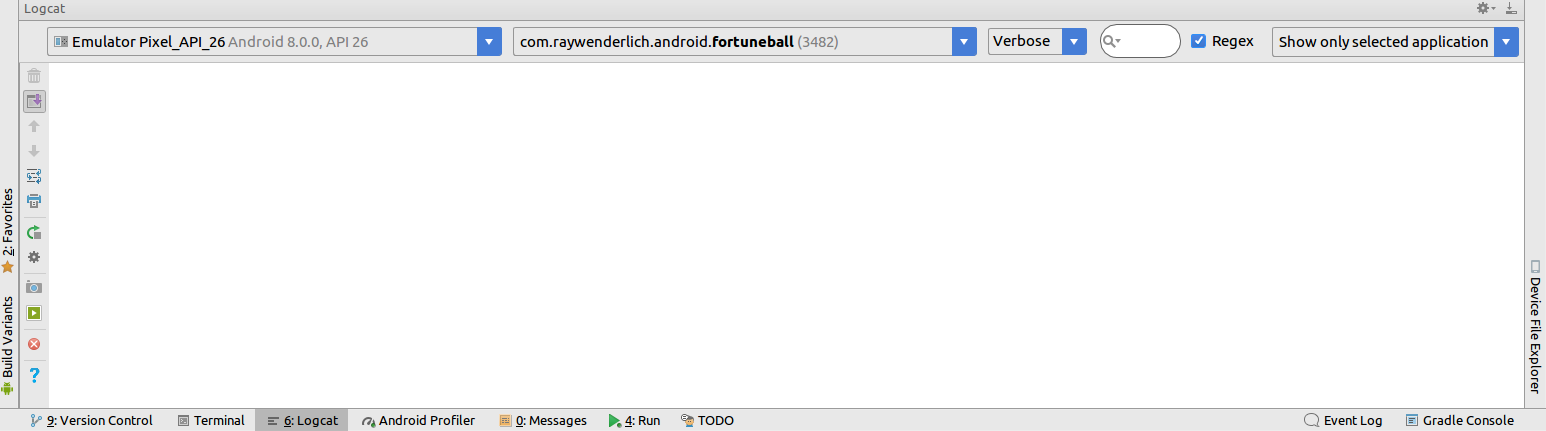
At the top, you specify the device or emulator that you want to monitor, and the “process” you are most interested in. You should select your app’s package name if it’s not already selected.
The Logcat tab has camera and play buttons to enable taking screenshots or screen video recordings.
Logcat gives you a detailed view into your device’s system messages with the ability to drill down into a specific app, or even to use the search bar to filter out messages unless they contain specific text.
Make sure you’ve selected Show only selected application in the top right, as shown in the screenshot above. Now, you’ll only see messages from your app, including those you write yourself.
Oh, what? You haven’t added any messages for yourself?