Dagger 2 Tutorial for Android: Advanced – Part 2
In this tutorial, you’ll learn how to implement advanced features of Dagger 2 by using subcomponents, custom scopes and multibinding. By Massimo Carli.
Component Dependencies With @Subcomponent
Previously, you learned how to define different @Components with different @Scopes and how to make them collaborate.
To do this, you had to pass AppComponent's reference to FeatureComponent using Builder, which Dagger implemented for you.
This is a good solution for cases where AppComponent doesn't need to know about a FeatureComponent depending on it.
Dagger also allows a different approach: What if AppComponent is a factory for the dependent modules, and with that, the FeatureComponent?
In that case, AppComponent wouldn't need to expose NewsRepository explicitly because Dagger would connect everything for you. The code in the MainActivity would be much simpler.
Your next step will be to achieve this behavior using a @Subcomponent.
Migrating to @Subcomponent
Migrating to use @Subcomponents is easy. Open FeatureComponent.kt and replace @Component with @Subcomponent. Then remove dependencies like this:
@Subcomponent( // HERE
  modules = [FeatureModule::class]
)
@FeatureScope
interface FeatureComponent {
 - - -
}
Instead of FeatureComponent being a fully-fledged component, you'll switch to using a Subcomponent, which stems out of the AppComponent. Now, edit AppComponent like this:
// 1
@Component(modules = [AppModule::class, FeatureModule::class])
@Singleton
interface AppComponent {
  // 2
  fun featureComp(): FeatureComponent
}
After removing repository(), this code did the following:
-
AppComponentneeds to know how to build the dependency graph forFeatureComponent, so you added the reference toFeatureModule. - Defined a factory method for
FeatureComponent.
The last step is to change MainActivity to get the reference to FeatureComponent directly from AppComponent. You do that like this:
typealias FeatureComponentProvider = Provider<FeatureComponent>

class MainActivity : AppCompatActivity(), FeatureComponentProvider {

  lateinit var featureComp: FeatureComponent

  override fun onCreate(savedInstanceState: Bundle?) {
    super.onCreate(savedInstanceState)
    setContentView(R.layout.activity_main)
    if (savedInstanceState == null) {
      supportFragmentManager.beginTransaction()
        .replace(R.id.anchor, NewsListFragment())
        .commit()
      // HERE
      featureComp = (applicationContext as InitApp).appComp().featureComp()
    }
  }

  override fun get(): FeatureComponent = featureComp
}
Here, you get the reference to AppComponent as usual, then use featureComp() to get the reference to FeatureComponent.
Build and run once more, to make sure things haven't changed internally! :]
RwNews App
@Component Dependencies Versus @Subcomponent
So far, you've seen two ways of managing dependencies between graph components with different @Scopes. But is there a best approach? The answer is: It depends. :]
@Subcomponents allow you to write less code because you've exposed all the objects in the dependency graph, not just the ones you publish using specific functions.
On the other hand, each @Component needs to know what the @Subcomponents are, which can lead to problems with circular dependencies. For this reason, using the dependencies attribute of @Component is, at the moment, the only option for apps with multiple modules.
To understand this, consider the following dependency diagram between the module containing the NewsRepository implementation and the classes you use for displaying news.
Dependency Cycle
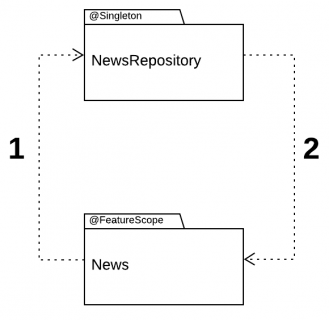
The feature displays news from NewsRepository, so there must be a dependency between them. The image shows this dependency with label 1.
When you define the @Subcomponent, you need to create its factory function in the main @Component. This introduces the dependency marked 2 in the diagram.
This, in turn, creates a cycle that prevents the usage of @Subcomponent between classes in different modules.
If you use the dependencies attribute of @Component, you don't need the dependency with label 2, but the main @Component must explicitly expose the objects that the dependent object can use.
This isn't a bad thing; it's a version of encapsulation. Another problem with this approach, however, is that you can't use multibindings, as you'll learn next.
Multibinding in Dagger
In your app, you can select news and display its details. Now, suppose you want to add a feature to print some stats on the content of the news.
First, create a stats package and create NewsStats.kt in the new package. Then model all of the stats types using the following abstraction:
const val STATS_LOG = "NEWS_STATS"

interface NewsStats {

  fun printStats(news: News)
}
This is a simple interface defining printStats(), which receives the NewsModel and prints some statistics.
The file also contains STATS_LOG, which you use for the specific statistic's output. A simple implementation could be the one that calculates the length of the news item.
Create LengthNewsStats.kt in the same package with the following code:
class LengthNewsStats : NewsStats {
  override fun printStats(news: News) {
    Log.i(STATS_LOG, "News Length: ${news.body.length}")
  }
}
But how do you use it? It gives you the ability to add different NewsStats implementations without changing the code.
Adding Different Implementations
Now, imagine you want to calculate different type of statistics when the app displays the news. To do so, edit the NewsDetailPresenterImpl.kt like so:
@FeatureScope
class NewsDetailPresenterImpl @Inject constructor(
  private val newsRepository: NewsRepository,
  // 1
  private val newsStats: @JvmSuppressWildcards(true) Set<NewsStats>
) : BasePresenter<NewsModel, NewsDetailView>(),
  NewsDetailPresenter {

  override fun displayNewsDetail(newsId: Long) {
    Log.i(TAG, "In NewsDetailPresenterImpl using Repository $newsRepository")
    newsRepository.byId(newsId)?.let { news ->
      view?.displayNews(news)
      // 2
      newsStats.forEach { stats ->
        stats.printStats(news)
      }
    }
  }
}
In the code above you:
- Added a new constructor parameter of type
Set<NewsStats>with all the instances ofNewsStatsyou want to use. To make Dagger work in Kotlin, you also need to use@JvmSuppressWildcards. This allows the Kotlin compiler to avoid generating wildcard code, and to focus on the concrete type instead. - Iterated over
NewsStats, invokingprintStats()for the news you display.
Build and run the project, and an error. Dagger complains. It does that often, doesn't it? :]
It's throwing an error because it doesn't know how to create Set<NewsStats>. You already know how to solve this, though: Use a @Module. To keep things separate and because the existing FeatureModule is abstract, start by defining a new class and file called StatsModule.kt in the di package:
@Module
class StatsModule {

  @Provides
  fun provideNewsStats(): Set<NewsStats> = setOf(
    LengthNewsStats()
  )
}
Here, you simply create an object of type Set<NewsStats> and initialize it with an instance of LengthNewsStats. At the moment, that's the only implementation of NewsStats.
To use this definition, you also have to add a reference to @Module in AppComponent like so:
@Subcomponent(
  modules = [
    FeatureModule::class,
    StatsModule::class // HERE
  ]
)
@FeatureScope
interface FeatureComponent {
  - - -
}
Build and run, then open News Details. You'll notice that everything works as you expected.
RwNews App
Filter the LogCat output using NEWS_STATS
I/NEWS_STATS: News Length: 1013
You successfully added one implementation of the stats utility class, to log the news! Now let's see about implementing another one.